-웹스크래핑과 크롤러
-
스크래핑 - 각각의 페이지에서 정보를 추출하는 행위
-
크롤러 - 자동으로 정보추출을 반복하는 프로그램
-반 자동화 프로그램
-
수 작업의 일부를 프로그래밍 지원하는 형태
-
1단계 : 수집할 페이지를 지정하여 프로그램 시작 -> 수동
-
2단계 : 대상 페이지를 내려받고 특정데이터 추출 -> 프로그램
-
3단계 : 수집한 데이터를 일정 형식으로 저장 -> 수동 또는 프로그램
-완전 자동화 프로그램
-
반 자동화 프로그램의 모든 부분을 자동화 프로그램으로 작성하여 실행
-
스케쥴링을 이용하여 순환/반복 기능을 가짐 - 크롤러
-
변화에 취약하다는 단점 존재
-⭐️HTTP GET방식과 POST방식
-GET(조회할 때 주로 사용)
-
Body없이 Header만으로 전송된다.
-
링크/북마크가 가능하다.
-
요청에 길이제한이 있다.
-
URL의 ? 뒤에 쿼리 문자열이 올 수 있다.
-
쿼리 문자열은 key와 value를 가지고 있으며, 각 쿼리는 &로 구분한다.
/test/demo_form.php?name1=value1&name2=value2 => 보안에 취약
-POST(등록/갱신할 때 주로 사용)
-
Body에 query data가 들어간다.
-
링크/ 북마크가 불가능하다.
-
데이터 길이에 제한이 없다.
-
URL을 가지지 않으므로 주로 중요한 데이터를 다룰 때 사용한다.
--HTTP Client모듈 - PYthon
-urllib
-
Python built-in module
-
간편하게 HTTP request를 보낼 수 있음
-
로그인 및 세션을 유지하기가 번거로움
-Requests #doc
-
간편하게 HTTP request를 보낼 수 있음
-
세션을 유지하기가 용이함
-
python2/ python3 완벽 지원
-
코드를 간결하고 documentation이 잘 되어 있음
-Selenium #doc : 웹 브라우저 자동화 tool
-
javascript/css 지원, 기존 GUI브라우저 자동화 라이브러리
-
사람이 웹서핑 하는 것과 동일한 환경, 대신에 리소스를 많이 사용함
-
웹브라우저에서 HTML에 명시된 이미지/CSS/JavaScript를 모두 자동 다운로드/적용
--파싱(parsing)
-
가공되지 않은 문자열에서 필요한 부분을 추출하여 의미있는 (구조화된) 데이터로 만드는 과정
--웹 상에서 특정 문자열 정보를 가져 오려면?
-
정규 표현식을 활용
-
가장 빠른 처리가 가능하나, 정규 표현식 Rule을 만드는 것이 많이 번거롭고 복잡합니다.
-
때에 따라 필요할 수도 있습니다.
2. HTML Parser 라이브러리를 활용
-
DOM Tree을 탐색하는 방식으로 적용이 쉽습니다.
html > body > div > ul
-
ex> BeautifulSoup4, lxml
--BeautifulSoup
https://www.crummy.com/software/BeautifulSoup/bs4/doc/
pip install beautifulsoup4
-
파싱을 도와 주는 강력한 python 라이브러리
-
HTML/XML Parser : HTML/XML문자열에서 원하는 태그 정보를 추출합니다.
-
정규식을 작성할 필요 없이 tag, id, class등의 이름으로 쉽게 파싱 가능
-
쉽고 간결하며, documentation이 매우 잘 되어 있음
**Tag를 찾는 2가지 방법
-
find를 통해 태그 하나씩 찾기
-
태그 관계를 지정하여 찾기(CSS Selector 사용)


**기상청 날씨 데이터 파싱
-
BeautifulSoup의 find(), find_all() 함수 사용
-
파싱한 데이터를 list와 dict에 저장
-
json file로 저장하고, 읽기
import requests
from bs4 import BeautifulSoup

url = "http://www.kma.go.kr/weather/forecast/mid-term-rss3.jsp"
res = requests.get(url)
print(res.status_code)
html = res.text
soup = BeautifulSoup(html, 'html.parser')
# print(soup)

# find() 함수 사용
title = soup.find('title')
print(type(title), title, title.string)

# find_all() 함수 사용
title_all = soup.find_all('title')
print(type(title_all), title_all)
for title_tag in title_all:
    print(title_tag.string)

for header in soup.find_all('header'):
    # print(header)
    title = header.find('title').text
    tm = header.find('tm').text
    wf = header.find('wf').text
    print(title, tm, wf)
>>>200
<class 'bs4.element.Tag'> <title>기상청 육상 중기예보</title> 기상청 육상 중기예보
<class 'bs4.element.ResultSet'> [<title>기상청 육상 중기예보</title>, <title>전국 육상 중기예보 - 2021년 01월 06일 (수)요일 06:00 발표</title>, <title>전국 육상중기예보</title>]
기상청 육상 중기예보
전국 육상 중기예보 - 2021년 01월 06일 (수)요일 06:00 발표
전국 육상중기예보
전국 육상중기예보 202101060600 ○ (강수) 9일(토)~10일(일)은 전라권과 제주도에 눈이 오겠고, 11일(월)은 제주도에 비 또는 눈이 오겠습니다.<br />○ (기온) 9일(토)~12일(화) 아침 기온은 -21~-2도, 낮 기온은 -6~6도로 어제(아침 기온 -7~3도, 낮 기온 -4~8도)보다 낮겠습니다.<br /> 특히, 강원영서는 -20도 이하, 중부내륙과 경북내륙은 -15도 이하(남부내륙 -10도 이하)로 떨어지는 곳이 많아 매우 춥겠습니다.<br /> 이번 추위는 9일(토)까지 절정에 달하겠고, 이후 기온이 차차 오르겠으나, 12일(화)까지 평년(아침 기온 -12~0도, 낮 기온 1~9도)보다 2~6도 낮아 춥겠습니다.<br /> 한편, 13일(수)~16일(토)의 아침 기온은 -11~1도, 낮 기온은 -1~8도로 평년과 비슷하겠습니다.<br />○ (해상) 9일(토)까지 대부분 해상에서 바람이 매우 강하게 불고, 물결이 2.0~5.0m로 매우 높게 일겠습니다.<br />○ (주말전망) 9일(토)~10일(일) 전라권과 제주도는 대체로 흐리고 눈이 오겠습니다. 수도권과 강원도, 경상권은 대체로 맑겠고, 충청권은 구름많겠습니다.<br /> 아침 기온은 -21~-6도, 낮 기온은 -6~4도의 분포로 전국 대부분 지역이 영하권을 보이며 매우 춥겠습니다.<br /><br />* 10일(일)까지 찬 대륙고기압의 영향으로 기온이 큰 폭으로 떨어지겠고, 바람이 강하게 불면서 체감온도는 더욱 낮아 매우 춥겠으며,<br /> 전라서해안과 제주도, 울릉도.독도를 중심으로 많은 눈이 내릴 가능성이 있겠으니 앞으로 발표되는 기상정보를 참고하기 바랍니다.<br />* 13일(수)~16일(토)은 북쪽에서 내려오는 기압골의 이동 및 발달 정도에 따라 기온이 변경될 가능성이 크겠으니 앞으로 발표되는 기상정보를 참고하기 바랍니다.
# location 태그의 갯수 - 41개
print(len(soup.find_all('location', attrs={"wl_ver":"3"})))
location_one = soup.find('location', attrs={"wl_ver":"3"})
# print(location_one)
province = location_one.find('province').text
city = location_one.find('city').text
print(province, city)
print(len(location_one.find_all('data')))
for data in location_one.find_all('data'):
    # print(data)
    mode = data.find('mode').text
    tmef = data.find('tmef').text
    wf = data.find('wf').text
    tmn = data.find('tmn').text
    tmx = data.find('tmx').text
    print(mode, tmef, wf, tmn, tmx)
>>>41
서울ㆍ인천ㆍ경기도 서울
13
A02 2021-01-09 00:00 맑음 -15 -6
A02 2021-01-09 12:00 맑음 -15 -6
A02 2021-01-10 00:00 맑음 -12 -3
A02 2021-01-10 12:00 구름많음 -12 -3
A02 2021-01-11 00:00 흐림 -8 -1
A02 2021-01-11 12:00 맑음 -8 -1
A02 2021-01-12 00:00 맑음 -8 0
A02 2021-01-12 12:00 구름많음 -8 0
A02 2021-01-13 00:00 구름많음 -6 1
A02 2021-01-13 12:00 맑음 -6 1
A01 2021-01-14 00:00 맑음 -7 0
A01 2021-01-15 00:00 맑음 -5 2
A01 2021-01-16 00:00 맑음 -9 -1
# dict에 저장
location_dict = {}

location_one = soup.find('location', attrs={"wl_ver":"3"})
location_dict['province'] = location_one.find('province').text
location_dict['city'] = location_one.find('city').text
print(location_dict)

data_list = []
for data in location_one.find_all('data'):
    data_dict = dict() #{}
    data_dict['mode'] = data.find('mode').text
    data_dict['tmef'] = data.find('tmef').text
    data_dict['wf'] = data.find('wf').text
    data_dict['tmn'] = data.find('tmn').text
    data_dict['tmx'] = data.find('tmx').text
    data_list.append(data_dict)
    # print(data_dict)

# print(data_list)
location_dict['datas'] = data_list
print(location_dict)
>>>{'province': '서울ㆍ인천ㆍ경기도', 'city': '서울'}
{'province': '서울ㆍ인천ㆍ경기도', 'city': '서울', 'datas': [{'mode': 'A02', 'tmef': '2021-01-09 00:00', 'wf': '맑음', 'tmn': '-15', 'tmx': '-6'}, {'mode': 'A02', 'tmef': '2021-01-09 12:00', 'wf': '맑음', 'tmn': '-15', 'tmx': '-6'}, {'mode': 'A02', 'tmef': '2021-01-10 00:00', 'wf': '맑음', 'tmn': '-12', 'tmx': '-3'}, {'mode': 'A02', 'tmef': '2021-01-10 12:00', 'wf': '구름많음', 'tmn': '-12', 'tmx': '-3'}, {'mode': 'A02', 'tmef': '2021-01-11 00:00', 'wf': '흐림', 'tmn': '-8', 'tmx': '-1'}, {'mode': 'A02', 'tmef': '2021-01-11 12:00', 'wf': '맑음', 'tmn': '-8', 'tmx': '-1'}, {'mode': 'A02', 'tmef': '2021-01-12 00:00', 'wf': '맑음', 'tmn': '-8', 'tmx': '0'}, {'mode': 'A02', 'tmef': '2021-01-12 12:00', 'wf': '구름많음', 'tmn': '-8', 'tmx': '0'}, {'mode': 'A02', 'tmef': '2021-01-13 00:00', 'wf': '구름많음', 'tmn': '-6', 'tmx': '1'}, {'mode': 'A02', 'tmef': '2021-01-13 12:00', 'wf': '맑음', 'tmn': '-6', 'tmx': '1'}, {'mode': 'A01', 'tmef': '2021-01-14 00:00', 'wf': '맑음', 'tmn': '-7', 'tmx': '0'}, {'mode': 'A01', 'tmef': '2021-01-15 00:00', 'wf': '맑음', 'tmn': '-5', 'tmx': '2'}, {'mode': 'A01', 'tmef': '2021-01-16 00:00', 'wf': '맑음', 'tmn': '-9', 'tmx': '-1'}]}
전국의 날씨정보를 dict와 list에 저장하기
import requests
from bs4 import BeautifulSoup

url = "http://www.kma.go.kr/weather/forecast/mid-term-rss3.jsp"
res = requests.get(url)
print(res.status_code)
html = res.text
soup = BeautifulSoup(html, 'html.parser')

# 41개의 location 정보를 저장한 list선언
location_list = []
location_all_tag = soup.find_all('location', attrs={"wl_ver":"3"})
print(len(location_all_tag))
for location in location_all_tag:
    # 1개의 location 정보를 저장할 dict 선언
    location_dict = {}
    location_dict['province'] = location.find('province').text
    location_dict['city'] = location.find('city').text

    # 1개의 location에 포함된 13개의 data를 저장할 list 선언
    data_list = []
    for data in location_one.find_all('data'):
        # 1개의 <data>를 저장할 dict 선언
        data_dict = dict() #{}
        # <data><mode>
        data_dict['mode'] = data.find('mode').text
        data_dict['tmef'] = data.find('tmef').text
        data_dict['wf'] = data.find('wf').text
        data_dict['tmn'] = data.find('tmn').text
        data_dict['tmx'] = data.find('tmx').text
        data_list.append(data_dict)

    location_dict['datas'] = data_list

    location_list.append(location_dict)

print(location_list)
JSON File 저장하고 읽기
import json

# json file 생성
with open('data/weather_20210106.json','w') as file:
    json.dump(location_list, file)
# json file 읽기
import json
with open('data/weather_20210106.json') as file:
contents = file.read()
weather_json = json.loads(contents)
weather_json
**CSS(cascading style sheets)
--CSS Selector를 통한 Tag 찾기 지원
-
tag name : "tag_name"
-
tag_id : "#tag_id"
-
tag class names : ".tag_class"
--CSS Selector를 통한 Tag 찾기 지원
-
* : 모든 Tag
-
tag : 해당 모든 Tag
-
Tag1 > Tag2 : Tag1의 직계인 모든 Tag2
-
Tag1 Tag2 : Tag1의 자손인 모든 Tag2(직계임이 요구되지 않음)
-
Tag1, Tag2 : Tag1이거나 Tag2인 모든 Tag
-
tag[attr] : attr속성이 정의된 모든 Tag
-
tag[attr="bar"] : attr속성이 "bar"문자열과 일치하는 모든 Tag
-
tag[attr*="bar"] : attr속성이 "bar"문자열과 부분 매칭되는 모든 Tag
-
tag[attr^="bar"] : attr속성이 "bar"문자열로 시작하는 모든 Tag
-
tag[attr$="bar"] : attr속성이 "bar"문자열로 끝나는 모든 Tag
select('div > ul') 1개 (바로 밑(직계))
select('div ul') 2개
<div>
    <ul>
        <li>
            <ul>
                <li>
                </li>
            </ul>
        </li>
    </ul>
</div>
<a href="xxxread.nhn">링크1</a>
<a href="xxxread.nhn?mode=">링크</a>
select("a['href']") #href 속성의 값을 가져옴
select("a[href='read.nhn']")
--CSS Selector를 통한 Tag 찾기 지원
-
tag#tag_id : id가 tag_id인 모든 Tag
-
tag.tag_class : 클래스명 중에 tag_class가 포함된 모든 Tag
-
tag#tag_id.tag_cls1.tag_cls2 : id가 tag_id이고, 클래스명 중에 tag_cls1와 tag_cls2가 모두 포함된 Tag
-
tag.tag_cls1.tag_cls2 : 클래스명 중에 tag_cls1와 tag_cls2가 모두 포함된 모든 Tag
-
tag.tag_cls1 .tag_cls2 : 클래스명 중에 tag_cls1이 포함된 Tag의 자식 중에 (직계가 아니어도 OK), 클래스명에 tag_cls2가 포함된 모든 Tag
**정규표현식 사이트 : https://regexr.com/
--멜론 100차트
Melon 100 Chart
-
100곡의 노래 제목, Song ID추출 (정규표현식 사용)
-
Song ID로 상세페이지를 100번 요청해서 노래 상세정보 추출
-
100곡의 상세정보를 json file에 저장한다.
-
json file을 Pandas의 DataFrame 객체에 저장해서 표데이터를 만듦
-
표 데이터를 MariaDB에 저장하기
1. 100곡의 노래 제목, Song ID추출 (정규표현식 사용)
import requests
from bs4 import BeautifulSoup
import re

url = 'https://www.melon.com/chart/index.htm'
req_header = {
    'user-agent' : 'Mozilla/5.0 (Macintosh; Intel Mac OS X 11_0_1) AppleWebKit/537.36 (KHTML, like Gecko) Chrome/87.0.4280.88 Safari/537.36'
    }

# 요청을 보내기
res = requests.get(url, headers=req_header)
print(res.status_code)
# 응답결과가 정상이면
if res.ok:
    # 응답 객체에 포함된 text를 추출
    html = res.text
    # 추출한 text를 파싱하기 위한 BeautifulSoup 객체생성
    soup = BeautifulSoup(html, 'html.parser')
    # print(soup)
    # <div id='tb_list'>div 태그 선택 (1개)
    print(len(soup.select('div#tb_list')))
    # <div id='tb_list'> 하위에 있는 tr 태그 선택 (101개)
    print(len(soup.select('div#tb_list tr')))
    # <div id='tb_list'> 하위에 있는 tr 하위에 <div class='wrap_song_info'> (200개)
    print(len(soup.select('div#tb_list tr .wrap_song_info')))
    # <div id='tb_list'> 하위에 있는 tr 하위에 <div class='wrap_song_info'> 하위에 a (458개)
    print(len(soup.select('div.wrap_song_info a')))
    # <div id='tb_list'> 하위에 있는 tr 하위에 <div class='wrap_song_info'> 하위에 <a href='playSong'> (100개)
    print(len(soup.select('div.wrap_song_info a[href*=\'playSong\']')))

    atag_list = soup.select("div.wrap_song_info a[href*='playSong']")
    print('-------------------')
    print(type(atag_list), type(atag_list[2]), atag_list[2].text)

    # 100곡 노래 저장할 list
    song_list = []
    for idx, atag in enumerate(atag_list, 1):
        # 1곡 노래 저장할 dict
        song_dict = {}

        # a tag의 content
        title = atag.text
        # a tag의 href 속성 값
        href = atag['href']
        # print(idx, title, href)
        # 정규표현식 패턴으로 숫자를 검색
        matched = re.search(r'(\d+)\);', href)
        # print(matched, matched.group(0), matched.group(1))
        song_id = matched.group(1)
        # print(idx, title, song_id)
        song_url = f'https://www.melon.com/song/detail.htm?songId={song_id}'

        # 추출한 song title과 url을 song_dict에 저장
        song_dict['title'] = title
        song_dict['url'] = song_url
        # 1개의 노래정보를 담고 있는 song_dict를 song_list에 추가
        song_list.append(song_dict)

print(len(song_list))
song_list[0:3]
>>>200
1
101
200
458
100
100
-------------------
<class 'bs4.element.ResultSet'> <class 'bs4.element.Tag'> Dynamite
100
Out[25]:
[{'title': 'VVS (Feat. JUSTHIS) (Prod. GroovyRoom)',
'url': 'https://www.melon.com/song/detail.htm?songId=33077590'},
{'title': '밤하늘의 별을(2020)',
'url': 'https://www.melon.com/song/detail.htm?songId=33061995'},
{'title': 'Dynamite',
'url': 'https://www.melon.com/song/detail.htm?songId=32872978'}]
select -> result set형태인 list를 반환
https://www.melon.com/album/detail.htm?albumId=33077590
https://www.melon.com/song/detail.htm?songId=33077590
**정규표현식 연습
# 정규표현식 연습하기
# 문자열에 포함된 \n\r\t 제거하기
import re

my_str = 'a\nb\rc\td' * 3
print(my_str)

# 정규표현식 패턴 객체 생성
regexp = re.compile(r'[\n\r\t]')
print(type(regexp), regexp)

# 패턴과 일치하는 문자열을 찾아서 다른 문자열로 치환(substitute)
result = regexp.sub(" ", my_str)
print(result)

result = result.replace(" ", "")
print(result)
>>>a
c da
c da
c d
<class 're.Pattern'> re.compile('[\\n\\r\\t]')
a b c da b c da b c d
abcdabcdabcd
2. Song ID로 상세페이지를 100번 요청해서 노래 상세정보 추출
import requests
from bs4 import BeautifulSoup
import re

req_header = {
    'user-agent': 'Mozilla/5.0 (Macintosh; Intel Mac OS X 11_0_1) AppleWebKit/537.36 (KHTML, like Gecko) Chrome/87.0.4280.88 Safari/537.36'
    }

# 노래 100곡의 상세정보를 저장할 dict
song_detail_list = []
for song in song_list:
    # 노래 1곡의 상세정보를 저장할 dict
    song_detail_dict = {}
    #print(song['title'], song['link'])
    song_url = song['url']
    res = requests.get(song_url, headers=req_header)
    print(res.status_code)
    if res.ok:
        html = res.text
        soup = BeautifulSoup(html,'html.parser')
        #노래제목
        song_detail_dict['곡명'] = song['title']
        #가수
        song_detail_dict['가수'] = soup.select('a[href*="goArtistDetail"] span')[0].text
        #앨범
        song_detail_dict['앨범'] = soup.select('div.meta dd')[0].text
        #발매일
        song_detail_dict['발매일'] = soup.select('div.meta dd')[1].text
        #장르
        song_detail_dict['장르'] = soup.select('div.meta dd')[2].text
        #가사
        lyric = soup.select('div#d_video_summary')[0].text
        # 정규표현식 Pattern 생성
        regexp = re.compile(r'[\n\r\t]')
        # Pattern과 매칭되는 문자열로 empty string으로 치환해라
        song_detail_dict['가사'] = regexp.sub('',lyric.strip())

        #각각의 Song정보를 담고 있는 dict를 list에 저장
        song_detail_list.append(song_detail_dict)

    #        print('-----')
    #        print(song_detail_dict)

print(len(song_detail_list))
print(song_detail_list[0:3])
3. 100곡의 상세정보를 json file에 저장한다.
import json

with open('data/songs.json', 'w', encoding='utf-8') as file:
    json.dump(song_detail_list, file)
with open('data/songs.json', 'r', encoding='utf-8') as file:
contents = file.read()
songs_json = json.loads(contents)
print(len(songs_json), type(songs_json))
# [{},{},{}]
# print(songs_json[0])
**Pandas
- Pandas(http://pandas.pydata.org/)는 데이터 처리와 분석을 위한 파이썬 라이브러리입니다. R의 data.frame을 본떠서 설계한 DataFrame이라는 데이터 구조를 기반으로 만들어졌습니다.
- 간단하게 말하면 Pandas의 DataFrame은 엑셀의 스프레드시트와 비슷한 테이블 형태라고 할 수 있습니다. Pandas는 이 테이블을 수정하고 조작하는 다양한 기능을 제공합니다. 특히, SQL처럼 테이블에 쿼리나 조인을 수행할 수 있습니다.
- 전체 배열의 원소가 동일한 타입 이어야 하는 NumPy와는 달리 Pandas는 각 열의 타입이 달라도 됩니다(예를 들면 정수, 날짜, 부동소숫점, 문자열).
- SQL, 엑셀 파일, CSV 파일 같은 다양한 파일과 데이터베이스에서 데이터를 읽어 들일 수 있는 것이 Pandas가 제공하는 또 하나의 유용한 기능입니다.
- 10 Minutes to pandas라는 판다스의 공식 튜토리얼을 읽어보시는 것을 추천 드립니다.
--Series
- Series는 pd.Series() 함수를 사용하여 정의함.
- Python list와 numpy array가 이 함수의 인자로 입력됨.
- Series는 각 성분의 인덱스와, 이에 대응되는 값으로 구성되어 있음.
- Series 생성 시 인덱스는 0으로 시작하는 정수 형태의 기본 인덱스가 부여됨.
- 기본 인덱스 대신 Series 생성 시 각 성분에 대한 인덱스를 사용자가 직접 명시할 수도 있음.

- Series obj의 인덱스만을 추출 : obj.index
- Series obj의 값만을 추출 : obj.values
- Series obj에 부여된 데이터형을 확인 : obj.dtype
- 인덱스에 대한 이름을 지정 : obj.name과 obj.index.name에 값을 대입해 줌
--DataFrame
- DataFrame은 pd.DataFrame() 함수를 사용하여 정의함. P
- ython 딕셔너리 혹은 numpy의 2차원 array가 이 함수의 인자로 입력됨.

- DataFrame에서는 서로 다른 두 종류의 인덱스가 각각 행 방향과 열 방향에 부여되어 있으며, 교차하는 지점에 실제 값이 위치해 있음.
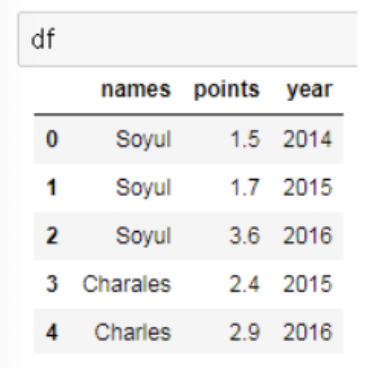
- 행 방향의 인덱스를 '인덱스', 열 방향의 인덱스를 '컬럼'이라고 부름.
- DataFrame의 인덱스 확인 : df.index
- DataFrame의 컬럼명 확인 : df.columns
- DataFrame의 값 확인 : df.values
- DataFrame의 행,열 갯수 확인 : df.shape
4. json file을 Pandas의 DataFrame 객체에 저장해서 표데이터를 만듦
import pandas as pd

# DataFrame 객체 생성
song_df = pd.DataFrame(columns=['곡명','가수','앨범','발매일','장르','가사'])
# song_df

for song in songs_json:
    # dict 객체를 Series 객체에 저장
    series_obj = pd.Series(song)
    # Series 객체를 DataFrame 객체에 append 합니다.
    song_df = song_df.append(series_obj, ignore_index=True)

song_df.head()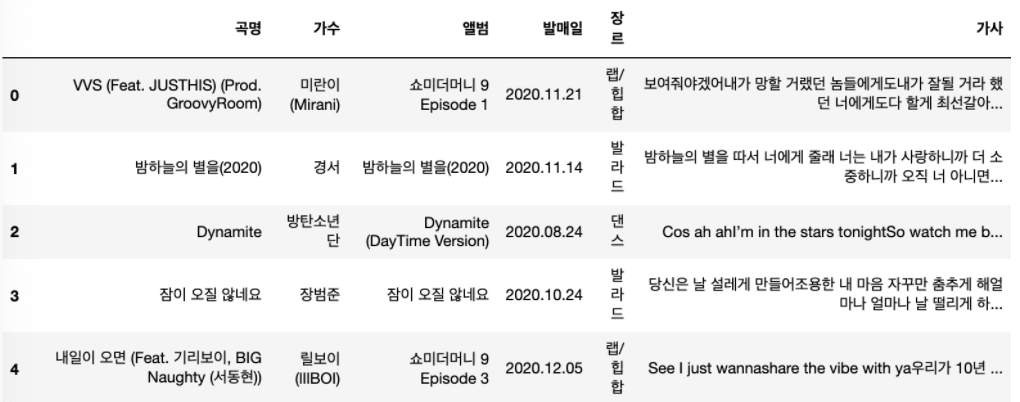
song_df.tail()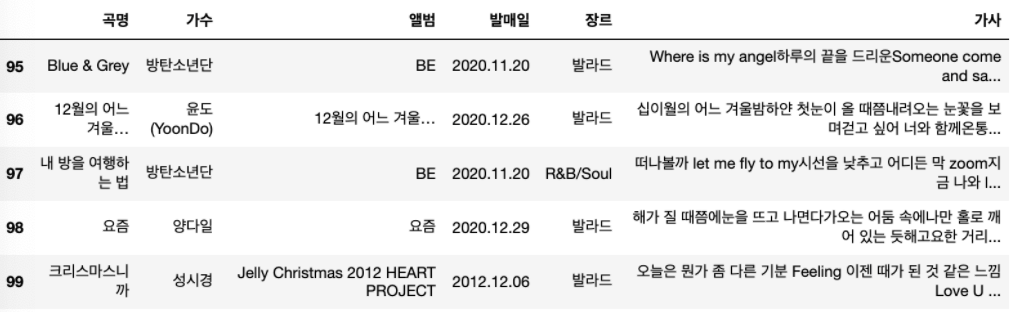
song_df.sample(3)
print('shape : ', song_df.shape)
print('colums : ', song_df.columns)
print('index : ', song_df.index)
print(type(song_df.values))
# print('values : ', song_df.values[0:1]) # 2차원 배열
>>>shape : (100, 6)
colums : Index(['곡명', '가수', '앨범', '발매일', '장르', '가사'], dtype='object')
index : RangeIndex(start=0, stop=100, step=1)
<class 'numpy.ndarray'>
song_df.info()>>><class 'pandas.core.frame.DataFrame'>
RangeIndex: 100 entries, 0 to 99
Data columns (total 6 columns):
# Column Non-Null Count Dtype
--- ------ -------------- -----
0 곡명 100 non-null object
1 가수 100 non-null object
2 앨범 100 non-null object
3 발매일 100 non-null object
4 장르 100 non-null object
5 가사 100 non-null object
dtypes: object(6)
memory usage: 4.8+ KB
# 1개의 열(컬럼) 선택
print(type(song_df['가수']))
song_df['가수']
>>><class 'pandas.core.series.Series'>
Out[52]:
0 미란이 (Mirani)
1 경서
2 방탄소년단
3 장범준
4 릴보이 (lIlBOI)
...
95 방탄소년단
96 윤도 (YoonDo)
97 방탄소년단
98 양다일
99 성시경
Name: 가수, Length: 100, dtype: object
# 가수별로 Row Counting
song_df['가수'].value_counts()
>>>방탄소년단 7
아이유 5
릴보이 (lIlBOI) 4
폴킴 4
머쉬베놈 (MUSHVENOM) 3
..
비 1
노을 1
Crush 1
적재 1
규현 (KYUHYUN) 1
Name: 가수, Length: 73, dtype: int64
# 가수별로 Row Counting
song_df['가수'].value_counts().head(10)
>>>방탄소년단 7
아이유 5
릴보이 (lIlBOI) 4
폴킴 4
머쉬베놈 (MUSHVENOM) 3
장범준 2
스윙스 2
마크툽 (MAKTUB) 2
이하이 2
오마이걸 (OH MY GIRL) 2
Name: 가수, dtype: int64
# 장르별로 Row Counting
song_df['장르'].value_counts().head(10)
>>>발라드 27
랩/힙합 19
댄스 16
POP 11
R&B/Soul 6
발라드, 국내드라마 5
발라드, 인디음악 4
록/메탈 3
록/메탈, 국내드라마 2
랩/힙합, 인디음악 2
Name: 장르, dtype: int64
# unique한 장르명 가져오기
song_df['장르'].unique()
array(['랩/힙합', '발라드', '댄스', '인디음악, 포크/블루스', 'POP', '발라드, 인디음악', '록/메탈',
'록/메탈, 국내드라마', '랩/힙합, 인디음악', '발라드, 국내드라마', 'R&B/Soul, 인디음악',
'R&B/Soul', '인디음악, 록/메탈', '성인가요'], dtype=object)
특정 행과 열을 선택
-
loc[], iloc[] 사용
-
Slicing 사용해서 구간을 선택
-
특정행과 특정열을 선택
-
조건식을 만족하는 행과 열을 선택
# loc[] - location의 약자, 특정행과 열을 선택할 때 사용
# loc[ 행을 선택하는 기준, 열을 선택하는 기준]

# 인덱스가 0부터 5까지인 행과 모든 열을 선택
song_df.loc[0:5, :]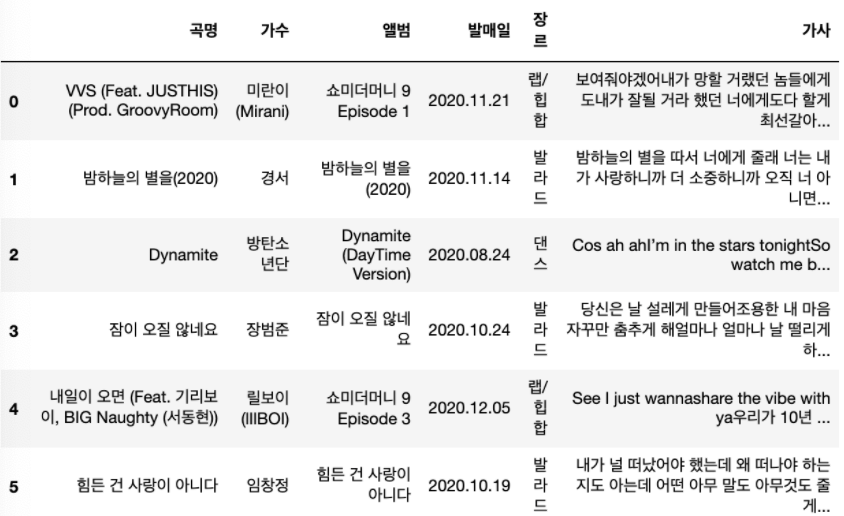
# Slicing으로 인덱스가 0부터 8까지, 1줄 씩 skip, 모든 열
song_df.loc[0:8:2, :]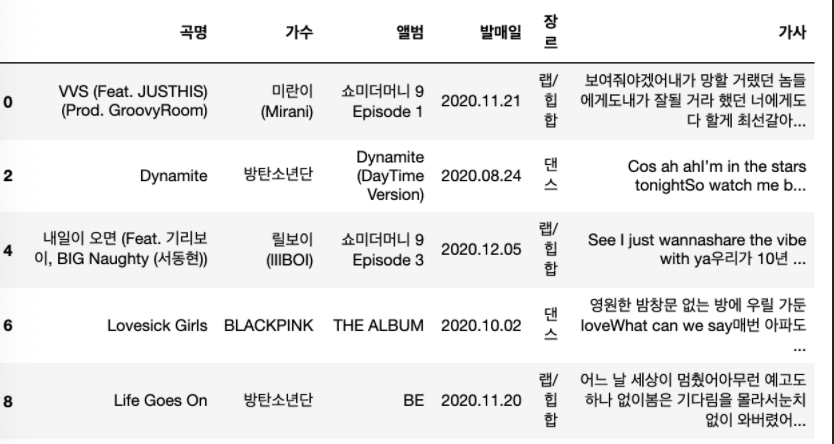
# Slicing으로 인덱스가 0부터 8까지, 1줄 씩 skip,'곡명'부터 '앨범'까지의 열을 선택
song_df.loc[0:8:2, '곡명':'앨범']
# 특정행(4, 10, 20)과 모든 열을 선택
song_df.loc[[4,10,20],:]
print(type(song_df.loc[1]))
song_df.loc[1]
>>><class 'pandas.core.series.Series'>
Out[64]:
곡명 밤하늘의 별을(2020)
가수 경서
앨범 밤하늘의 별을(2020)
발매일 2020.11.14
장르 발라드
가사 밤하늘의 별을 따서 너에게 줄래 너는 내가 사랑하니까 더 소중하니까 오직 너 아니면...
Name: 1, dtype: object
print(type(song_df.loc[1:2]))
song_df.loc[1:2]
>>><class 'pandas.core.frame.DataFrame'>
Out[66]:

# 특정행(10, 30, 60)과 가수, 앨범, 발매일
song_df.loc[[10, 30, 60], ['가수', '앨범','발매일']]

# 조건식을 만족하는 행과 열을 선택
# 가수가 방탄소년단
song_df['가수'] == '방탄소년단'
>>>0 False
1 False
2 True
3 False
4 False
...
95 True
96 False
97 True
98 False
99 False
Name: 가수, Length: 100, dtype: bool
condition = song_df['가수'] == '방탄소년단'
song_df.loc[condition,['곡명','앨범','발매일','장르']]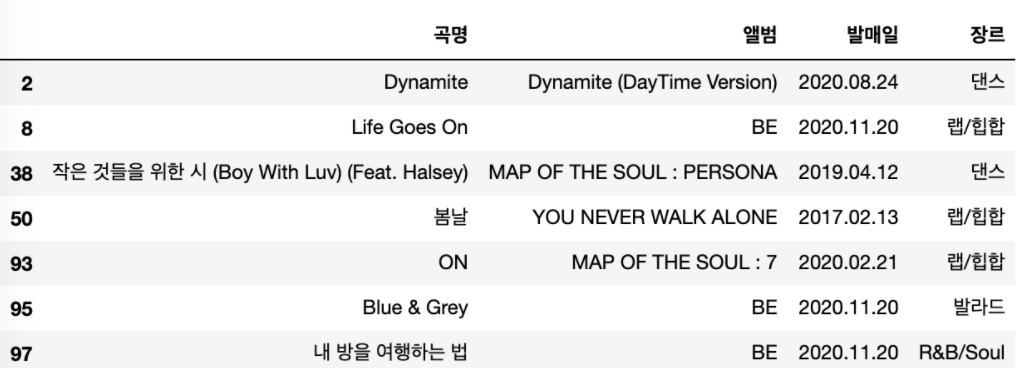
# 아이유의 노래와 앨범 장르를 가져오세요
song_df.loc[song_df['가수'] == '아이유', ['곡명','앨범']]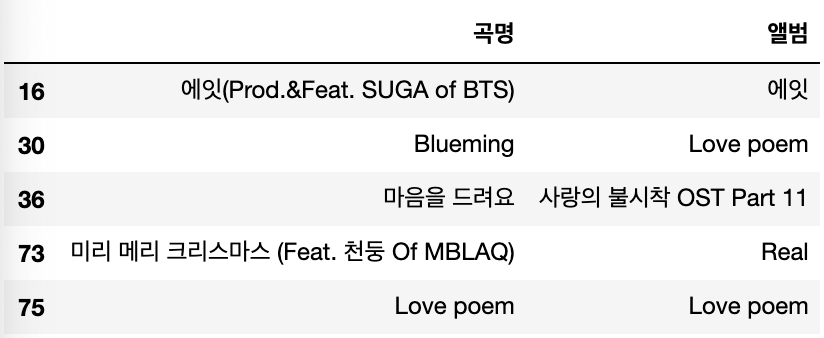
# 장르가 댄스인 곡명부터 장르까지 가져오세요
song_df.loc[song_df['장르'] == '댄스','곡명':'장르']
# 최근 발매일 순서대로 정렬
song_df.loc[song_df['장르'] == '댄스','곡명':'장르'].sort_values(by='발매일', ascending=False).reset_index(drop=True)
**maria DB 설치
3306 maria db 포트번호
맥 denied 참고 : https://velog.io/@yhe228/ERRORmysql-ERROR-1698-28000-Access-denied-for-user-rootlocalhost
mysql.server start
#MySQL Database 생성
mysql -u root –p
show databases;
use mysql;
create user python@localhost identified by 'python';
grant all on *.* to python@localhost;
flush privileges;
exit;
mysql -u python -p
create database python_db;
show databases;
use python_db;
**과제
-
html, css, javascript, bootstrap(css library) 각각의 역할은 무엇인지? 간단하게 코드 작성
-
Ajax(Asynchronous Javascript and XML) - 국회의원 정보 분석 예제
-
올려준 예제들 코드 읽어보기
'CLOUD > Python' 카테고리의 다른 글
| 1/18 웹스크래핑 - 복습, scrapy (0) | 2021.01.18 |
|---|---|
| 1/11 파이썬 6차시 - 웹스크래핑(MariaDB연동), 시각화 (0) | 2021.01.11 |
| 1/5 파이썬 4차시 - 깃파이참연동, 모듈과 패키지, 예외처리, 파일다루기, 웹스크래핑 (0) | 2021.01.05 |
| 1/4 파이썬 3차시 - 함수가이드라인, pythonic code, 람다, 객체와클래스, 모듈과 패키지 (0) | 2021.01.04 |
| 12/30 파이썬 2차시 - 제어문, 자료구조, 코딩컨벤션, 함수, colab (0) | 2020.12.30 |