#4 GitHub 레포지터리 생성 및 소스 코드 커밋
#4-1 GitHub 레포지터리 생성

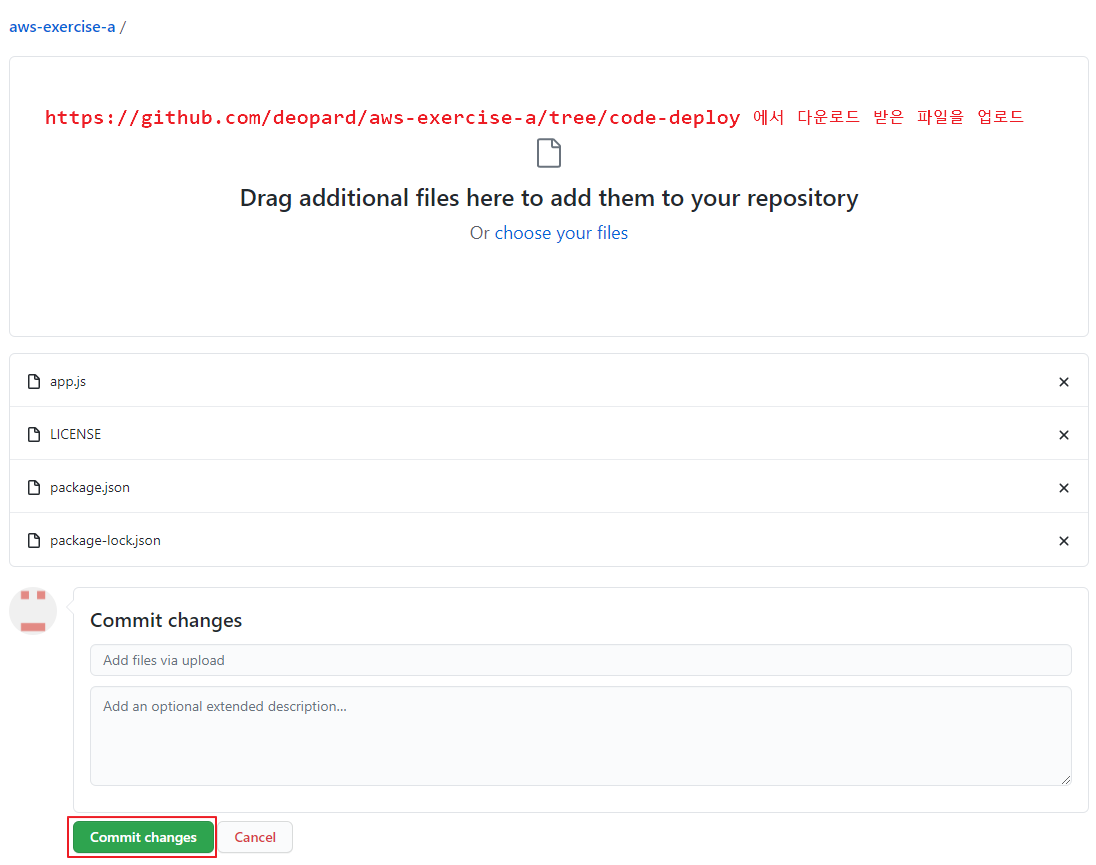
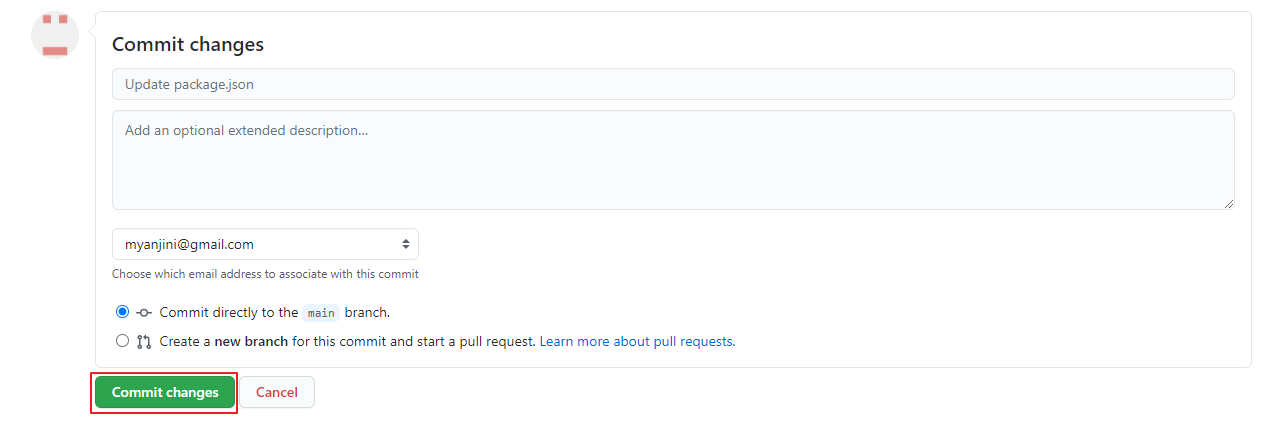
#4-2 소스 코드 업로드 및 커밋
#4-3 appsec.yml 내용 확인 ⇒ 배포 시 CodeDeploy Agent가 수행할 내용을 기술
|
version: 0.0 os: linux files: - source: / destination: /var/www/aws-exercise-a hooks: AfterInstall: - location: scripts/set_owner timeout: 5 runas: root - location: scripts/install_dependencies timeout: 120 runas: ec2-user ApplicationStart: - location: scripts/restart_server timeout: 10 runas: root ValidateService: - location: scripts/validate_server timeout: 30 runas: ec2-user |
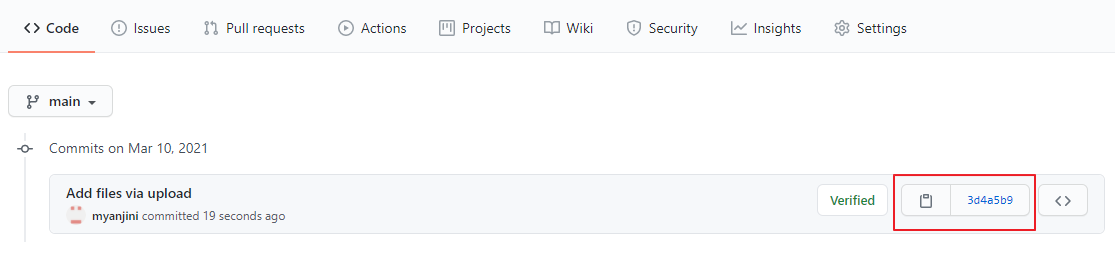
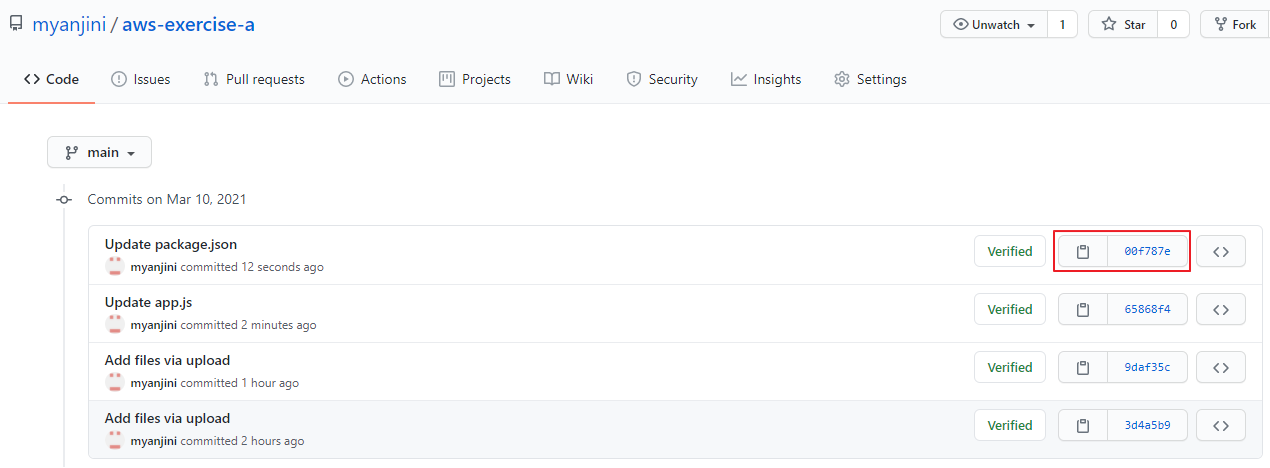
#4-4 배포할 커밋 버전(ID)를 확인

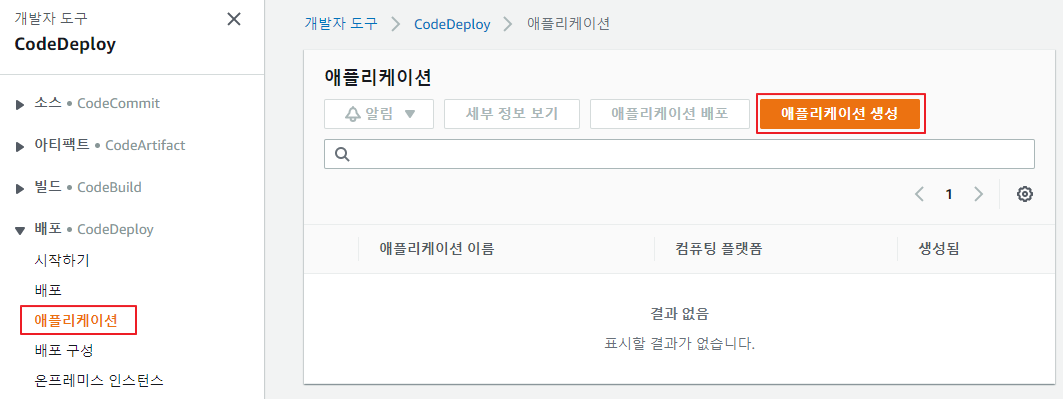
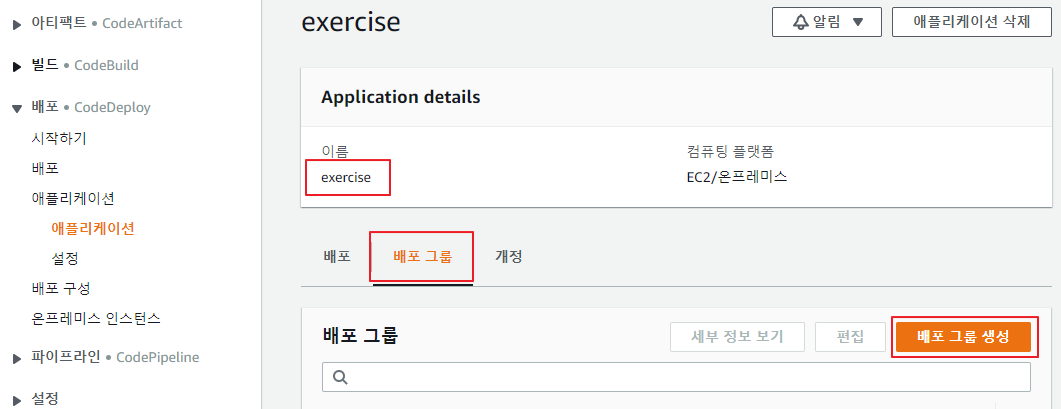
#5 CodeDeploy 애플리케이션 생성 (P152)
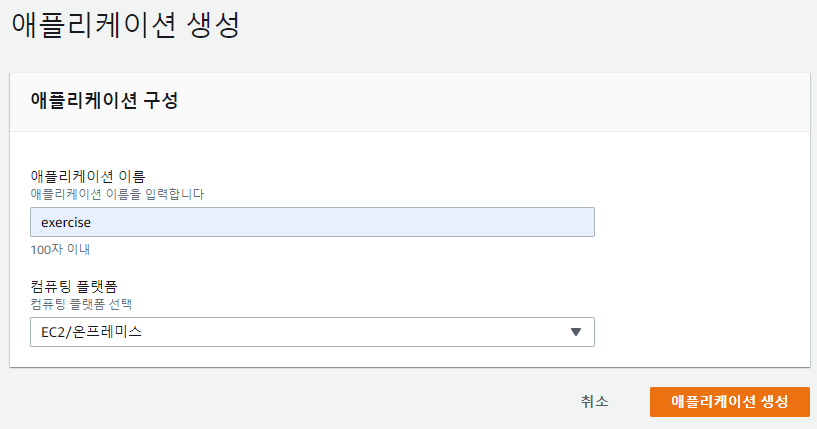
#5-1 애플리케이션 생성
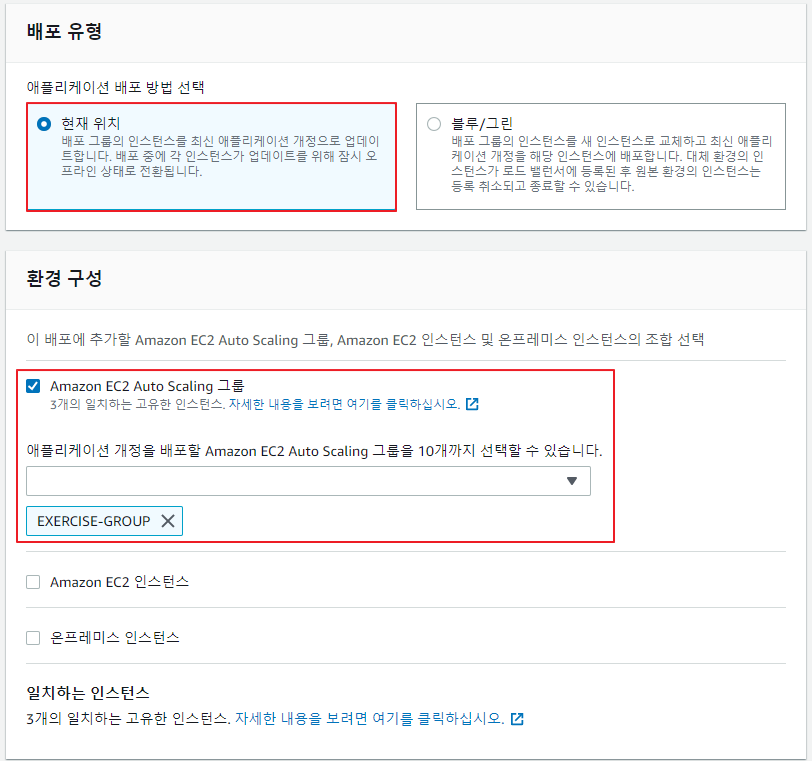
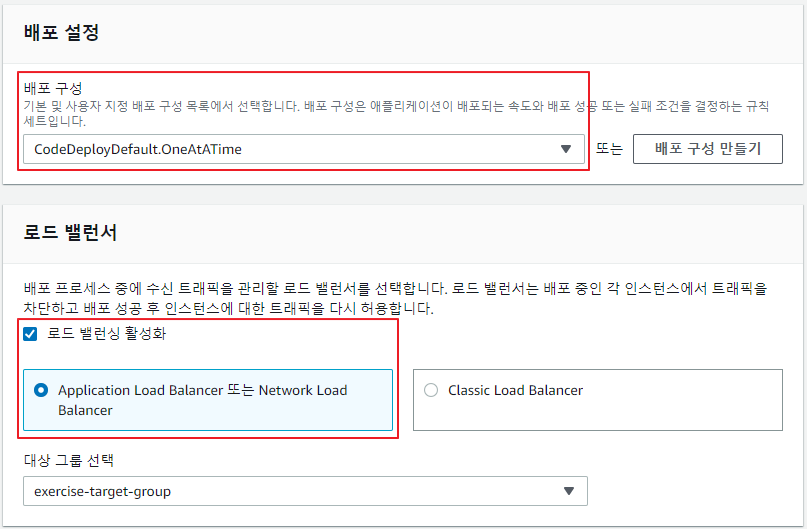
#5-2 배포 그룹 생성
배포 대상(개발계, 테스트계, 운영계 등)과 방법(한번에, 단계적으로, 반반씩 등)을 그룹핑

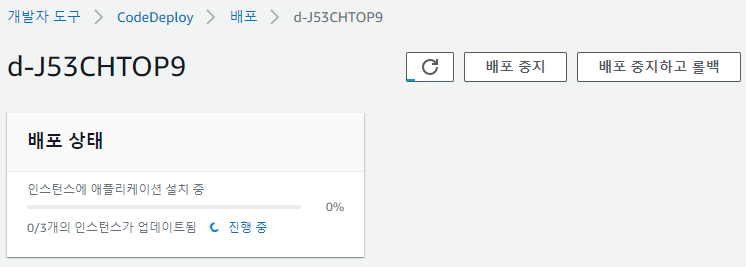
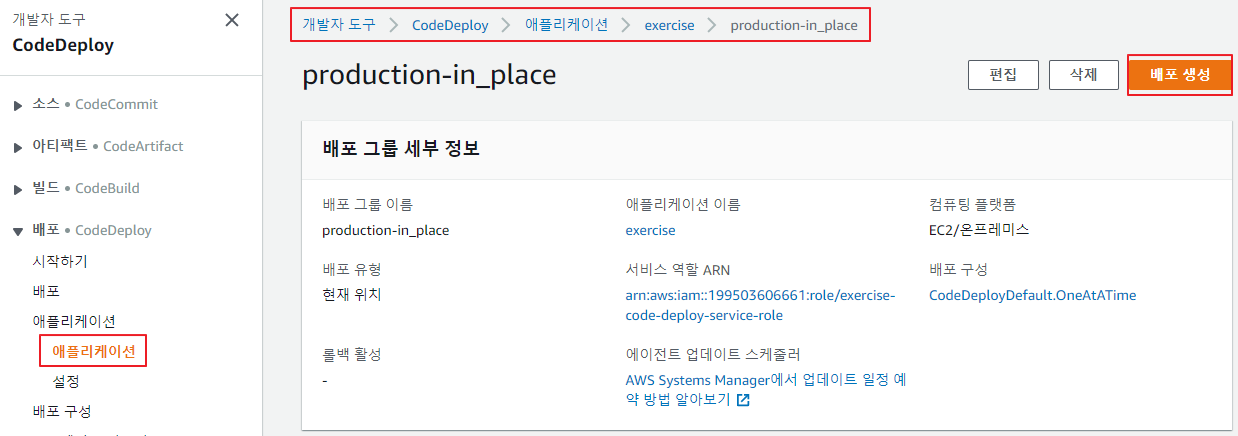
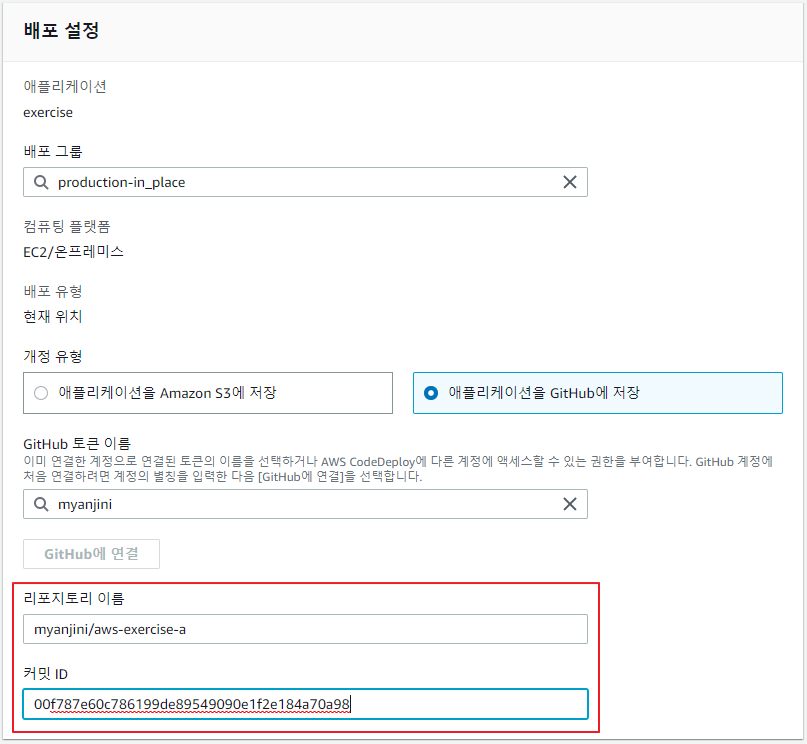
#5-3 배포 생성


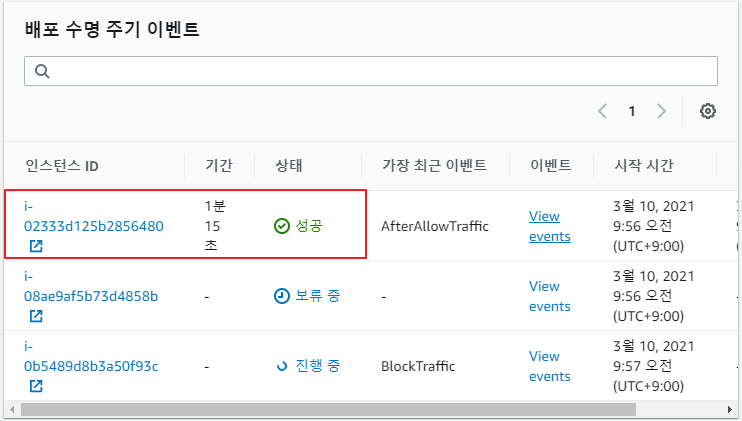
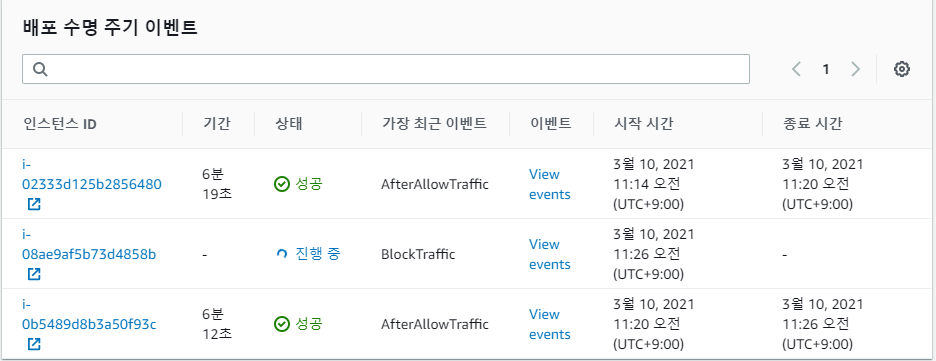
#5-4 배포 진행을 확인
배포 생명 주기 이벤트 ⇒


#5-5 실패가 난 경우, 오류 메시지 확인 후 조치
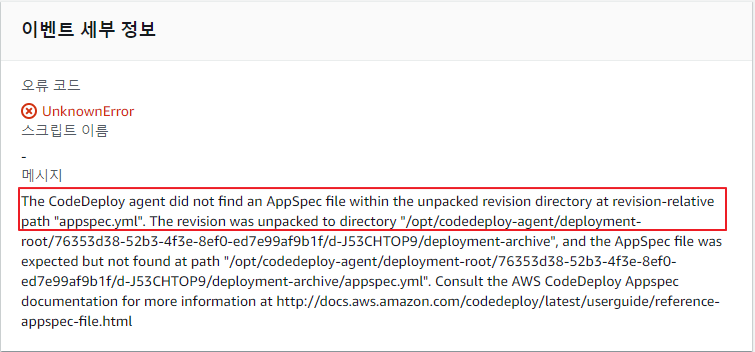
⇒ appsec.yml 파일이 존재하지 않음
#5-6 배포가 정상적으로 수행된 경우

#5-7 로드 밸러서 DNS 이름으로 접속하면 서비스가 되는 것을 확인

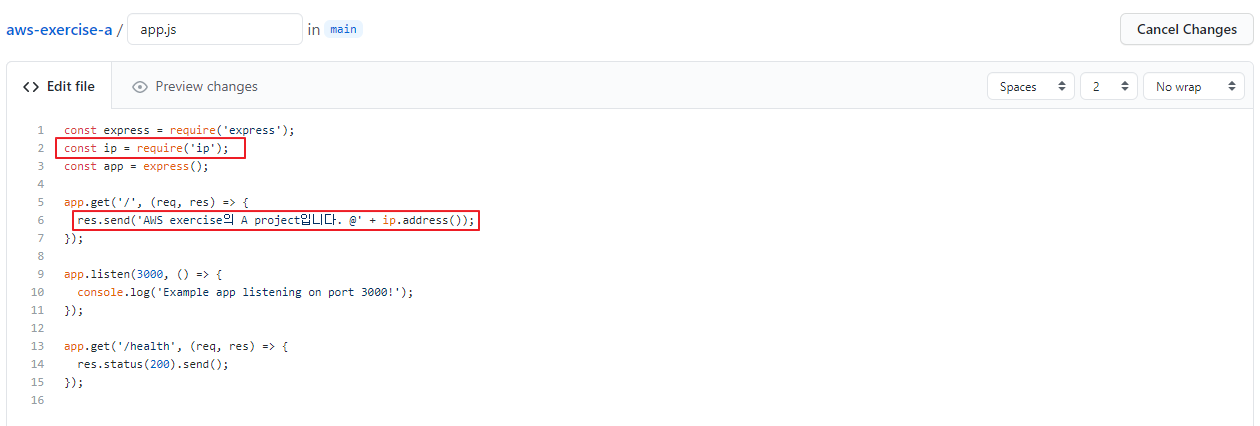
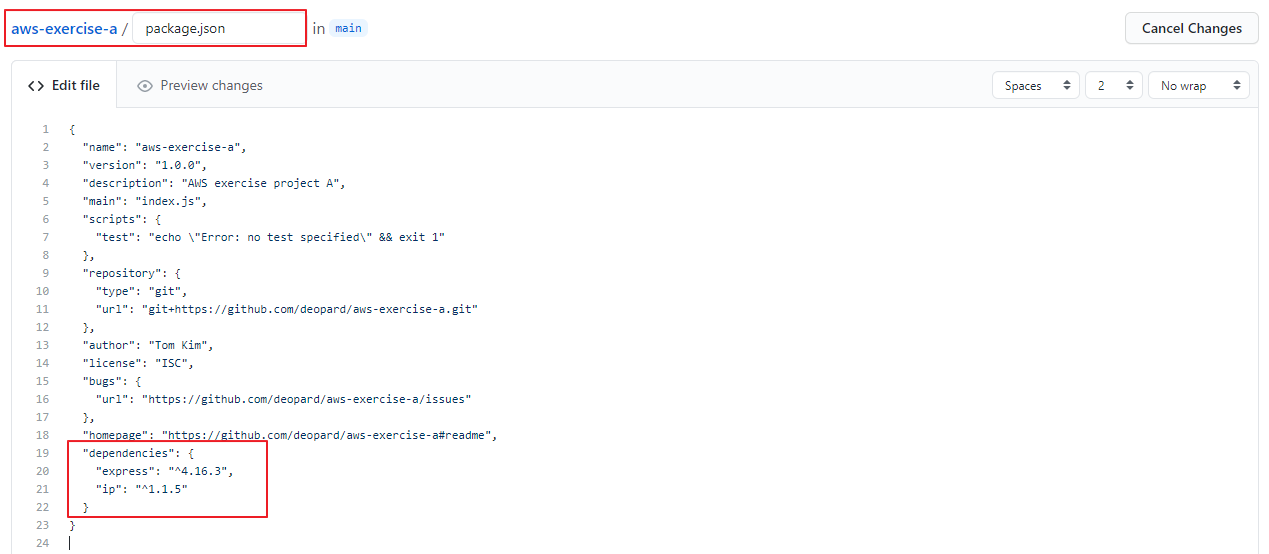
#5-8 소스 코드를 수정 ⇒ 애플리케이션이 실행되는 인스턴스의 IP 주소가 출력되도록 수정


#5-9 최신 버전의 커밋 ID를 확인
#5-10 최신 버전으로 업데이트하는 배포를 생성
배포할 소스 코드의 커밋 ID(최신 버전의 커밋 ID)를 설정
#5-11 배포가 진행됨에 따라서 일시적으로 두 가지 버전의 애플리케이션이 함께 서비스되는 것을 확인할 수 있음
한 개의 인스턴스에 배포 완료

새 버전

이전 버전

두 개의 인스턴스에 배포 완료


모든 인스턴스에 배포 완료


#5-12 CodeDeploy Agent 로그 확인
[ec2-user@ip-172-31-37-14 /]$ tail -f /var/log/aws/codedeploy-agent/codedeploy-agent.log
2021-03-10 02:45:10 INFO [codedeploy-agent(2537)]: Version file found in /opt/codedeploy-agent/.version with agent version OFFICIAL_1.3.1-1880_rpm.
2021-03-10 02:45:55 INFO [codedeploy-agent(2537)]: [Aws::CodeDeployCommand::Client 200 45.174906 0 retries] poll_host_command(host_identifier:"arn:aws:ec2:us-east-1:199503606661:instance/i-02333d125b2856480")
2021-03-10 02:45:56 INFO [codedeploy-agent(2537)]: Version file found in /opt/codedeploy-agent/.version with agent version OFFICIAL_1.3.1-1880_rpm.
2021-03-10 02:46:42 INFO [codedeploy-agent(2537)]: [Aws::CodeDeployCommand::Client 200 45.725575 0 retries] poll_host_command(host_identifier:"arn:aws:ec2:us-east-1:199503606661:instance/i-02333d125b2856480")
2021-03-10 02:46:43 INFO [codedeploy-agent(2537)]: Version file found in /opt/codedeploy-agent/.version with agent version OFFICIAL_1.3.1-1880_rpm.
2021-03-10 02:47:28 INFO [codedeploy-agent(2537)]: [Aws::CodeDeployCommand::Client 200 45.302906 0 retries] poll_host_command(host_identifier:"arn:aws:ec2:us-east-1:199503606661:instance/i-02333d125b2856480")
2021-03-10 02:47:29 INFO [codedeploy-agent(2537)]: Version file found in /opt/codedeploy-agent/.version with agent version OFFICIAL_1.3.1-1880_rpm.
#5-13 배포 스크립트 로그 ⇐ appsec.yml 파일에 배포 생명 주기 이벤트 별로 실행되는 쉘 스크립트의 로그

[ec2-user@ip-172-31-37-14 /]$ tail -f /opt/codedeploy-agent/deployment-root/deployment-logs/codedeploy-agent-deployments.log
[2021-03-10 02:19:31.431] [d-JOXA0GQP9][stdout]Running restart_server
[2021-03-10 02:19:31.431] [d-JOXA0GQP9][stdout]======================
[2021-03-10 02:19:31.578] [d-JOXA0GQP9][stdout]Restarting nginx (via systemctl): [ OK ]
[2021-03-10 02:19:32.357] [d-JOXA0GQP9]LifecycleEvent - ValidateService
[2021-03-10 02:19:32.358] [d-JOXA0GQP9]Script - scripts/validate_server
[2021-03-10 02:19:32.370] [d-JOXA0GQP9][stdout]=======================
[2021-03-10 02:19:32.370] [d-JOXA0GQP9][stdout]Running validate_server
[2021-03-10 02:19:32.370] [d-JOXA0GQP9][stdout]=======================
[2021-03-10 02:19:33.159] [d-JOXA0GQP9][stdout]Check http://127.0.0.1/health
[2021-03-10 02:19:33.159] [d-JOXA0GQP9][stdout]200
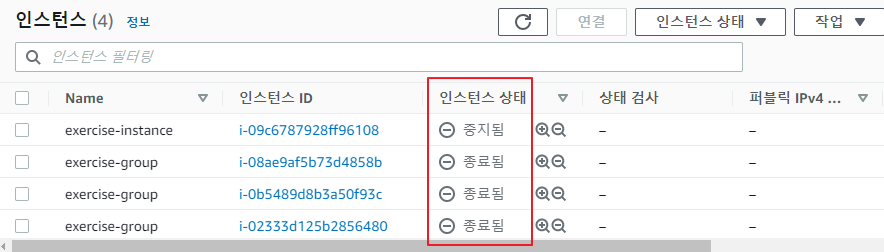
#5-14 리소스 정리

암호시스템
암호화
+--------------------->----------------------+
| |
평문(Plain text) <=======> 알고리즘 <=======> 암호문(Cipher text)
| + |
| 키(key) |
| |
+---------------------<----------------------+
복호화
키 구성에 따라서 대칭키 암호화 방식과 비대칭 암호화 방식으로 구분이 가능
대칭키 : 암호화 과정에 사용된 키와 복호화 과정에 사용된 키가 동일
= 유일키
= 비밀키 ⇒ "비밀키 암호화 방식"
= 관용 암호화 방식
- 단점: 키 관리 및 분배가 어렵다.
CIPHER(data,keyA)
송신자 ---------------+---------------> 수신자A
data | CIPHER(data,keyA) → 복호화에 사용할 key를 가지고 있지 않음 ⇒ 키 분배 문제
keyA |
도청 및 훔쳐보기가 가능
|
|
keyB ---------------+---------------> 수신자B
~~~~~~
수신자 많아지면(=통신 대상이 많아지면) 관리해야할 키가 증가 ⇒ 키 관리 문제
비대칭키 : 암호화 과정에 사용된 키와 복호화 과정에 사용된 키가 상이
개인키와 공개키로 구성된 키 쌍을 생성 ← 유일키의 개념이 깨짐
(개인키는 외부에 오픈되지 않고,) 공개키는 외부에 오픈해도 무관 ← 비밀키의 개념이 깨짐 ⇒ "공개키 암호화 방식"
개인키로 암호화한 것은 공개키로 복호화할 수 있고, 공개키로 암호화한 것은 개인키로 복호화할 수 있음
(1) 키 쌍을 생성
송신자 -------------------------------> 수신자A
SndPriKey RcvPriKey
SndPubKey RcvPubKey
(2) 공개키를 공개키 저장소에 오픈 → 누구나가 참조 가능 ⇒ 키 분배의 문제가 해결
모든 사용자는 자신의 개인키만 안전하게 보관 ⇒ 키 관리의 문제가 해결
[ SndPubKey, RcvPubKey ]
송신자 -------------------------------> 수신자A
SndPriKey RcvPriKey
송신자가 수신자A만 볼 수 있도록 데이터를 전달하는 방법 ⇒ 기밀성 서비스를 구현
(1) 수신자A의 공개키를 취득
(2) 수신자A의 공개키로 데이터를 암호화
(3) 암호화된 데이터를 전달
(4) 수신자A는 자신의 개인키로 암호화된 데이터를 복호화
원본증명, 부인방지, 인증 등의 서비스를 구현
(1) 송신자가 본의 개인키로 암호화해서 전달 ⇒ "서명한다"
(2) 암호화된 데이터와 암호화된 데이터를 복호화하는데 필요한 공개키는 누구나 취득이 가능
(3) 암호화된 데이터가 송신자의 공개키로 복호화된다는 것
⇒ 송신자의 개인키로 암화된 것 = 암호화된 데이터가 송신자가 만들 것이 확실
⇒ "서명검증한다"
Secret Manager를 이용한 비밀 값 관리 (P179)
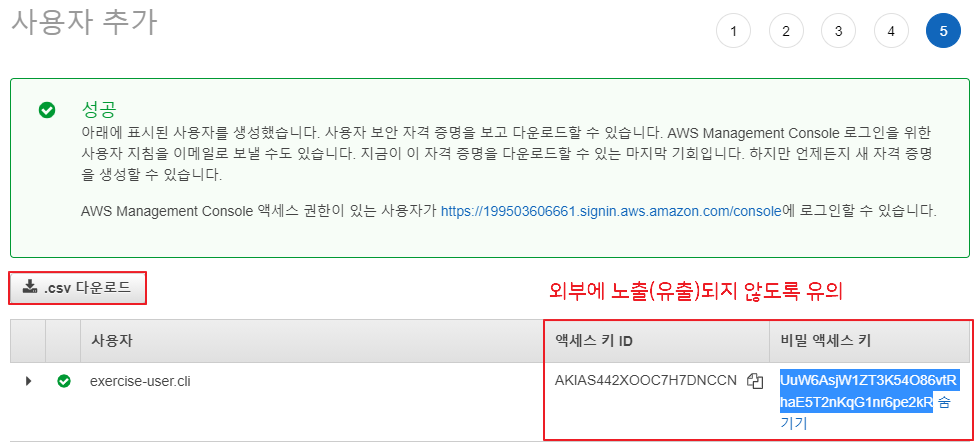
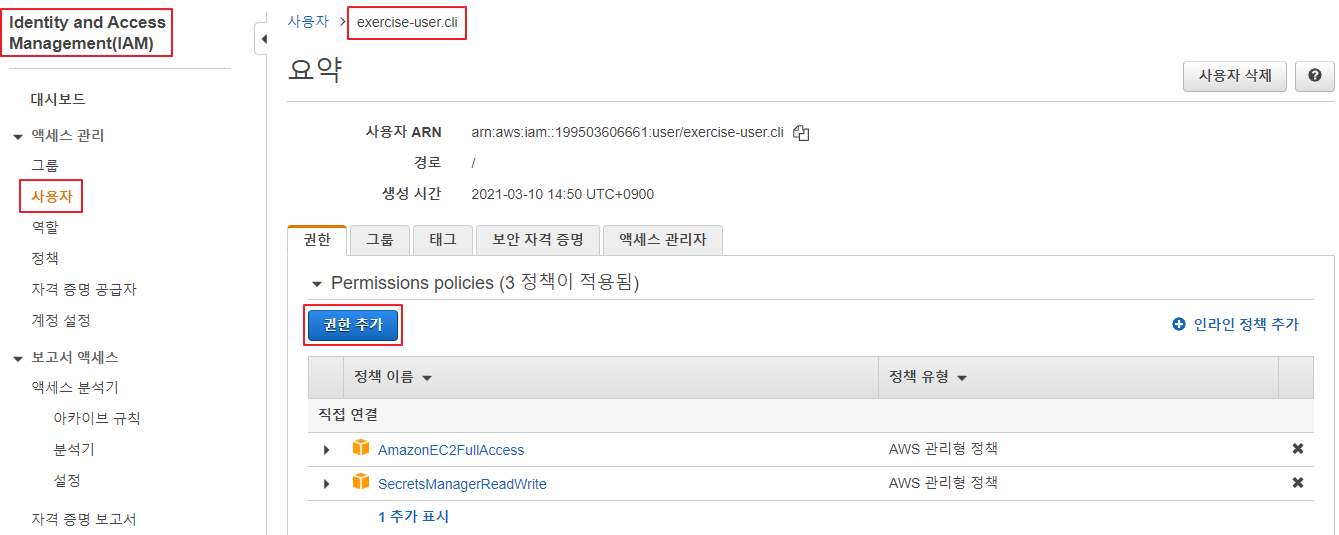
#1 AWS CLI를 위한 사용자 생성 (P313)


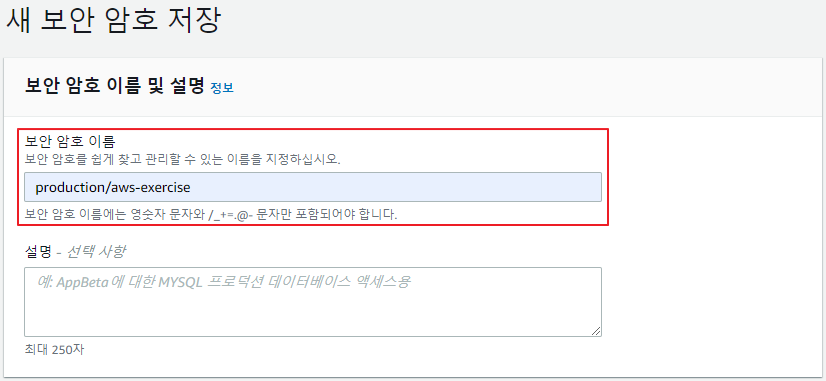
#2 비밀(secret) 생성 (P179)

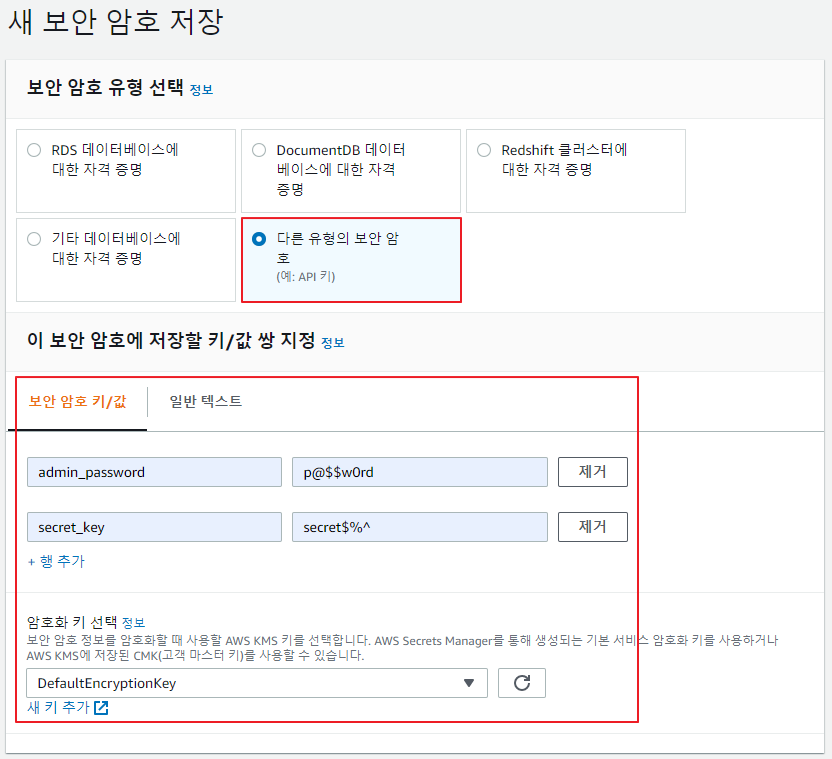
admin_password의 값과 secret_key의 값은 중요한 정보(값)라고 가정합니다.
#3 자바스크립트 샘플 코드를 이용해서 비밀 값을 가져와서 사용 (P184)
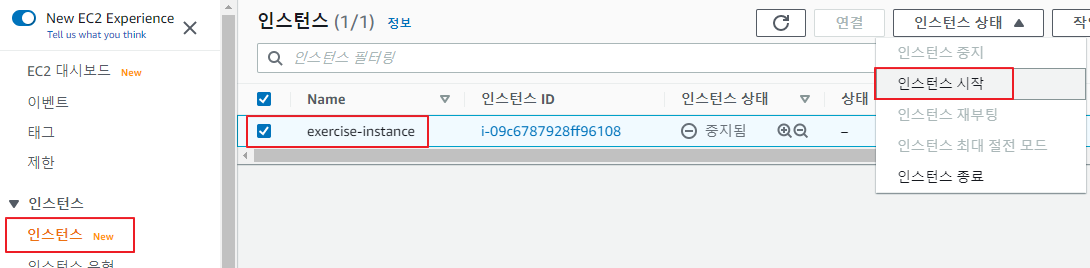
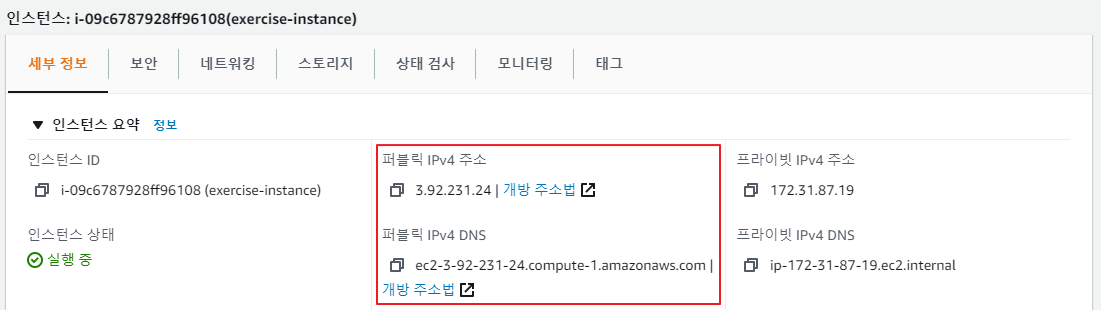
#3-1 exercise-instance 인스턴스를 시작
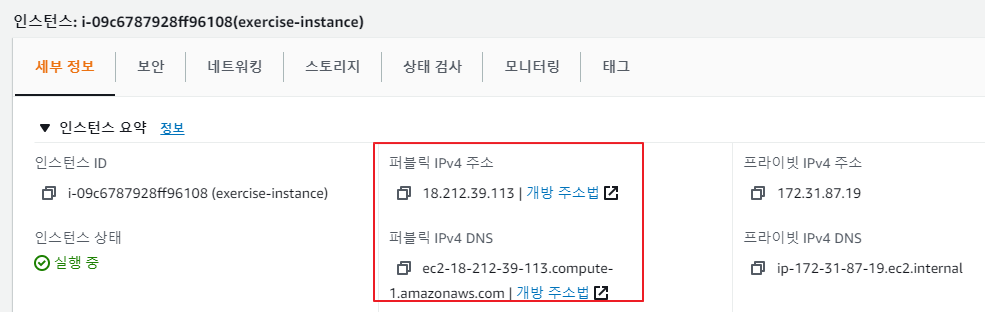
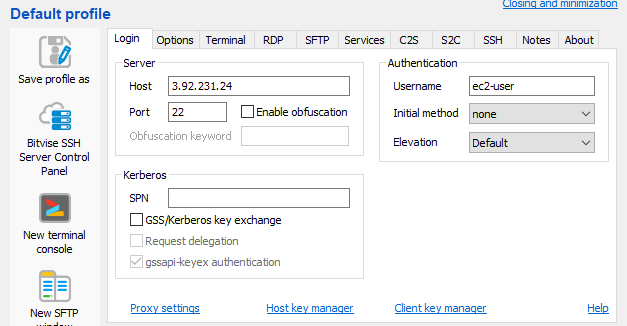
#3-2 해당 인스턴스의 퍼블릭 IP로 SSH 접속

#3-3 비밀 값을 가져와서 사용자 응답으로 반환하는 코드를 반영
[ec2-user@ip-172-31-87-19 ~]$ cd /var/www
[ec2-user@ip-172-31-87-19 www]$ git clone https://github.com/deopard/aws-exercise-a.git
Cloning into 'aws-exercise-a'...
remote: Enumerating objects: 39, done.
remote: Total 39 (delta 0), reused 0 (delta 0), pack-reused 39
Unpacking objects: 100% (39/39), done.
[ec2-user@ip-172-31-87-19 www]$ cd aws-exercise-a/
[ec2-user@ip-172-31-87-19 aws-exercise-a]$ git checkout secrets-manager
Branch 'secrets-manager' set up to track remote branch 'secrets-manager' from 'origin'.
Switched to a new branch 'secrets-manager'
[ec2-user@ip-172-31-87-19 aws-exercise-a]$ vi app.js
|
const express = require('express'); const app = express(); // Use this code snippet in your app. // If you need more information about configurations or implementing the sample code, visit the AWS docs: // https://aws.amazon.com/developers/getting-started/nodejs/ // Load the AWS SDK var AWS = require('aws-sdk'), endpoint = "https://secretsmanager.us-east-1.amazonaws.com", // 본인 리전으로 변경 region = "us-east-1", secretName = "production/aws-exercise", // 보안 암호 이름 secret, binarySecretData; // Create a Secrets Manager client var client = new AWS.SecretsManager({ endpoint: endpoint, region: region, accessKeyId: 'AKIAS*********7DNCCN', // 본인의 액세스 키 ID를 입력 secretAccessKey: 'UuW6AsjW1Z*****************nKqG1nr6pe2kR' // 본인의 시크릿 액세스 키를 입력 }); // http://EC2_INSTANCE_IP/ 형식으로 요청이 들어왔을 수 때 수행하는 기능 app.get('/', (req, res) => { client.getSecretValue({ SecretId: secretName }, function (err, data) { // 보안 암호 키/값을 반환 if (err) { if (err.code === 'ResourceNotFoundException') console.log("The requested secret " + secretName + " was not found"); else if (err.code === 'InvalidRequestException') console.log("The request was invalid due to: " + err.message); else if (err.code === 'InvalidParameterException') console.log("The request had invalid params: " + err.message); } else { // Decrypted secret using the associated KMS CMK // Depending on whether the secret was a string or binary, one of these fields will be populated if (data.SecretString !== "") { secret = JSON.parse(data.SecretString); } else { binarySecretData = data.SecretBinary; } } // 사용자에게 전달할 메시지를 생성 (메시지에는 보안 암호 값이 포함) res.send(`SecretsManager로 실행되는 AWS exercise의 A project입니다.<br /> - Admin 비밀번호: ${secret.admin_password}<br /> - 비밀 값: ${secret.secret_key}`); }); }); app.listen(3000, () => { console.log('Example app listening on port 3000!'); }); app.get('/health', (req, res) => { res.status(200).send(); }); |
#3-4 의존 모듈 설치
[ec2-user@ip-172-31-87-19 aws-exercise-a]$ npm install
added 64 packages from 110 contributors and audited 64 packages in 2.656s
found 0 vulnerabilities
#3-5 nginx 서비스 재시작
[ec2-user@ip-172-31-87-19 aws-exercise-a]$ sudo service nginx restart
Restarting nginx (via systemctl): [ OK ]
#3-6 브라우저로 서비스 확인 ⇒ 비밀값이 출력되는 것을 확인

비교: 소스 코드에 중요 정보가 포함된 경우
app.js
|
const express = require('express'); const app = express(); // Use this code snippet in your app. // If you need more information about configurations or implementing the sample code, visit the AWS docs: // https://aws.amazon.com/developers/getting-started/nodejs/ const ADMIN_PASSWORD = "p@$$w0rd"; // 소스 코드에 중요한 정보가 포함되고 const SECRET_KEY = "secret$%^"; // 소스 코드에 접근할 수 있는 모든 사용자(개발자)가 중요 정보를 확인(열람) app.get('/', (req, res) => { res.send(`SecretsManager로 실행되는 AWS exercise의 A project입니다.<br /> - Admin 비밀번호: ${ADMIN_PASSWORD}<br /> - 비밀 값: ${SECRET_KEY}`); }); app.listen(3000, () => { console.log('Example app listening on port 3000!'); }); app.get('/health', (req, res) => { res.status(200).send(); }); |
#4 리소스 정리
[ec2-user@ip-172-31-87-19 aws-exercise-a]$ cd ..
[ec2-user@ip-172-31-87-19 www]$ rm -rf aws-exercise-a/
[ec2-user@ip-172-31-87-19 www]$ sudo shutdown -h now
CloudWatch에 사용자 지정 지표 기록 (P194)
#1 사용자에게 CloudWatchEventsFullAccess 정책을 추가


#2 사용자 지정 지표를 생성해서 CloudWatch로 전송
### 인스턴스 시작

### 인스턴스에 SSH 접속
### 작업 디렉터리 생성 및 지표 데이터 파일 생성
[ec2-user@ip-172-31-87-19 ~]$ cd /var/www
[ec2-user@ip-172-31-87-19 www]$ mkdir cloudwatch-custom
[ec2-user@ip-172-31-87-19 www]$ cd cloudwatch-custom/
[ec2-user@ip-172-31-87-19 cloudwatch-custom]$ vi test_data.json
|
[ { "MetricName": "People", "Dimensions": [{ "Name": "Gender", "Value": "All" }], "Timestamp": "2021-03-08T14:00:00.000+09:00", "Value": 20, "Unit": "Count" }, { "MetricName": "People", "Dimensions": [{ "Name": "Gender", "Value": "All" }], "Timestamp": "2021-03-08T15:00:00.000+09:00", "Value": 24, "Unit": "Count" }, { "MetricName": "People", "Dimensions": [{ "Name": "Gender", "Value": "All" }], "Timestamp": "2021-03-08T16:00:00.000+09:00", "Value": 30, "Unit": "Count" }, { "MetricName": "People", "Dimensions": [{ "Name": "Gender", "Value": "All" }], "Timestamp": "2021-03-08T17:00:00.000+09:00", "Value": 23, "Unit": "Count" } ] |
[참고: https://gist.github.com/deopard/76d334b9c4616c8e5e60429631c0f3b2]

### 지표 데이터를 CloudWatch로 전송
[ec2-user@ip-172-31-87-19 cloudwatch-custom]$ aws configure
AWS Access Key ID [None]: AKIAS*******7DNCCN ⇐ exercise-user.cli 사용자 생성시
AWS Secret Access Key [None]: UuW6AsjW1*****************nKqG1nr6pe2kR 내려받은 csv 파일에 내용을 참조
Default region name [None]: us-east-1
Default output format [None]:
[ec2-user@ip-172-31-87-19 cloudwatch-custom]$ aws cloudwatch put-metric-data --namespace "Exercise People" --metric-data file://test_data.json
#3 CloudWatch에서 지표를 확인


#4 실습 환경 정리
[ec2-user@ip-172-31-87-19 cloudwatch-custom]$ cd /var/www
[ec2-user@ip-172-31-87-19 www]$ rm -rf cloudwatch-custom/
CloudWatch Agent로 메모리, 디스크 사용량 지표, 로그 기록 (P199)
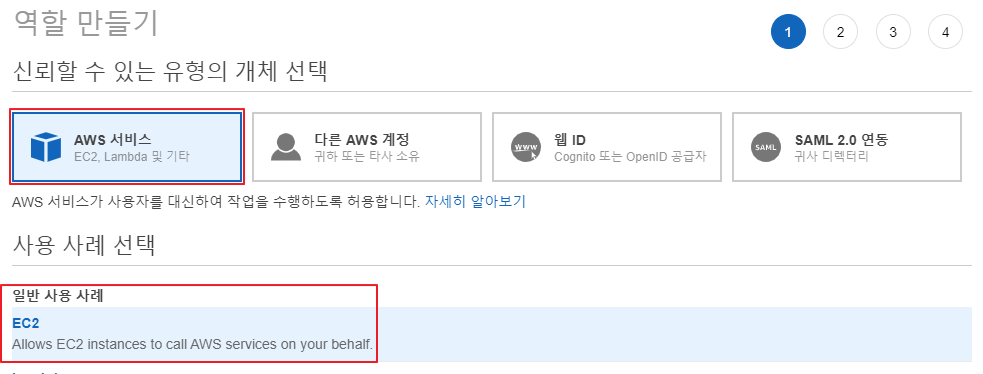
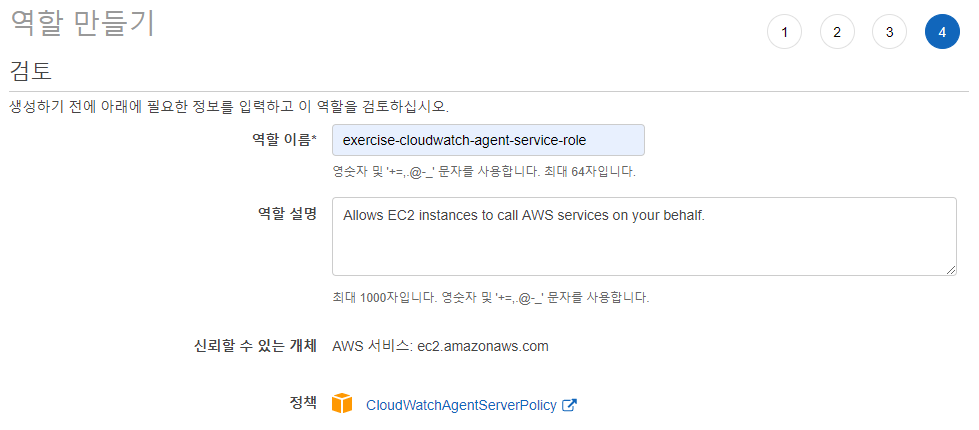
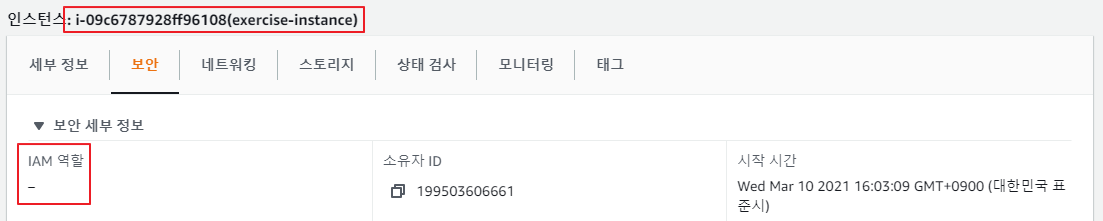
#1 인스턴스에 IAM 역할 추가


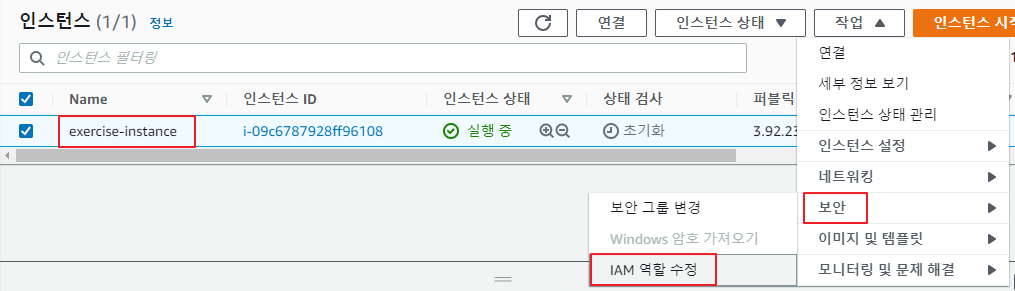
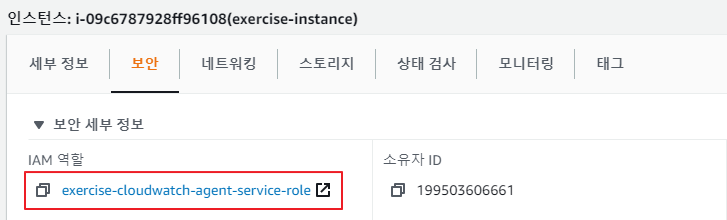
#2 인스턴스의 IAM 역할을 변경(부여)

#3 인스턴스에 CloudWatch 에이전트를 설치 및 설정

[ec2-user@ip-172-31-87-19 www]$ sudo yum install amazon-cloudwatch-agent ⇐ P203 실습 02~04을 대체
P204 실습 05 내용 ⇒
[ec2-user@ip-172-31-87-19 www]$ sudo /opt/aws/amazon-cloudwatch-agent/bin/amazon-cloudwatch-agent-config-wizard
=============================================================
= Welcome to the AWS CloudWatch Agent Configuration Manager =
=============================================================
On which OS are you planning to use the agent?
1. linux
2. windows
default choice: [1]:
1
Trying to fetch the default region based on ec2 metadata...
Are you using EC2 or On-Premises hosts?
1. EC2
2. On-Premises
default choice: [1]:
1
Which user are you planning to run the agent?
1. root
2. cwagent
3. others
default choice: [1]:
1
Do you want to turn on StatsD daemon? ⇐ 사용자 지정 지표를 쉽게 기록할 수 있게 하는 프로토콜
1. yes
2. no
default choice: [1]:
2
Do you want to monitor metrics from CollectD? ⇐ 사용자 지정 지표를 쉽게 기록할 수 있게 하는 프로토콜
1. yes
2. no
default choice: [1]:
2
Do you want to monitor any host metrics? e.g. CPU, memory, etc.
1. yes ⇐ 호스트의 지표(CPU, 메모리 등) 기록 여부
2. no
default choice: [1]:
1
Do you want to monitor cpu metrics per core? Additional CloudWatch charges may apply.
1. yes
2. no ⇐ CPU 코어별 기록 여부
default choice: [1]:
2
Do you want to add ec2 dimensions (ImageId, InstanceId, InstanceType, AutoScalingGroupName) into all of your metrics if the info is available? ⇐ 기록 가능한 모든 EC2 차원 기록 여부
1. yes
2. no
default choice: [1]:
1
Would you like to collect your metrics at high resolution (sub-minute resolution)? This enables sub-minute resolution for all metrics, but you can customize for specific metrics in the output json file.⇐ 지표 기록 주기
1. 1s
2. 10s
3. 30s
4. 60s
default choice: [4]:
4
Which default metrics config do you want? ⇐ 기록할 지표를 지정 (P209 CloudWatch Agent에 미리 정의된 지표)
1. Basic
2. Standard
3. Advanced
4. None
default choice: [1]:
2
Current config as follows:
{
"agent": {
"metrics_collection_interval": 60,
"run_as_user": "root"
},
"metrics": {
"append_dimensions": {
"AutoScalingGroupName": "${aws:AutoScalingGroupName}",
"ImageId": "${aws:ImageId}",
"InstanceId": "${aws:InstanceId}",
"InstanceType": "${aws:InstanceType}"
},
"metrics_collected": {
"cpu": {
"measurement": [
"cpu_usage_idle",
"cpu_usage_iowait",
"cpu_usage_user",
"cpu_usage_system"
],
"metrics_collection_interval": 60,
"totalcpu": false
},
"disk": {
"measurement": [
"used_percent",
"inodes_free"
],
"metrics_collection_interval": 60,
"resources": [
"*"
]
},
"diskio": {
"measurement": [
"io_time"
],
"metrics_collection_interval": 60,
"resources": [
"*"
]
},
"mem": {
"measurement": [
"mem_used_percent"
],
"metrics_collection_interval": 60
},
"swap": {
"measurement": [
"swap_used_percent"
],
"metrics_collection_interval": 60
}
}
}
}
Are you satisfied with the above config? Note: it can be manually customized after the wizard completes to add additional items. ⇐ 설정을 확인
1. yes
2. no
default choice: [1]:
1
Do you have any existing CloudWatch Log Agent (http://docs.aws.amazon.com/AmazonCloudWatch/latest/logs/AgentReference.html) configuration file to import for migration? ⇐ 기존 CloudWatch Log 관련 설정 여부 확인
1. yes
2. no
default choice: [2]:
2
Do you want to monitor any log files? ⇐ 모니터링할 로그 파일 존재 여부
1. yes
2. no
default choice: [1]:
2
Saved config file to /opt/aws/amazon-cloudwatch-agent/bin/config.json successfully.
Current config as follows:
{
"agent": {
"metrics_collection_interval": 60,
"run_as_user": "root"
},
"metrics": {
"append_dimensions": {
"AutoScalingGroupName": "${aws:AutoScalingGroupName}",
"ImageId": "${aws:ImageId}",
"InstanceId": "${aws:InstanceId}",
"InstanceType": "${aws:InstanceType}"
},
"metrics_collected": {
"cpu": {
"measurement": [
"cpu_usage_idle",
"cpu_usage_iowait",
"cpu_usage_user",
"cpu_usage_system"
],
"metrics_collection_interval": 60,
"totalcpu": false
},
"disk": {
"measurement": [
"used_percent",
"inodes_free"
],
"metrics_collection_interval": 60,
"resources": [
"*"
]
},
"diskio": {
"measurement": [
"io_time"
],
"metrics_collection_interval": 60,
"resources": [
"*"
]
},
"mem": {
"measurement": [
"mem_used_percent"
],
"metrics_collection_interval": 60
},
"swap": {
"measurement": [
"swap_used_percent"
],
"metrics_collection_interval": 60
}
}
}
}
Please check the above content of the config.
The config file is also located at /opt/aws/amazon-cloudwatch-agent/bin/config.json. ⇐ 설정 정보가 저장
Edit it manually if needed.
Do you want to store the config in the SSM parameter store?
1. yes
2. no
default choice: [1]:
2
Program exits now.
#4 설정 정보를 기반으로 에이전트를 실행 및 확인
[ec2-user@ip-172-31-87-19 www]$ sudo /opt/aws/amazon-cloudwatch-agent/bin/amazon-cloudwatch-agent-ctl -a fetch-config -m ec2 -c file:/opt/aws/amazon-cloudwatch-agent/bin/config.json -s
/opt/aws/amazon-cloudwatch-agent/bin/config-downloader --output-dir /opt/aws/amazon-cloudwatch-agent/etc/amazon-cloudwatch-agent.d --download-source file:/opt/aws/amazon-cloudwatch-agent/bin/config.json --mode ec2 --config /opt/aws/amazon-cloudwatch-agent/etc/common-config.toml --multi-config default
Successfully fetched the config and saved in /opt/aws/amazon-cloudwatch-agent/etc/amazon-cloudwatch-agent.d/file_config.json.tmp
Start configuration validation...
/opt/aws/amazon-cloudwatch-agent/bin/config-translator --input /opt/aws/amazon-cloudwatch-agent/etc/amazon-cloudwatch-agent.json --input-dir /opt/aws/amazon-cloudwatch-agent/etc/amazon-cloudwatch-agent.d --output /opt/aws/amazon-cloudwatch-agent/etc/amazon-cloudwatch-agent.toml --mode ec2 --config /opt/aws/amazon-cloudwatch-agent/etc/common-config.toml --multi-config default
2021/03/10 08:30:59 Reading json config file path: /opt/aws/amazon-cloudwatch-agent/etc/amazon-cloudwatch-agent.d/file_config.json.tmp ...
Valid Json input schema.
I! Detecting runasuser...
No csm configuration found.
No log configuration found.
Configuration validation first phase succeeded
/opt/aws/amazon-cloudwatch-agent/bin/amazon-cloudwatch-agent -schematest -config /opt/aws/amazon-cloudwatch-agent/etc/amazon-cloudwatch-agent.toml
Configuration validation second phase succeeded
Configuration validation succeeded
Created symlink from /etc/systemd/system/multi-user.target.wants/amazon-cloudwatch-agent.service to /etc/systemd/system/amazon-cloudwatch-agent.service.
Redirecting to /bin/systemctl restart amazon-cloudwatch-agent.service
[ec2-user@ip-172-31-87-19 www]$ sudo systemctl status amazon-cloudwatch-agent
● amazon-cloudwatch-agent.service - Amazon CloudWatch Agent
Loaded: loaded (/etc/systemd/system/amazon-cloudwatch-agent.service; enabled; vendor preset: disabled)
Active: active (running) since Wed 2021-03-10 08:30:59 UTC; 1min 17s ago
Main PID: 4233 (amazon-cloudwat)
CGroup: /system.slice/amazon-cloudwatch-agent.service
└─4233 /opt/aws/amazon-cloudwatch-agent/bin/amazon-cloudwatch-agent -config /opt/aws/amazon-cloudwatc...
Mar 10 08:30:59 ip-172-31-87-19.ec2.internal systemd[1]: Started Amazon CloudWatch Agent.
Mar 10 08:30:59 ip-172-31-87-19.ec2.internal systemd[1]: Starting Amazon CloudWatch Agent...
Mar 10 08:30:59 ip-172-31-87-19.ec2.internal start-amazon-cloudwatch-agent[4233]: /opt/aws/amazon-cloudwatch-ag....
Mar 10 08:30:59 ip-172-31-87-19.ec2.internal start-amazon-cloudwatch-agent[4233]: Valid Json input schema.
Mar 10 08:30:59 ip-172-31-87-19.ec2.internal start-amazon-cloudwatch-agent[4233]: I! Detecting runasuser...
Hint: Some lines were ellipsized, use -l to show in full.
[ec2-user@ip-172-31-87-19 www]$ sudo /opt/aws/amazon-cloudwatch-agent/bin/amazon-cloudwatch-agent-ctl -m ec2 -a status
{
"status": "running",
"starttime": "2021-03-10T08:30:59+0000",
"version": "1.247345.35"
}
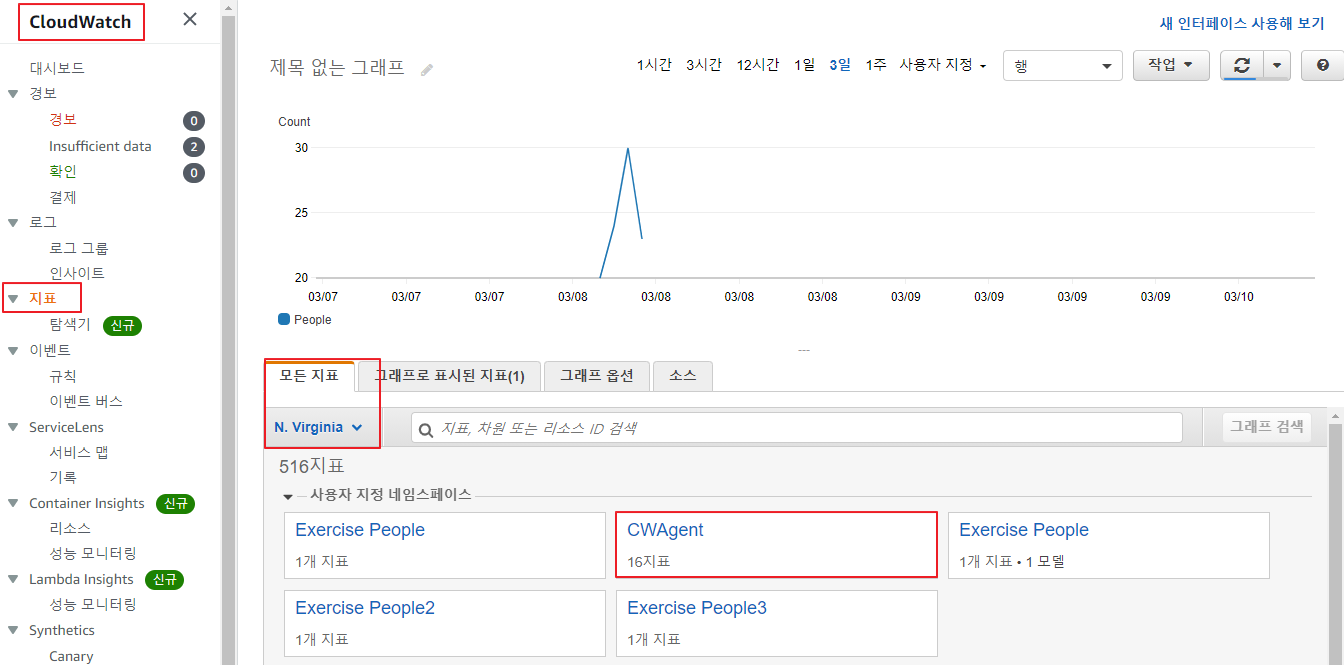
#5 CloudWatch에 기록된 지표를 확인


#6 실습이 끝나면 인스턴스 중지
[ec2-user@ip-172-31-87-19 www]$ sudo shutdown -h now
'CLOUD > AWS' 카테고리의 다른 글
| 3/12 - AWS 11차시 (0) | 2021.03.12 |
|---|---|
| 3/11 - AWS 10차시 (0) | 2021.03.11 |
| 3/9 - AWS 8차시 (0) | 2021.03.09 |
| 3/8 - AWS 7차시 (0) | 2021.03.08 |
| 3/5 - A Cloud Guru를 이용한 AWS 6차시 (0) | 2021.03.05 |