배포(deployment)
빅뱅 배포
애플리케이션의 전체 또는 대부분을 한 번에 업데이트
롤링 배포 = 단계적 배포
애플리케이션의 이전 버전(파란색)을 점차적으로 새 버전(초록색)으로 교체

Blue-Green, Red-Black, A/B 배포
두 개의 동일한 프로덕션 환경이 병렬로 작동
하나는 모든 사용자의 트래픽을 수신하는 실행 상태, 다른 하나는 유휴 상태
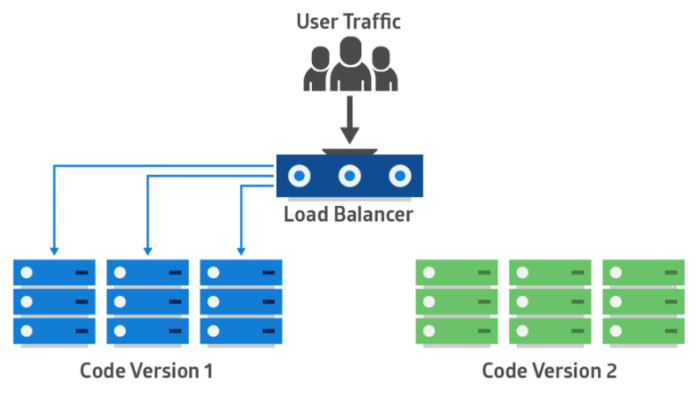
새로운 버전의 애플리케이션은 그린 환경에 배포되고 기능 및 성능 테스트를 수행
테스트 결과가 성공이면 애플리케이션의 트래픽을 파란색에서 초록색으로 라우팅(변경)

초록색이 활성화된 후 문제가 발생하면 트래픽을 다시 파란색으로 라우팅
Blue-Green 배포에서는 두 시스템 모두가 동일한 지속 계층 또는 데이터베이스 백엔드를 사용해야 함
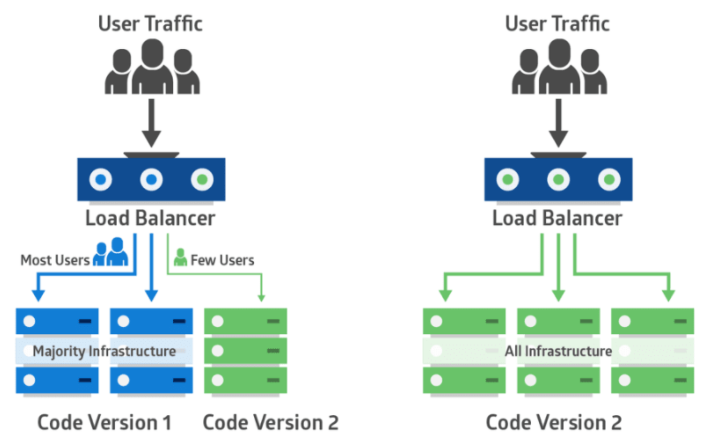
카나리아(canary) 배포
프로덕션 인프라의 작은 부분에 새 애플리케이션 코드를 배포해서 소수의 사용자만 해당 애플리케이션으로 라우팅
보고된 오류가 없는 새 버전은 나머지 인프라에 점차적으로 롤 아웃
Amazon API Gateway
개발자가 규모와 관계 없이 API를 쉽게 생성, 게시, 유지관리, 모니터링, 보안유지를 할 수 있도록 하는 완전관리형 서비스
API: 애플리케이션이 백엔드 서비스의 데이터, 비즈니스 로직 또는 기능에 액세스할 수 있도록 해 주는 역할
API 유형: RESTful API, WebSocket API

API Gateway Canary Release Deployment

#1 역할을 확인

#2 첫번째 람다 함수를 생성


#3 두번째 람다 함수를 생성


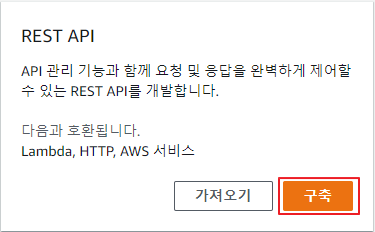
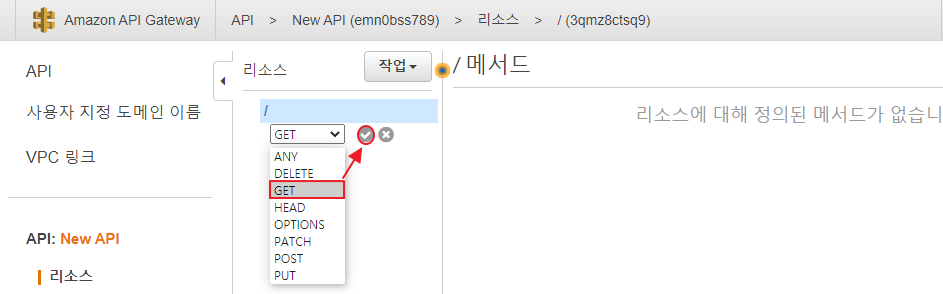
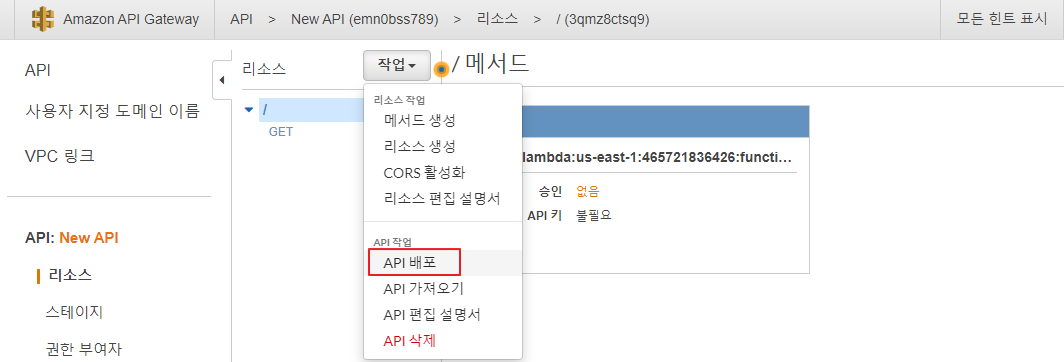
#4 API를 생성


#5 API 배포


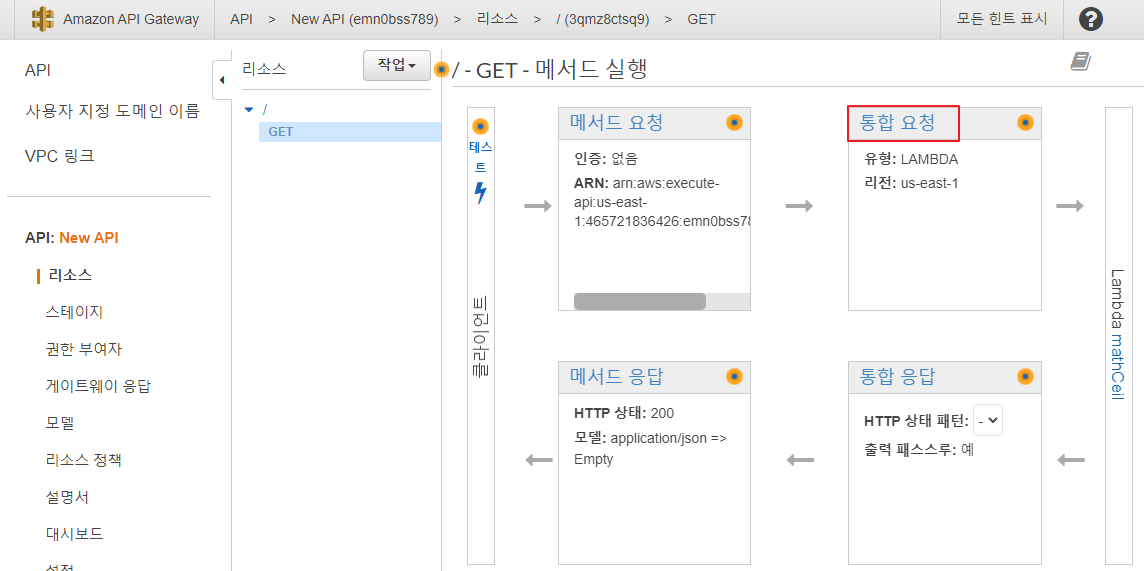
새로고침을 여러번해도 동일한 결과가 출력 ⇒ API 게이트웨이에 연결되어 있는 람다 함수가 MathCeil 하나이므로


브라우저로 API 게이트웨이 엔드포인트를 호출해도 변화가 없음을 확인 ⇒ 새로운 버전이 등록되지 않았기 때문
#6 API가 호출되었을 때 실행되는 람다 함수를 변경

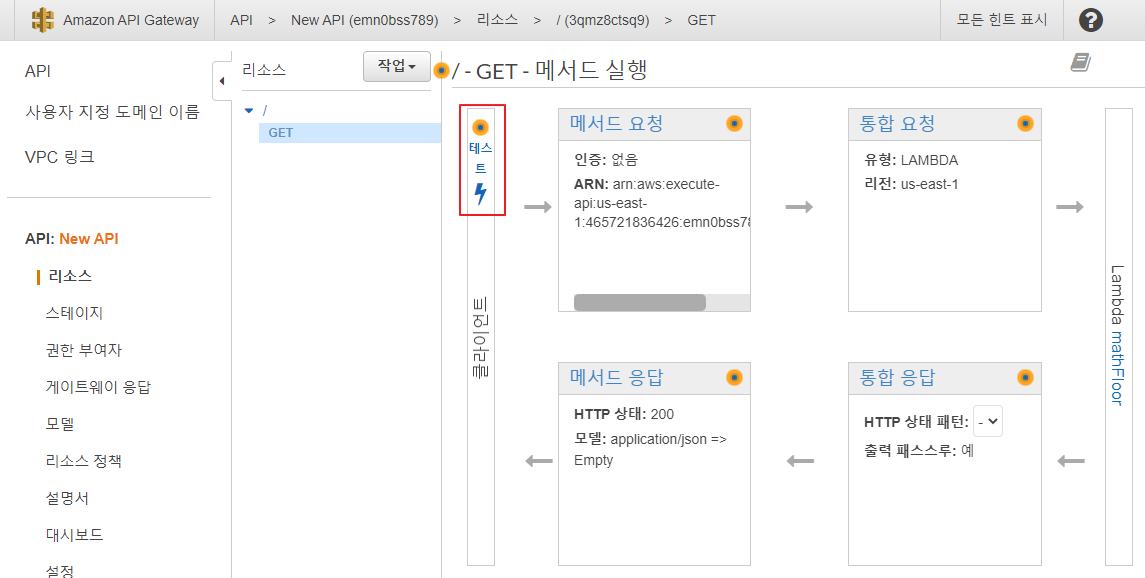

테스트를 여러 번 수행해도 동일한 결과(mathFloor 실행 결과, 999 반환)를 반환하는 것을 확인
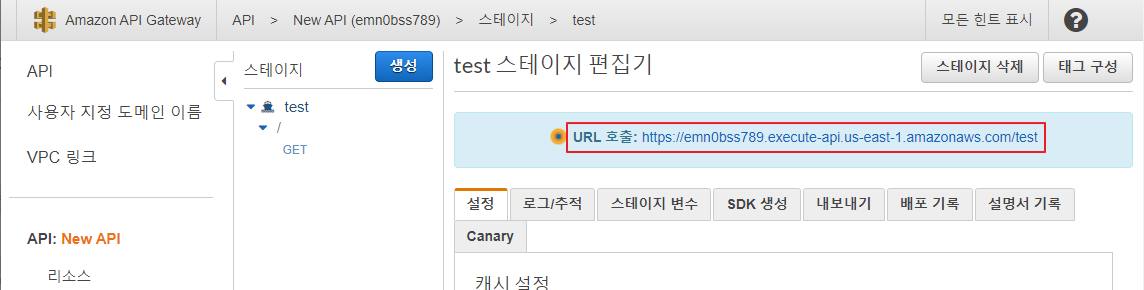
#7 새로운 API를 배포


#8 URL 호출
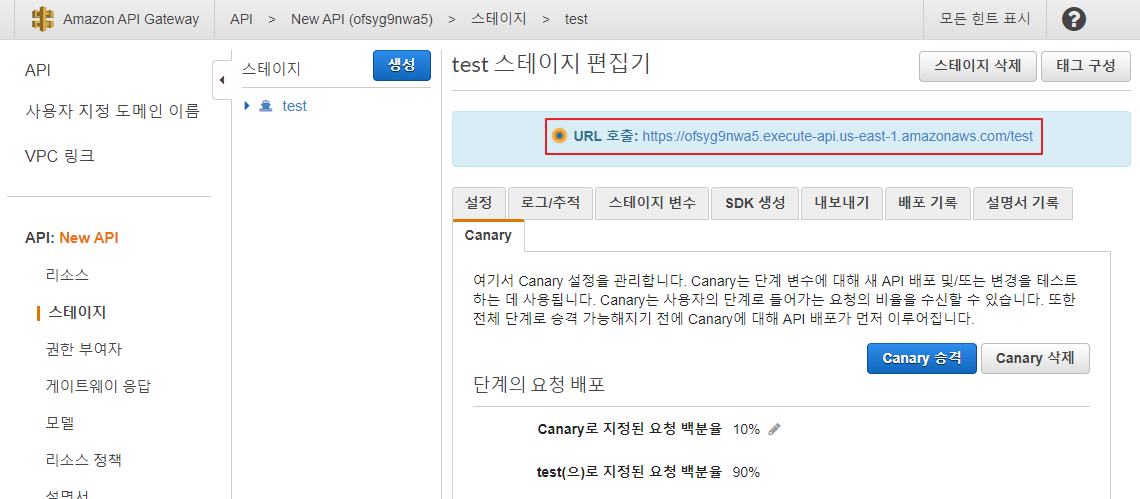


새 버전과 이전 버전이 1:9 비율로 제공되는 것을 확인
#9 Canary로 지정된 요청 비율을 50%으로 조정
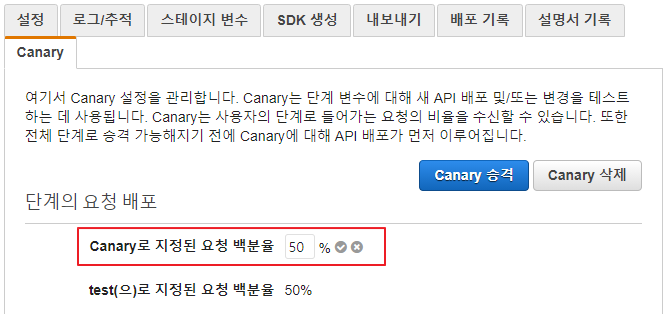
새 버전과 이전 버전이 5:5 비율로 제공되는 것을 확인
#10 Canary 승격


새로운 버전의 실행 결과(999)만 제공되는 것을 확인
EC2 인스턴스 생성 및 서버 환경 구성 (P13~25)
#1 리전 확인 및 설정

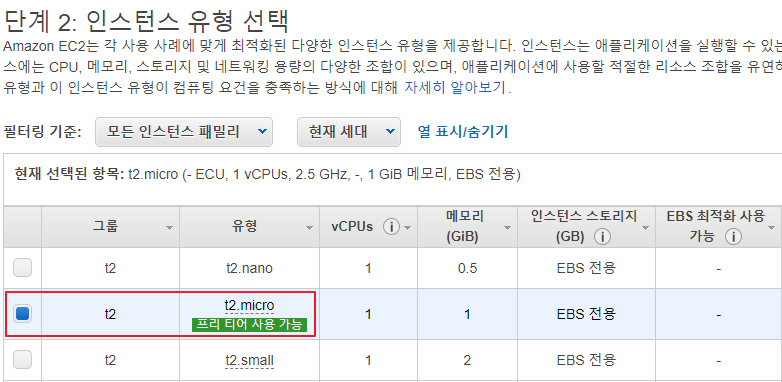
#2 EC2 인스턴스 생성
[인스턴스 시작] 버튼 클릭


⇒ CentOS 기반으로 AWS에 최적화되어 있는 리눅스 가상머신 이미지


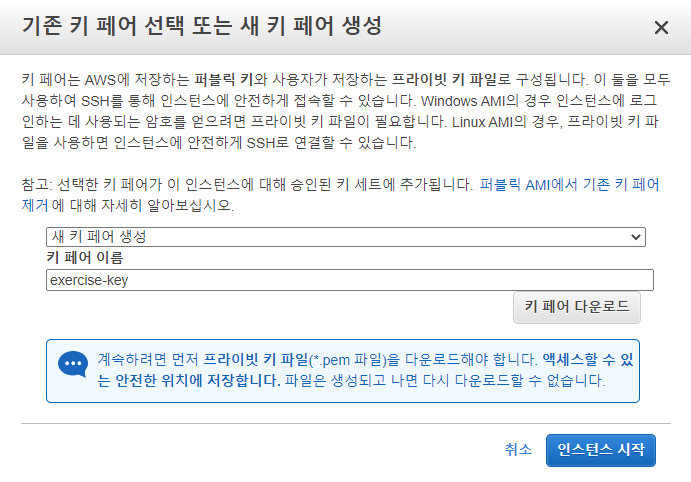

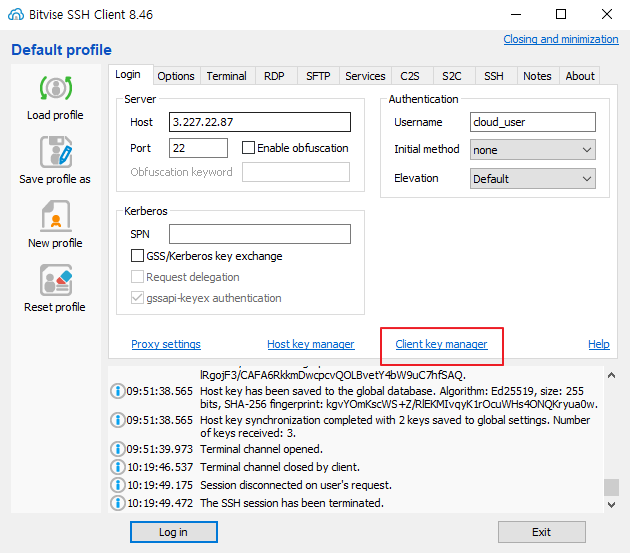
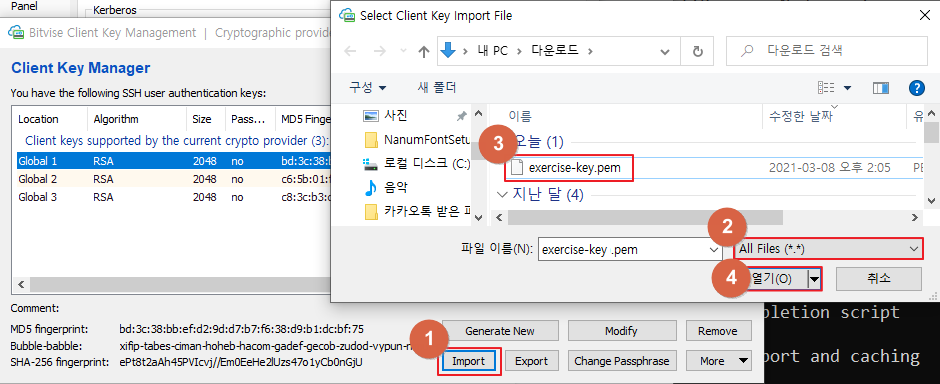
#3 SSH 접속을 위한 개인키 등록 및 SSH 접속

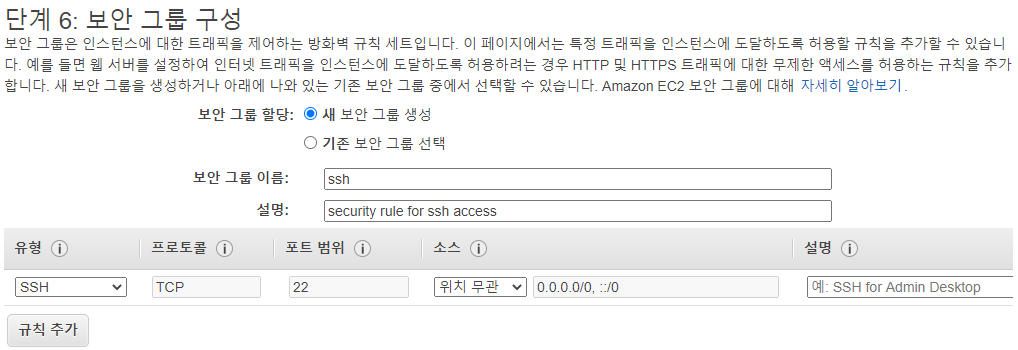
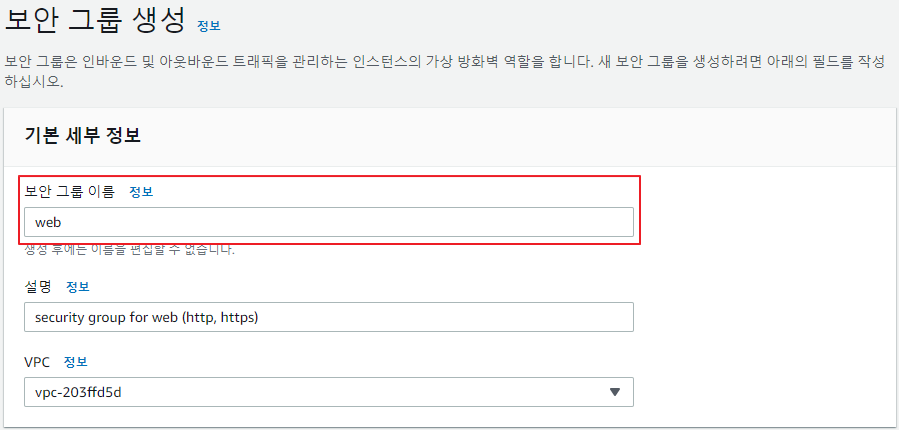
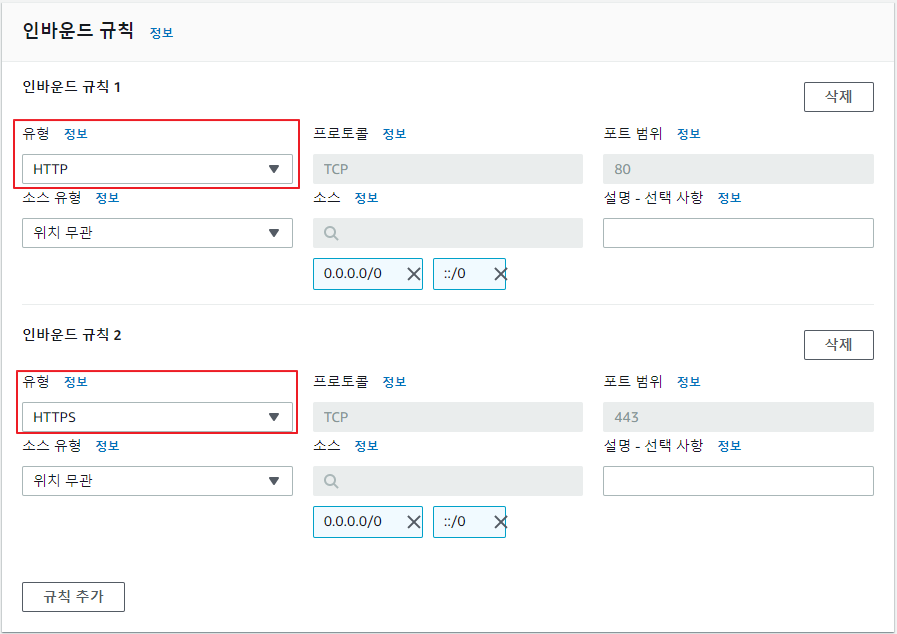
#4 HTTP, HTTPS 접속이 가능하도록 보안그룹을 추가


#5 서버 환경 구성 - 실습에 필요한 node.js를 설치
#5-1 nvm(Node Version Manager) 설치 스크립트를 가져와서 실행(설치)
[ec2-user@ip-172-31-87-19 ~]$ curl -o- https://raw.githubusercontent.com/creationix/nvm/v0.33.11/install.sh | bash
% Total % Received % Xferd Average Speed Time Time Time Current
Dload Upload Total Spent Left Speed
100 12819 100 12819 0 0 596k 0 --:--:-- --:--:-- --:--:-- 596k
=> Downloading nvm as script to '/home/ec2-user/.nvm'
=> Appending nvm source string to /home/ec2-user/.bashrc
=> Appending bash_completion source string to /home/ec2-user/.bashrc
=> Close and reopen your terminal to start using nvm or run the following to use it now:
export NVM_DIR="$HOME/.nvm"
[ -s "$NVM_DIR/nvm.sh" ] && \. "$NVM_DIR/nvm.sh" # This loads nvm
[ -s "$NVM_DIR/bash_completion" ] && \. "$NVM_DIR/bash_completion" # This loads nvm bash_completion
#5-2 nvm.sh 등록
[ec2-user@ip-172-31-87-19 ~]$ . ~/.nvm/nvm.sh
~ ~ ~
| | |
| | +--- 파일명과 확장자를 구분하는 구분자
| +--- 숨김 파일/디렉터리
+--- source 명령어를 의미 (환경 변수를 변경할 때 사용)
$ source ~/.nvm/nvm.sh 동일
#5-3 10.13.0 버전의 node.js를 설치
[ec2-user@ip-172-31-87-19 ~]$ nvm install 10.13.0
Downloading and installing node v10.13.0...
Downloading https://nodejs.org/dist/v10.13.0/node-v10.13.0-linux-x64.tar.xz...
############################################################################################# 100.0%
Computing checksum with sha256sum
Checksums matched!
Now using node v10.13.0 (npm v6.4.1)
Creating default alias: default -> 10.13.0 (-> v10.13.0)
#5-4 node.js 설치 확인
[ec2-user@ip-172-31-87-19 ~]$ node -e "console.log('Running Node.js ' + process.version)"
Running Node.js v10.13.0 ~~
→ 뒤에 나오는 문자열을 자바스크립트로 해석해서 실행
소스코드 배포 (P25~42)
#1 git을 이용한 소스코드 배포
#1-1 git 설치에 필요한 패키지를 설치
[ec2-user@ip-172-31-87-19 ~]$ sudo yum install curl-devel expat-devel gettext-devel openssl-devel zlib-devel
#1-2 작업 디렉터리 생성 후 이동
[ec2-user@ip-172-31-87-19 ~]$ cd /var
[ec2-user@ip-172-31-87-19 var]$ sudo mkdir www
[ec2-user@ip-172-31-87-19 var]$ sudo chown ec2-user www
[ec2-user@ip-172-31-87-19 var]$ cd /var/www
[ec2-user@ip-172-31-87-19 www]$
#1-3 github으로부터 소스코드를 가져옴
[ec2-user@ip-172-31-87-19 www]$ git clone https://github.com/deopard/aws-exercise-a.git
Cloning into 'aws-exercise-a'...
remote: Enumerating objects: 39, done.
remote: Total 39 (delta 0), reused 0 (delta 0), pack-reused 39
Unpacking objects: 100% (39/39), done.
[ec2-user@ip-172-31-87-19 www]$ cd aws-exercise-a/
#1-4 소스코드를 확인
[ec2-user@ip-172-31-87-19 aws-exercise-a]$ ll
total 60
-rw-rw-r-- 1 ec2-user ec2-user 294 Mar 8 05:56 app.js
-rw-rw-r-- 1 ec2-user ec2-user 35149 Mar 8 05:56 LICENSE
-rw-rw-r-- 1 ec2-user ec2-user 539 Mar 8 05:56 package.json
-rw-rw-r-- 1 ec2-user ec2-user 13432 Mar 8 05:56 package-lock.json
drwxrwxr-x 2 ec2-user ec2-user 19 Mar 8 05:56 public
[ec2-user@ip-172-31-87-19 aws-exercise-a]$ cat app.js
const express = require('express'); ⇐ 웹 서버 모듈을 포함
const app = express();
app.get('/', (req, res) => { ⇐ / 로 GET 방식의 요청이 들어오면
res.send('AWS exercise의 A project입니다.'); 지정된 메시지를 응답 본문으로 반환
});
app.listen(3000, () => { ⇐ 3000번 포트로 요청을 대기
console.log('Example app listening on port 3000!');
});
app.get('/health', (req, res) => { ⇐ /health 로 GET 방식의 요청이 들어오면
res.status(200).send(); 응답 상태코드의 값을 200으로 설정해서 반환
});
[ec2-user@ip-172-31-87-19 aws-exercise-a]$ cat package.json
{
"name": "aws-exercise-a",
"version": "1.0.0",
"description": "AWS exercise project A",
"main": "index.js",
"scripts": {
"test": "echo \"Error: no test specified\" && exit 1"
},
"repository": {
"type": "git",
"url": "git+https://github.com/deopard/aws-exercise-a.git"
},
"author": "Tom Kim",
"license": "ISC",
"bugs": {
"url": "https://github.com/deopard/aws-exercise-a/issues"
},
"homepage": "https://github.com/deopard/aws-exercise-a#readme",
"dependencies": {
"express": "^4.16.3" ⇐ express 의존 모듈로 등록되어 있음
}
}
#1-5 의존 모듈 설치
[ec2-user@ip-172-31-87-19 aws-exercise-a]$ npm install
added 50 packages from 47 contributors and audited 50 packages in 1.555s
found 0 vulnerabilities
[ec2-user@ip-172-31-87-19 aws-exercise-a]$ ls ./node_modules/
accepts debug finalhandler merge-descriptors parseurl serve-static
array-flatten depd forwarded methods path-to-regexp setprototypeof
body-parser destroy fresh mime proxy-addr statuses
bytes ee-first http-errors mime-db qs type-is
content-disposition encodeurl iconv-lite mime-types range-parser unpipe
content-type escape-html inherits ms raw-body utils-merge
cookie etag ipaddr.js negotiator safe-buffer vary
cookie-signature express media-typer on-finished send
#2 웹 서버와 웹 애플리케이션 서버로 이원화
웹 서버 ⇒ nginx → 정적 자원 요청에 대한 응답
웹 애플리케이션 서버 ⇒ Phusion Passenger → 응용 프로그램의 실행 결과를 반환
#2-1 Phusion Passenger 설치 파일 다운로드
[ec2-user@ip-172-31-87-19 www]$ wget https://s3.amazonaws.com/phusion-passenger/releases/passenger-5.3.6.tar.gz
--2021-03-08 06:13:18-- https://s3.amazonaws.com/phusion-passenger/releases/passenger-5.3.6.tar.gz
Resolving s3.amazonaws.com (s3.amazonaws.com)... 52.216.86.101
Connecting to s3.amazonaws.com (s3.amazonaws.com)|52.216.86.101|:443... connected.
HTTP request sent, awaiting response... 200 OK
Length: 7198910 (6.9M) [application/x-tar]
Saving to: ‘passenger-5.3.6.tar.gz’
100%[==========================================================>] 7,198,910 --.-K/s in 0.08s
2021-03-08 06:13:18 (82.1 MB/s) - ‘passenger-5.3.6.tar.gz’ saved [7198910/7198910]
#2-2 작업 디렉터리 생성 및 압축 해제
[ec2-user@ip-172-31-87-19 www]$ sudo mkdir /var/passenger
[ec2-user@ip-172-31-87-19 www]$ sudo chown ec2-user /var/passenger
[ec2-user@ip-172-31-87-19 www]$ tar -xzvf passenger-5.3.6.tar.gz -C /varpassenger/
#2-3 경로 설정
[ec2-user@ip-172-31-87-19 www]$ echo export PATH=/var/passenger/passenger-5.3.6/bin:$PATH >> ~/.bash_profile
[ec2-user@ip-172-31-87-19 www]$ source ~/.bash_profile
#2-4 rvm 설치
[ec2-user@ip-172-31-87-19 www]$ gpg --keyserver hkp://pool.sks-keyservers.net --recv-keys 409B6B1796C275462A1703113804BB82D39DC0E3 7D2BAF1CF37B13E2069D6956105BD0E739499BDB
[ec2-user@ip-172-31-87-19 www]$ curl -sSL https://get.rvm.io | bash -s stable
[ec2-user@ip-172-31-87-19 www]$ source ~/.rvm/scripts/rvm
[ec2-user@ip-172-31-87-19 www]$ rvm reload
[ec2-user@ip-172-31-87-19 www]$ rvm requirements run
[ec2-user@ip-172-31-87-19 www]$ rvm install 2.4.3
**에러잡기
manpath: can't set the locale; make sure $LC_* and $LANG are correct
manpath: can't set the locale; make sure $LC_* and $LANG are correct
I just installed terminator terminal emulator on my linux mint. for some reason I don't understand, it sets my password to some of the locale options. I've tried several things but they only offer a
stackoverflow.com
#2-5 passenger nginx module 설치
[ec2-user@ip-172-31-87-19 www]$ passenger-install-nginx-module
Welcome to the Phusion Passenger Nginx module installer, v5.3.6.
This installer will guide you through the entire installation process. It
shouldn't take more than 5 minutes in total.
Here's what you can expect from the installation process:
1. This installer will compile and install Nginx with Passenger support.
2. You'll learn how to configure Passenger in Nginx.
3. You'll learn how to deploy a Ruby on Rails application.
Don't worry if anything goes wrong. This installer will advise you on how to
solve any problems.
Press Enter to continue, or Ctrl-C to abort. ⇐ Enter 키 누름
--------------------------------------------
Which languages are you interested in?
Use <space> to select.
If the menu doesn't display correctly, press '!' ⇐ 문자가 깨져 있는 경우 ! 키를 누름
( ) Ruby ⇐ 방향키와 스페이스키를 이용해서
> ( ) Python Node.js만 선택하고 나머지는 해제한 후 Enter 키를 누름
(*) Node.js
( ) Meteor
:
Your system does not have a lot of virtual memory ⇐ 가상 메모리가 부족해서 오류가 발생
Compiling Phusion Passenger works best when you have at least 1024 MB of virtual
memory. However your system only has 983 MB of total virtual memory (983 MB
RAM, 0 MB swap). It is recommended that you temporarily add more swap space
before proceeding. You can do it as follows:
sudo dd if=/dev/zero of=/swap bs=1M count=1024
sudo mkswap /swap
sudo swapon /swap
See also https://wiki.archlinux.org/index.php/Swap for more information about
the swap file on Linux.
If you cannot activate a swap file (e.g. because you're on OpenVZ, or if you
don't have root privileges) then you should install Phusion Passenger through
DEB/RPM packages. For more information, please refer to our installation
documentation:
https://www.phusionpassenger.com/library/install/nginx/
Press Ctrl-C to abort this installer (recommended). ⇐ Ctrl + C 키를 눌러서 설치를 종료
Press Enter if you want to continue with installation anyway.
#2-6 가상 메모리를 증설
[ec2-user@ip-172-31-87-19 www]$ sudo dd if=/dev/zero of=/swap bs=1M count=1024
1024+0 records in
1024+0 records out
1073741824 bytes (1.1 GB) copied, 13.744 s, 78.1 MB/s
[ec2-user@ip-172-31-87-19 www]$ sudo mkswap /swap
mkswap: /swap: insecure permissions 0644, 0600 suggested.
Setting up swapspace version 1, size = 1024 MiB (1073737728 bytes)
no label, UUID=10dd9729-afe4-4916-99d5-c7081ac60845
[ec2-user@ip-172-31-87-19 www]$ sudo swapon /swap
swapon: /swap: insecure permissions 0644, 0600 suggested.
#2-7 재설치
[ec2-user@ip-172-31-87-19 www]$ passenger-install-nginx-module
[Enter]
[!] 후 Node.js만 선택 후 [Enter]
1번 선택
설치 디렉터리를 디폴트로 선택
Permission problems ⇐ 권한 오류가 발생
This installer must be able to write to the following directory:
/opt/nginx
But it can't do that, because you're running the installer as ec2-user.
Please give this installer root privileges, by re-running it with rvmsudo:
export ORIG_PATH="$PATH"
rvmsudo -E /bin/bash
export PATH="$ORIG_PATH"
/home/ec2-user/.rvm/gems/ruby-2.4.3/wrappers/ruby /var/passenger/passenger-5.3.6/bin/passenger-install-nginx-module
#2-8 rvmsudo를 이용해서 루트 권한으로 설치를 진행
[ec2-user@ip-172-31-87-19 www]$ export ORIG_PATH="$PATH"
[ec2-user@ip-172-31-87-19 www]$ rvmsudo -E /bin/bash
Warning: can not check `/etc/sudoers` for `secure_path`, falling back to call via `/usr/bin/env`, this breaks rules from `/etc/sudoers`. Run:
export rvmsudo_secure_path=1
to avoid the warning, put it in shell initialization file to make it persistent.
In case there is no `secure_path` in `/etc/sudoers`. Run:
export rvmsudo_secure_path=0
to avoid the warning, put it in shell initialization file to make it persistent.
[root@ip-172-31-87-19 www]# export PATH="$ORIG_PATH"
[root@ip-172-31-87-19 www]# export rmvsudo_secure_path=1
[root@ip-172-31-87-19 www]# /home/ec2-user/.rvm/gems/ruby-2.4.3/wrappers/ruby /var/passenger/passenger-5.3.6/bin/passenger-install-nginx-module
[Enter]
[!] 후 Node.js만 선택 후 [Enter]
1번 선택
설치 디렉터리를 디폴트로 선택
:
*** 20~30분 정도 소요 ***
:
Nginx with Passenger support was successfully installed.
The Nginx configuration file (/opt/nginx/conf/nginx.conf)
must contain the correct configuration options in order for Phusion Passenger
to function correctly.
This installer has already modified the configuration file for you! The
following configuration snippet was inserted:
http {
...
passenger_root /var/passenger/passenger-5.3.6;
passenger_ruby /home/ec2-user/.rvm/gems/ruby-2.4.3/wrappers/ruby;
...
}
After you start Nginx, you are ready to deploy any number of Ruby on Rails
applications on Nginx.
Press ENTER to continue. ⇐ [Enter]
--------------------------------------------
Deploying a web application
To learn how to deploy a web app on Passenger, please follow the deployment
guide:
https://www.phusionpassenger.com/library/deploy/nginx/deploy/
Enjoy Phusion Passenger, a product of Phusion (www.phusion.nl) :-)
https://www.phusionpassenger.com
Passenger® is a registered trademark of Phusion Holding B.V.
#2-9 ec2-user 계정으로 전환
[root@ip-172-31-87-19 www]# exit
exit
[ec2-user@ip-172-31-87-19 www]$
#2-10 nginx.conf 수정
[ec2-user@ip-172-31-87-19 www]$ sudo vi /opt/nginx/conf/nginx.conf
|
worker_processes 1; events { worker_connections 1024; } http { server_names_hash_bucket_size 256; passenger_root /var/passenger/passenger-5.3.6; passenger_ruby /home/ec2-user/.rvm/gems/ruby-2.4.3/wrappers/ruby; include mime.types; default_type application/octet-stream; sendfile on; #tcp_nopush on; #keepalive_timeout 0; keepalive_timeout 65; #gzip on; server { listen 80; server_name 3.86.104.247; root /var/www/aws-exercise-a/public; passenger_enabled on; passenger_app_type node; passenger_startup_file /var/www/aws-exercise-a/app.js; } } |
#2-11 nginx 서비스를 시작 후 확인
[ec2-user@ip-172-31-87-19 www]$ sudo /opt/nginx/sbin/nginx

nginx 구동 ⇒ sudo /opt/nginx/sbin/nginx
nginx 중지 ⇒ sudo /opt/nginx/sbin/nginx -s stop
nginx 재구동 ⇒ sudo /opt/nginx/sbin/nginx -s reload
#3 nginx, Phusion Passenger 서비스 명령어 추가
#3-1 /etc/init.d 경로(서비스 스크립트가 존재하는 경로)에 스크립트를 추가
[ec2-user@ip-172-31-87-19 init.d]$ sudo vi nginx
|
#!/bin/sh # # nginx - this script starts and stops the nginx daemin # # chkconfig: - 85 15 # description: Nginx is an HTTP(S) server, HTTP(S) reverse \ # proxy and IMAP/POP3 proxy server # processname: nginx # config: /opt/nginx/conf/nginx.conf # pidfile: /opt/nginx/logs/nginx.pid # modified from http://articles.slicehost.com/2009/2/2/centos-adding-an-nginx-init-script # Source function library. . /etc/rc.d/init.d/functions # Source networking configuration. . /etc/sysconfig/network # Check that networking is up. [ "$NETWORKING" = "no" ] && exit 0 nginx="/opt/nginx/sbin/nginx" prog=$(basename $nginx) NGINX_CONF_FILE="/opt/nginx/conf/nginx.conf" lockfile=/var/lock/subsys/nginx start() { [ -x $nginx ] || exit 5 [ -f $NGINX_CONF_FILE ] || exit 6 echo -n $"Starting $prog: " daemon $nginx -c $NGINX_CONF_FILE retval=$? echo [ $retval -eq 0 ] && touch $lockfile return $retval } stop() { echo -n $"Stopping $prog: " killproc $prog -QUIT retval=$? echo [ $retval -eq 0 ] && rm -f $lockfile return $retval } restart() { configtest || return $? stop start } reload() { configtest || return $? echo -n $"Reloading $prog: " killproc $nginx -HUP RETVAL=$? echo } force_reload() { restart } configtest() { $nginx -t -c $NGINX_CONF_FILE } rh_status() { status $prog } rh_status_q() { rh_status >/dev/null 2>&1 } case "$1" in start) rh_status_q && exit 0 $1 ;; stop) rh_status_q || exit 0 $1 ;; restart|configtest) $1 ;; reload) rh_status_q || exit 7 $1 ;; force-reload) force_reload ;; status) rh_status ;; condrestart|try-restart) rh_status_q || exit 0 ;; *) echo $"Usage: $0 {start|stop|status|restart|condrestart|try-restart|reload|force-reload|configtest}" exit 2 esac |
[ec2-user@ip-172-31-87-19 init.d]$ sudo chmod 755 nginx
[ec2-user@ip-172-31-87-19 init.d]$ sudo service nginx stop ⇐ nginx 서비스 중지
Reloading systemd: [ OK ]
Stopping nginx (via systemctl): [ OK ]
[ec2-user@ip-172-31-87-19 init.d]$ sudo service nginx start ⇐ nginx 서비스 실행
Starting nginx (via systemctl): [ OK ]
[ec2-user@ip-172-31-87-19 init.d]$ sudo service nginx status ⇐ nginx 서비스 상태 확인
● nginx.service - SYSV: Nginx is an HTTP(S) server, HTTP(S) reverse proxy and IMAP/POP3 proxy server
Loaded: loaded (/etc/rc.d/init.d/nginx; bad; vendor preset: disabled)
Active: active (running) since Mon 2021-03-08 07:39:17 UTC; 1min 10s ago
Docs: man:systemd-sysv-generator(8)
Process: 621 ExecStart=/etc/rc.d/init.d/nginx start (code=exited, status=0/SUCCESS)
Main PID: 32562 (nginx)
CGroup: /system.slice/nginx.service
‣ 32562 nginx: master process /opt/nginx/sbin/nginx
Mar 08 07:39:17 ip-172-31-87-19.ec2.internal systemd[1]: Starting SYSV: Nginx is an HTTP(S) server, HTTP(S) reverse proxy and IMAP/POP3...ver...
Mar 08 07:39:17 ip-172-31-87-19.ec2.internal systemd[1]: Started SYSV: Nginx is an HTTP(S) server, HTTP(S) reverse proxy and IMAP/POP3 ...erver.
Hint: Some lines were ellipsized, use -l to show in full.
#3-2 시스템 시작 시 자동 시작 서비스 등록
[ec2-user@ip-172-31-87-19 init.d]$ sudo chkconfig --add nginx
[ec2-user@ip-172-31-87-19 init.d]$ sudo ntsysv

#4 하나의 서버에서 두 개의 애플리케이션을 서비스
#4-1 애플리케이션을 추가 설정
[ec2-user@ip-172-31-87-19 init.d]$ cd /var/www
[ec2-user@ip-172-31-87-19 www]$ git clone https://github.com/deopard/aws-exercise-b.git
Cloning into 'aws-exercise-b'...
remote: Enumerating objects: 10, done.
remote: Total 10 (delta 0), reused 0 (delta 0), pack-reused 10
Unpacking objects: 100% (10/10), done.
[ec2-user@ip-172-31-87-19 www]$ cd aws-exercise-b
[ec2-user@ip-172-31-87-19 aws-exercise-b]$ ll
total 24
-rw-rw-r-- 1 ec2-user ec2-user 294 Mar 8 07:47 app.js
-rw-rw-r-- 1 ec2-user ec2-user 539 Mar 8 07:47 package.json
-rw-rw-r-- 1 ec2-user ec2-user 13432 Mar 8 07:47 package-lock.json
drwxrwxr-x 2 ec2-user ec2-user 19 Mar 8 07:47 public
[ec2-user@ip-172-31-87-19 aws-exercise-b]$ cat app.js
const express = require('express');
const app = express();
app.get('/', (req, res) => {
res.send('AWS exercise의 B project입니다.');
});
app.listen(3000, () => {
console.log('Example app listening on port 3000!');
});
app.get('/health', (req, res) => {
res.status(200).send();
});
[ec2-user@ip-172-31-87-19 aws-exercise-b]$ npm install
added 50 packages from 47 contributors and audited 50 packages in 1.357s ⇐ aws-exercise-a 모듈을 실행할 때
found 0 vulnerabilities 이미 필요한 것을 모두 설치
#4-2 aws-exercise-b로 라우팅될 수 있도록 nginx.conf 파일을 server 요소를 추가
[ec2-user@ip-172-31-87-19 aws-exercise-b]$ sudo vi /opt/nginx/conf/nginx.conf
|
worker_processes 1; events { worker_connections 1024; } http { server_names_hash_bucket_size 256; passenger_root /var/passenger/passenger-5.3.6; passenger_ruby /home/ec2-user/.rvm/gems/ruby-2.4.3/wrappers/ruby; include mime.types; default_type application/octet-stream; sendfile on; #tcp_nopush on; #keepalive_timeout 0; keepalive_timeout 65; #gzip on; server { listen 80; server_name 3.86.104.247; # EC2 인스턴스의 퍼블릭 IP root /var/www/aws-exercise-a/public; passenger_enabled on; passenger_app_type node; passenger_startup_file /var/www/aws-exercise-a/app.js; } server { listen 80; server_name ec2-3-86-104-247.compute-1.amazonaws.com; # EC2 인스턴스의 퍼블릭 DNS root /var/www/aws-exercise-b/public; passenger_enabled on; passenger_app_type node; passenger_startup_file /var/www/aws-exercise-b/app.js; } } |
#4-3 서버 재실행 후 접속 테스트
[ec2-user@ip-172-31-87-19 aws-exercise-b]$ sudo service nginx restart
Restarting nginx (via systemctl): [ OK ]


AWS Auto Scaling 그룹을 이용한 다중 서버 구성 (P44)
#1 Auto Scaling 그룹 생성 (P48)
#1-1 인스턴스 중지

#1-2 스냅샷 생성
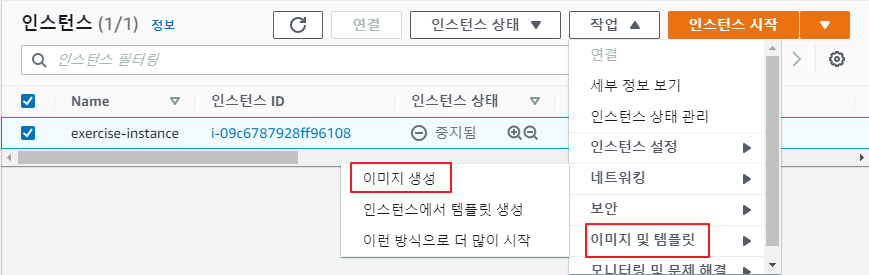


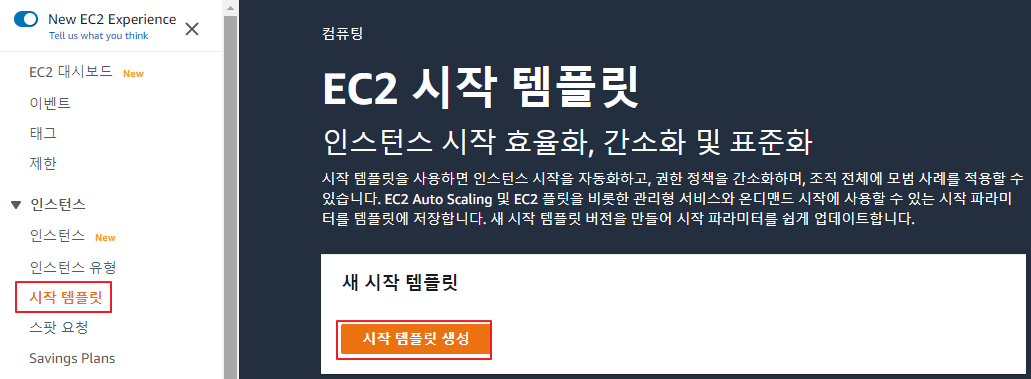
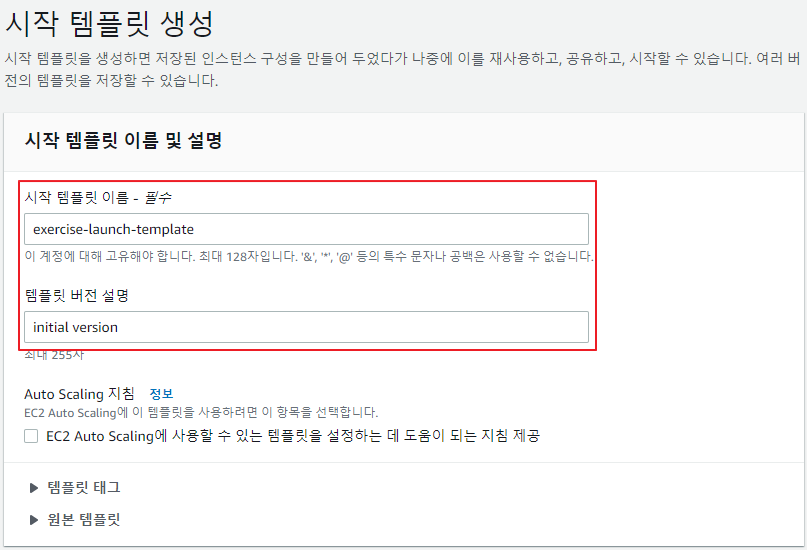
#1-3 시작 템플릿 생성
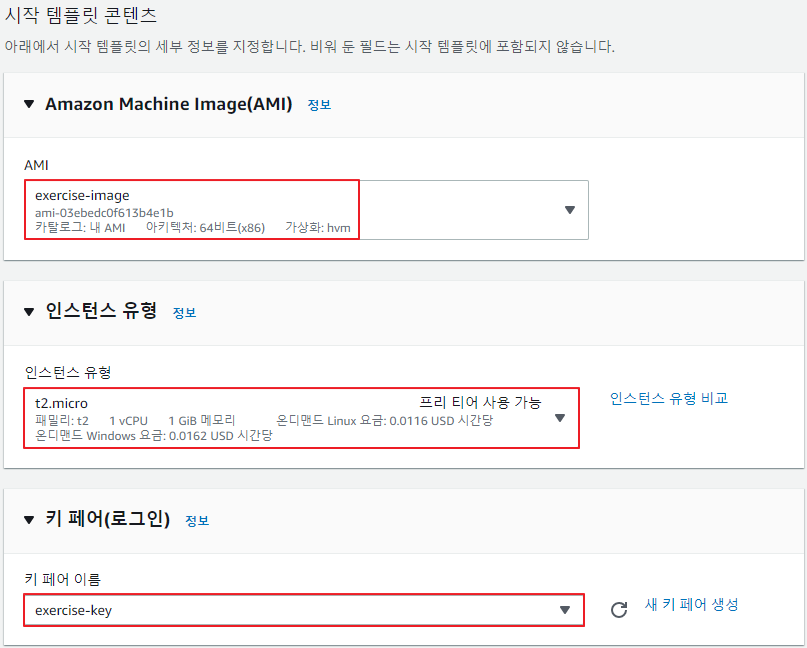


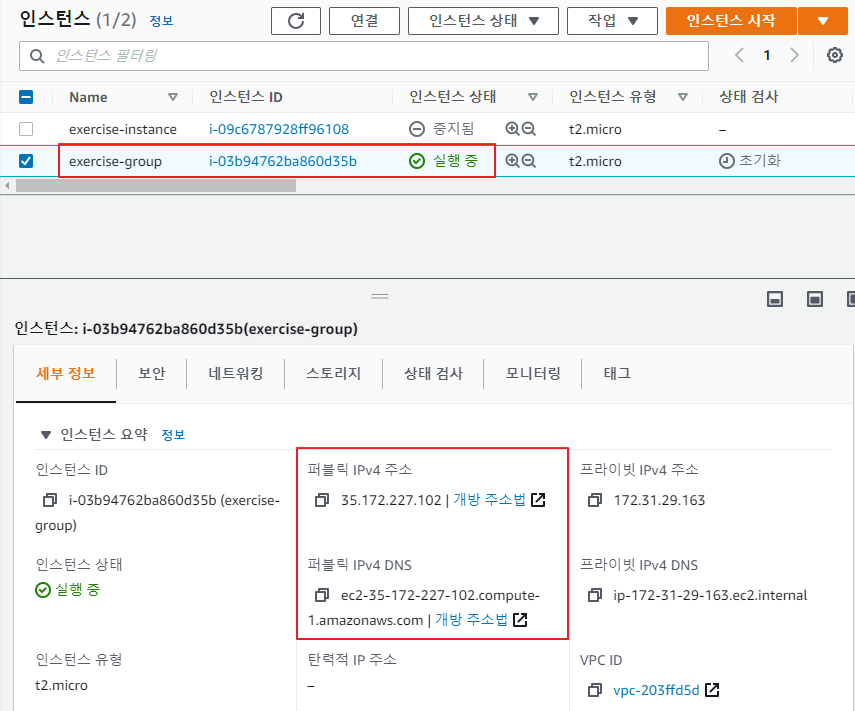
#1-4 Auto Scaling 그룹 생성

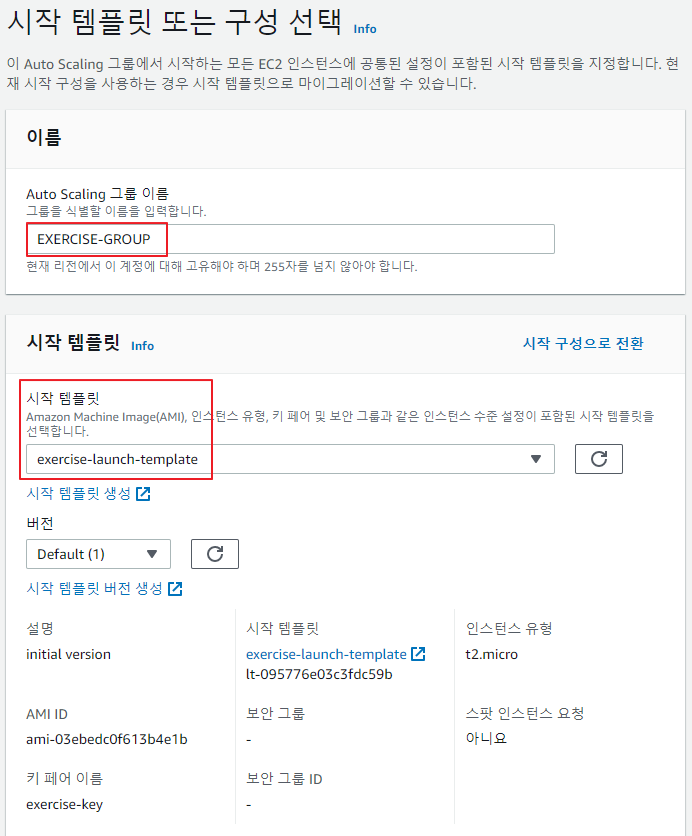

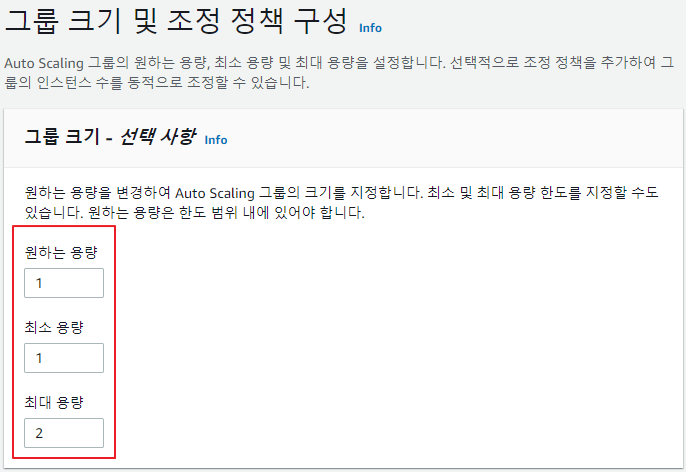
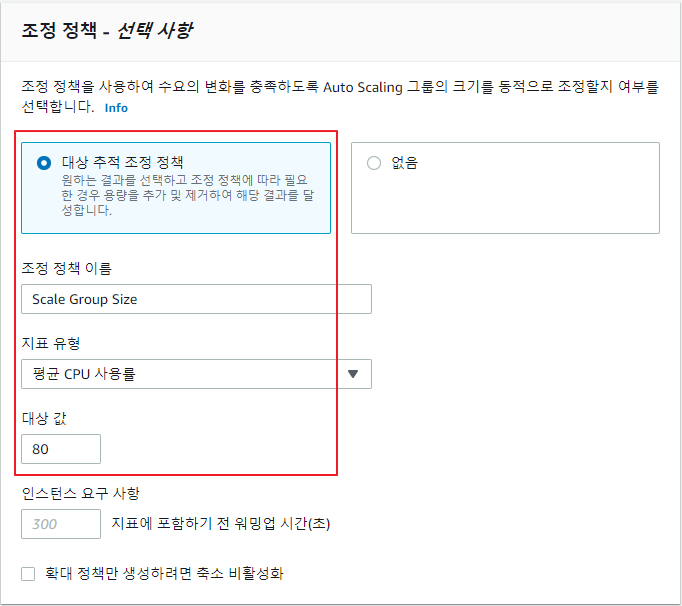

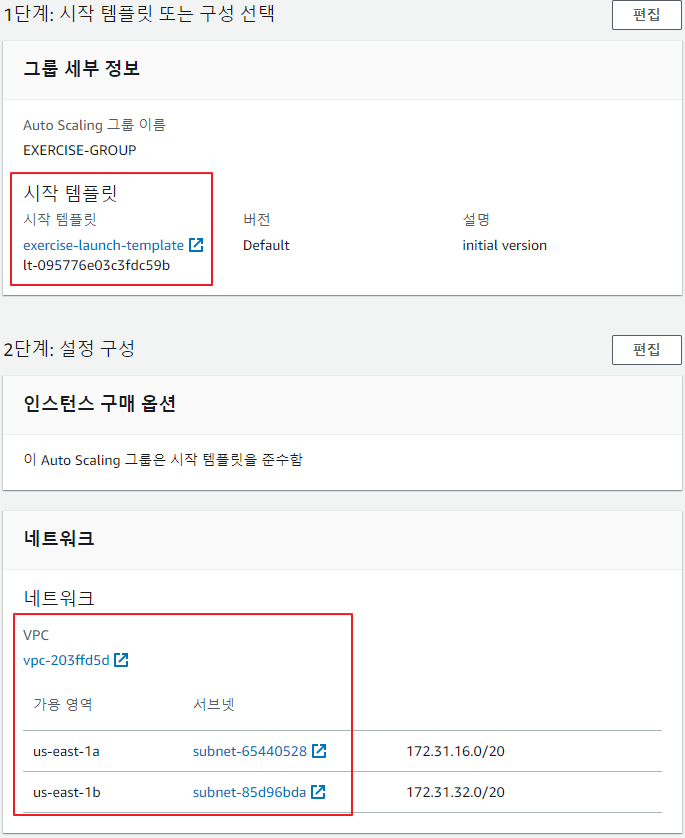

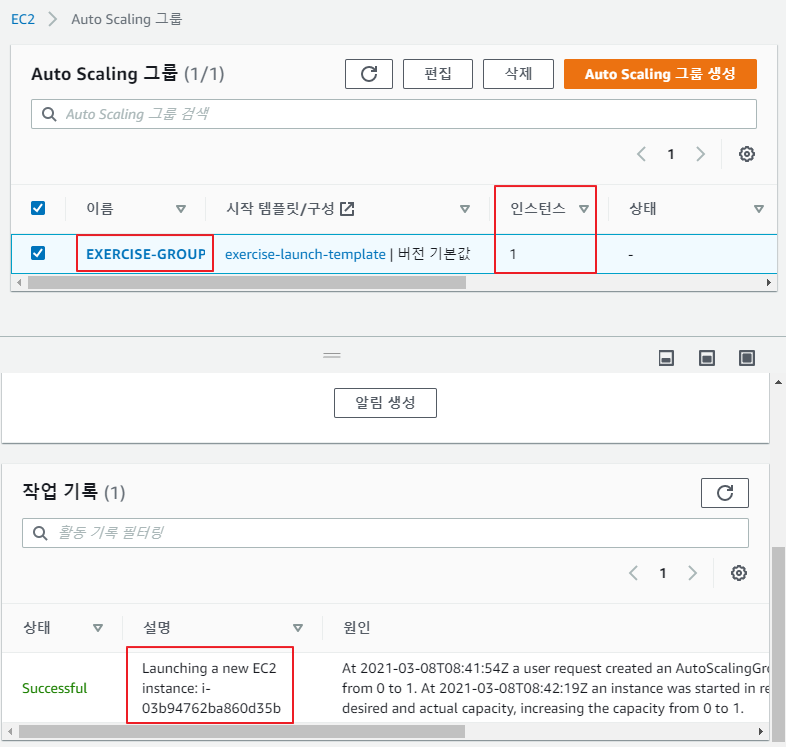
Auto Scaling 그룹을 생성하면 인스턴스가 하나 자동으로 생성되는 것을 확인
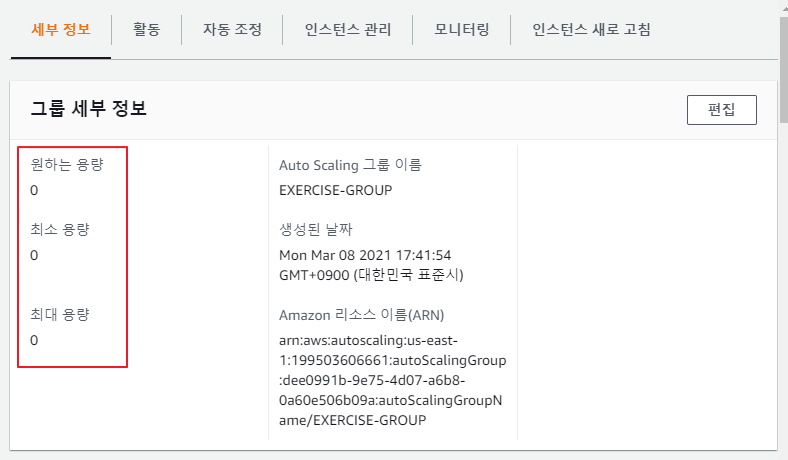
Auto Scaling Group 설정에 인스턴스를 모두 종료

'CLOUD > AWS' 카테고리의 다른 글
| 3/10 - AWS 9차시 (0) | 2021.03.10 |
|---|---|
| 3/9 - AWS 8차시 (0) | 2021.03.09 |
| 3/5 - A Cloud Guru를 이용한 AWS 6차시 (0) | 2021.03.05 |
| 3/4 - A Cloud Guru를 이용한 AWS 5차시 (0) | 2021.03.04 |
| 3/3 - A Cloud Guru를 이용한 AWS 4차시 (0) | 2021.03.03 |