Troubleshooting AWS Network Connectivity: Security Groups and NACLs

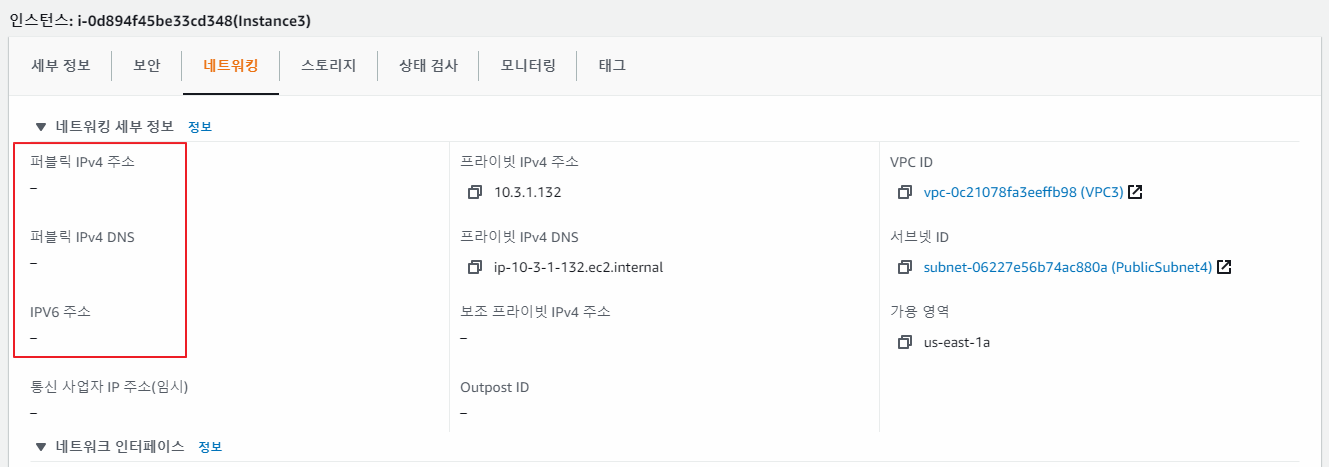
각 인스턴스에 SSH 접속 또는 ping 테스트를 시도 ⇒ Instance3은 퍼블릭 IP가 없어서 접근이 불가

Instance3에 퍼블릭 IP를 할당 ⇒ EIP 생성 후 인스턴스에 할당

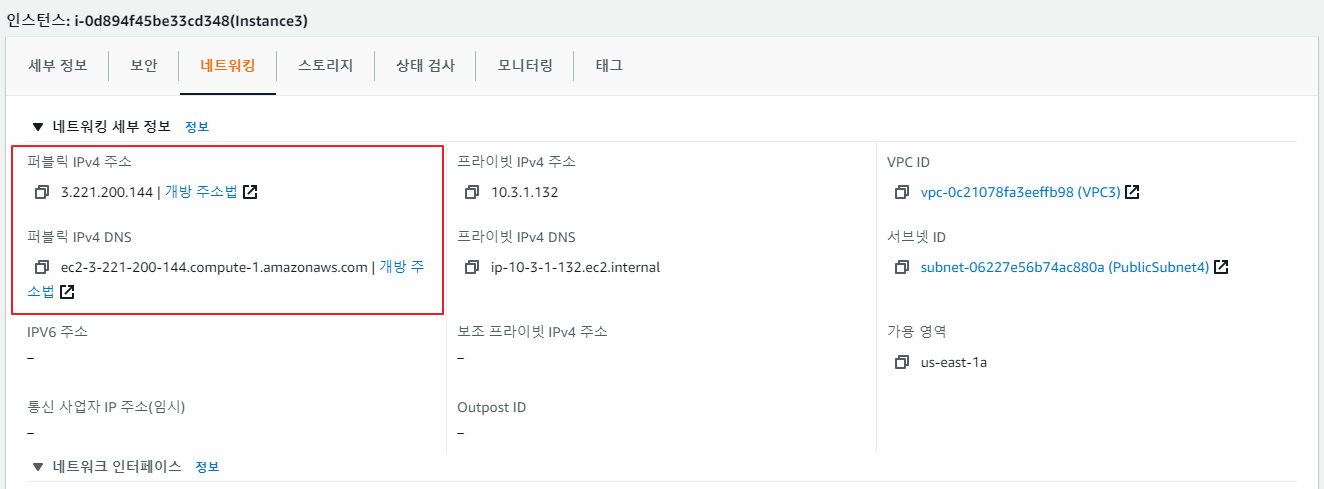
다시 Instance3으로 접속 테스트 ⇒ 접속되지 않는 것을 확인 ⇒ 연결된 보안그룹 설정을 확인
인바운드로 SSH, ICMP 연결을 허용하고, 아웃바운드로 모든 포트를 허용하고 있으므로 보안그룹 설정에는 문제가 없음

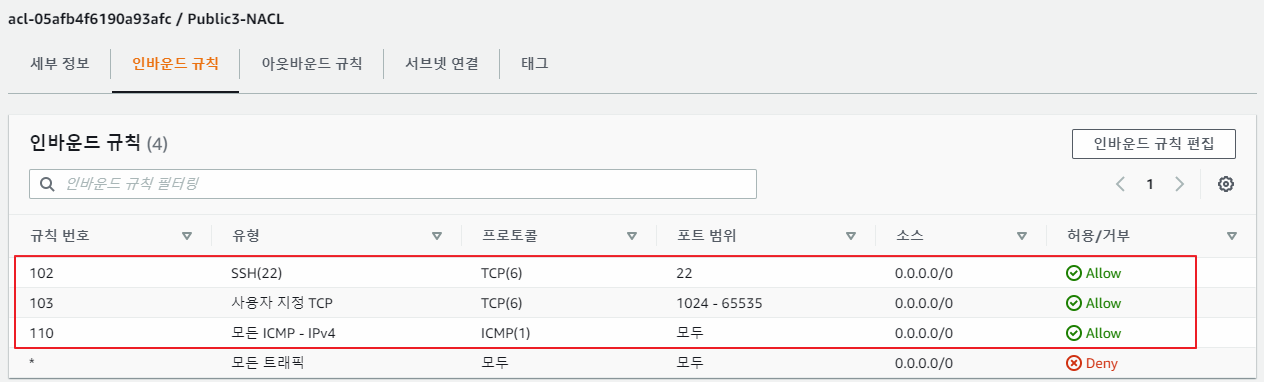
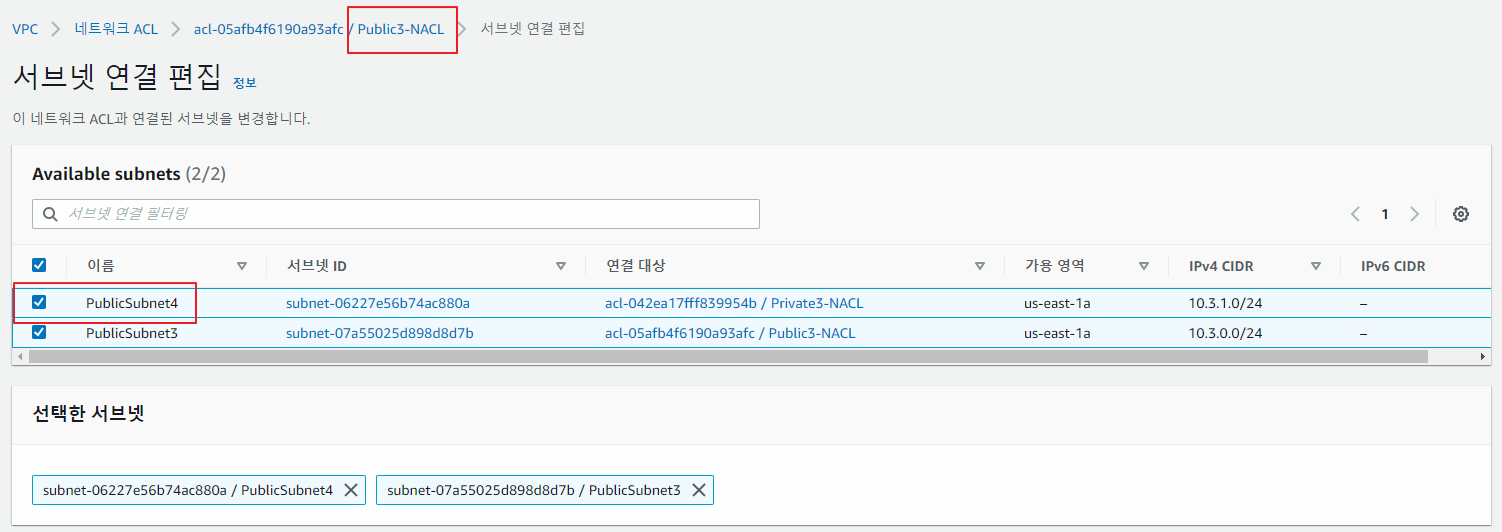
Instance3가 속해 있는 PublicSubnet4와 연결된 Private4-NACL 설정을 확인
⇒ 모든 트래픽을 차단하고 있음

가장 설정이 유사한 Public3-NACL을 PublicSubnet4에 연결

여전히 접속되지 않는 것을 확인 ⇒ 라우팅 테이블을 확인
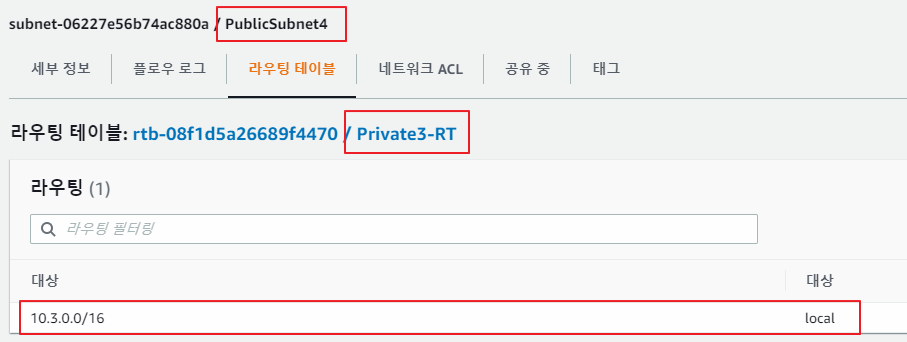
인터넷 게이트웨이로 라우팅을 추가
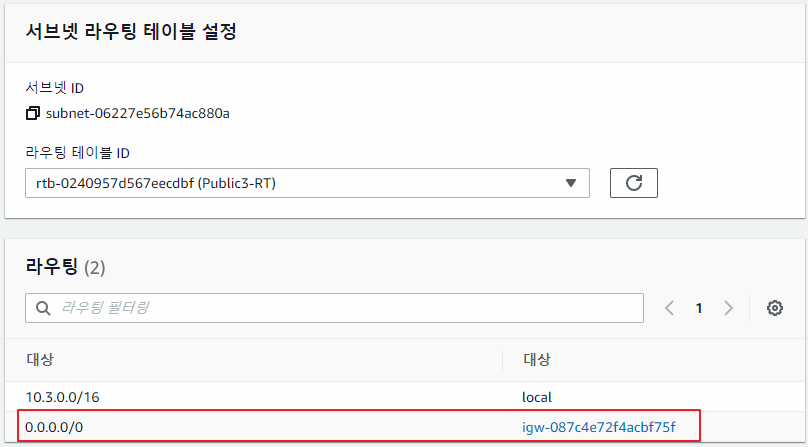
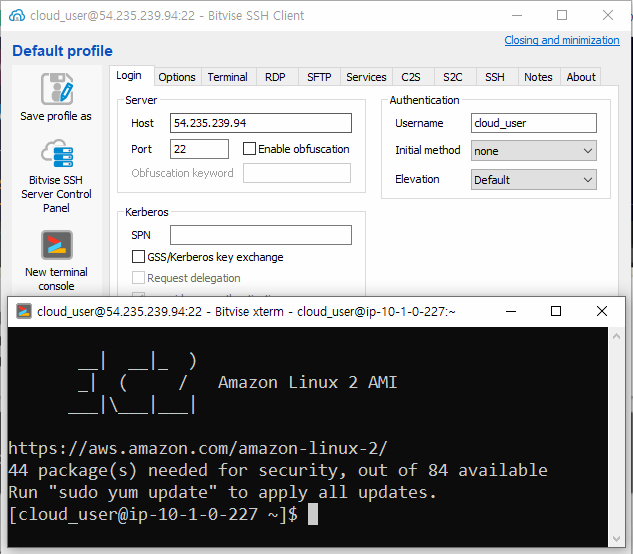
연결을 확인 ⇒ ping 테스트, SSH 접속 모두 성공
C:\Users\i>ping 3.221.200.144
Ping 3.221.200.144 32바이트 데이터 사용:
3.221.200.144의 응답: 바이트=32 시간=193ms TTL=223
3.221.200.144의 응답: 바이트=32 시간=195ms TTL=223
3.221.200.144의 응답: 바이트=32 시간=192ms TTL=223
3.221.200.144의 응답: 바이트=32 시간=193ms TTL=223
3.221.200.144에 대한 Ping 통계:
패킷: 보냄 = 4, 받음 = 4, 손실 = 0 (0% 손실),
왕복 시간(밀리초):
최소 = 192ms, 최대 = 195ms, 평균 = 193ms


Public IP, Private IP key 파일 잘 보관 후,
보안그룹, 서브넷, 라우팅, NACL, IGW와 연결이 잘되어있는지 확인
private_key -> ssh로 해당하는 가상머신에 접근가능
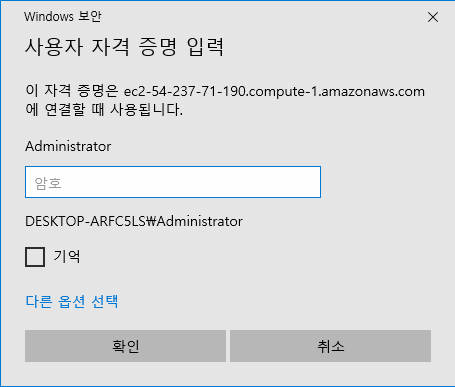
Create a Windows EC2 Instance and Connect using Remote Desktop Protocol (RDP)


Windows EC2 인스턴스의 경우에는 일반적으로 RDP(원격 데스크탑 프로토콜)를 사용해서 연결
~~~~~~~~~~~~~~~~~~~~~~~~~~~
Windows 컴퓨터를 관리하기 위한 GUI
VPC 서비스 확인
-
라우팅 테이블 → IGW와 연결을 확인
-
NACL → RDP 접속을 허용
-
SG → 모든 접속을 허용
RDP 전용 보안그룹을 생성


Windows EC2 인스턴스를 생성


RDP 연결을 위한 접속지 정보와 계정 정보 확인


(2) 접속지 정보가 포함된 파일 ⇒ 원격 데스크탑 연결 기능으로 직접 연결할 수도 있음
(3) 암호 가져오기 기능을 인스턴스 생성 후 약 4분 후에 정상적으로 동작
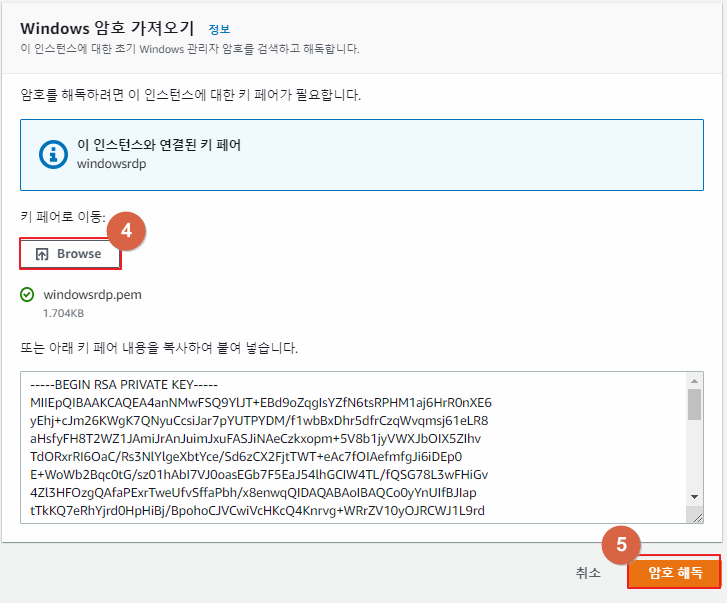
(4) Browser 버튼을 클릭 후 인스턴스 생성 시 다운로드 받은 개인 키 파일(windowsrdp.perm)을 선택

(6) RDP 접속에 필요한 패스워드를 확인
(3)에서 다운로드 받은 원격 데스크탑 파일을 실행 (또는 원격 데스크탑 연결)
(6)에서 생성한 패스워드로 원격접속

Creating Your Own EC2 Workstation in the AWS Consol
Workstation = AWS CLI로 AWS 인스턴스를 생성하고 관리할 수 있는 권한을 가진 인스턴스
~~~
Command Line Interface <-> GUI

EC2 인스턴스 생성 후 해당 인스턴스를 통해 S3 버킷을 생성하고, SNS 문자 메시지 전송
~~~~~~~~~~~~ ⇒ 워크스테이션 ~~~~~~~ ~~~ Simple Notification Serivce = 통지 서비스
EC2 인스턴스를 생성


EC2InstanceCDALabRole ⇒ EC2 인스턴스에서 AWS 내의 다양한 작업을 수행할 수 있는 권한을 부여
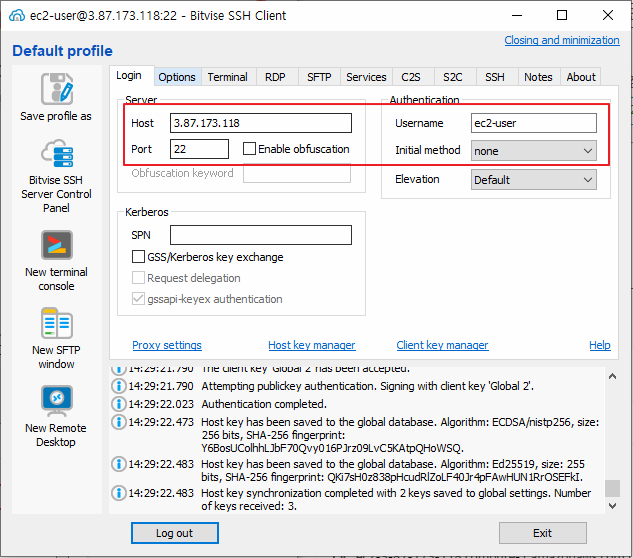
SSH 클라이언트를 이용해서 EC2 인스턴스에 접속

인스턴스의 퍼블릭 IP 주소를 확인
인스턴스 생성 시 발급받은 개인키를 등록
ec2-user 계정으로 접속
aws config 명령어로 기본 지역(region)을 us-east-1로 설정
[ec2-user@ip-10-0-0-63 ~]$ aws dynamodb list-tables
You must specify a region. You can also configure your region by running "aws configure".
[ec2-user@ip-10-0-0-63 ~]$ aws configure
AWS Access Key ID [None]:
AWS Secret Access Key [None]:
Default region name [None]: us-east-1
Default output format [None]:
DynamoDB에 테이블 목록을 조회
[ec2-user@ip-10-0-0-63 ~]$ aws dynamodb list-tables
{
"TableNames": []
}
DynamoDB CLI 명령어 ⇒ https://docs.aws.amazon.com/cli/latest/reference/dynamodb/index.html
https://docs.aws.amazon.com/cli/latest/reference/dynamodb/list-tables.html
S3 버킷 목록 생성 및 조회
[ec2-user@ip-10-0-0-63 ~]$ aws s3 ls
⇒ https://docs.aws.amazon.com/cli/latest/reference/s3/index.html
⇒ https://docs.aws.amazon.com/cli/latest/reference/s3/ls.html
[ec2-user@ip-10-0-0-63 ~]$ aws s3 mb s3://myanjini-20210302
make_bucket failed: s3://myanjini-20210302 An error occurred (OperationAborted) when calling the CreateBucket operation: A conflicting conditional operation is currently in progress against this resource. Please try again.
⇐ 동일한 이름의 버킷이 존재하므로 오류가 발생
[ec2-user@ip-10-0-0-63 ~]$ aws s3 mb s3://myanjini-20210302-v2
make_bucket: myanjini-20210302-v2
[ec2-user@ip-10-0-0-63 ~]$ aws s3 ls
2021-03-02 05:37:24 myanjini-20210302-v2 ⇐ 생성한 버킷이 조회
boto3(Python API) SDK를 이용한 SNS 서비스
https://boto3.amazonaws.com/v1/documentation/api/latest/index.html
https://boto3.amazonaws.com/v1/documentation/api/latest/reference/services/sns.html#SNS.Client.publish
[ec2-user@ip-10-0-0-63 ~]$ pip install boto3 ⇐ boto3 설치
-bash: pip: command not found ⇐ pip 명령어가 없음
[ec2-user@ip-10-0-0-63 ~]$ python --version ⇐ python 버전 확인 후 버전에 맞는 설치 스크립트를 가져와서 설치
Python 2.7.18
[ec2-user@ip-10-0-0-63 ~]$ curl -O https://bootstrap.pypa.io/2.7/get-pip.py
% Total % Received % Xferd Average Speed Time Time Time Current
Dload Upload Total Spent Left Speed
100 1863k 100 1863k 0 0 14.9M 0 --:--:-- --:--:-- --:--:-- 14.7M
[ec2-user@ip-10-0-0-63 ~]$ python get-pip.py --user
DEPRECATION: Python 2.7 reached the end of its life on January 1st, 2020. Please upgrade your Python as Python 2.7 is no longer maintained. pip 21.0 will drop support for Python 2.7 in January 2021. More details about Python 2 support in pip can be found at https://pip.pypa.io/en/latest/development/release-process/#python-2-support pip 21.0 will remove support for this functionality.
Collecting pip<21.0
Downloading pip-20.3.4-py2.py3-none-any.whl (1.5 MB)
|████████████████████████████████| 1.5 MB 15.1 MB/s
Collecting wheel
Downloading wheel-0.36.2-py2.py3-none-any.whl (35 kB)
Installing collected packages: pip, wheel
Successfully installed pip-20.3.4 wheel-0.36.2
[ec2-user@ip-10-0-0-63 ~]$ pip --version ⇐ pip 설치 여부 확인
pip 20.3.4 from /home/ec2-user/.local/lib/python2.7/site-packages/pip (python 2.7)
[ec2-user@ip-10-0-0-63 ~]$ pip install boto3 ⇐ boto3 설치
DEPRECATION: Python 2.7 reached the end of its life on January 1st, 2020. Please upgrade your Python as Python 2.7 is no longer maintained. pip 21.0 will drop support for Python 2.7 in January 2021. More details about Python 2 support in pip can be found at https://pip.pypa.io/en/latest/development/release-process/#python-2-support pip 21.0 will remove support for this functionality.
Defaulting to user installation because normal site-packages is not writeable
Collecting boto3
Downloading boto3-1.17.18-py2.py3-none-any.whl (130 kB)
|████████████████████████████████| 130 kB 16.7 MB/s
Requirement already satisfied: jmespath<1.0.0,>=0.7.1 in /usr/lib/python2.7/site-packages (from boto3) (0.9.3)
Collecting botocore<1.21.0,>=1.20.18
Downloading botocore-1.20.18-py2.py3-none-any.whl (7.3 MB)
|████████████████████████████████| 7.3 MB 39.5 MB/s
Requirement already satisfied: s3transfer<0.4.0,>=0.3.0 in /usr/lib/python2.7/site-packages (from boto3) (0.3.3)
Requirement already satisfied: python-dateutil<3.0.0,>=2.1 in /usr/lib/python2.7/site-packages (from botocore<1.21.0,>=1.20.18->boto3) (2.6.0)
Requirement already satisfied: urllib3<1.27,>=1.25.4 in /usr/lib/python2.7/site-packages (from botocore<1.21.0,>=1.20.18->boto3) (1.25.7)
Requirement already satisfied: futures<4.0.0,>=2.2.0 in /usr/lib/python2.7/site-packages (from s3transfer<0.4.0,>=0.3.0->boto3) (3.0.5)
Requirement already satisfied: six>=1.5 in /usr/lib/python2.7/site-packages (from python-dateutil<3.0.0,>=2.1->botocore<1.21.0,>=1.20.18->boto3) (1.9.0)
Installing collected packages: botocore, boto3
ERROR: pip's legacy dependency resolver does not consider dependency conflicts when selecting packages. This behaviour is the source of the following dependency conflicts.
awscli 1.18.147 requires botocore==1.18.6, but you'll have botocore 1.20.18 which is incompatible.
Successfully installed boto3-1.17.18 botocore-1.20.18
>>> import boto3
>>> sns = boto3.client('sns')
/home/ec2-user/.local/lib/python2.7/site-packages/boto3/compat.py:86: PythonDeprecationWarning: Boto3 will no longer support Python 2.7 starting July 15, 2021. To continue receiving service updates, bug fixes, and security updates please upgrade to Python 3.6 or later. More information can be found here: https://aws.amazon.com/blogs/developer/announcing-end-of-support-for-python-2-7-in-aws-sdk-for-python-and-aws-cli-v1/
warnings.warn(warning, PythonDeprecationWarning)
>>> sns.publish(PhoneNumber='+821012345678', Message='안녕, AWS')
{'ResponseMetadata': {'RetryAttempts': 0, 'HTTPStatusCode': 200, 'RequestId': 'ad4a0b4b-a0f6-5dab-9da0-53fc733cfc2a', 'HTTPHeaders': {'x-amzn-requestid': 'ad4a0b4b-a0f6-5dab-9da0-53fc733cfc2a', 'date': 'Tue, 02 Mar 2021 05:47:53 GMT', 'content-length': '294', 'content-type': 'text/xml'}}, u'MessageId': 'c9bd7ca9-9e82-5c5d-924a-241e4d48addc'}
PC에 AWS CLI 다운로드 및 설치
Windows ⇒ https://docs.aws.amazon.com/ko_kr/cli/latest/userguide/install-cliv2-windows.html
MacOS ⇒ https://docs.aws.amazon.com/ko_kr/cli/latest/userguide/install-cliv2-mac.html
***Mac python version문제 해결
https://wookiist.tistory.com/39
Create a Custom AMI in AWS
AWS에서 제공하는 AMI에는 운영체제만 포함되어 있으므로, 서비스에 필요한 응용 프로그램은 별도의 설치 과정이 필요
→ 오토 스케일링 등의 환경에서 인스턴스 시작과 별도로 응용 프로그램 설치 및 설정에 추가 시간(지연, 대기)이 발생
⇒ 사용자 지정 AMI를 생성해서 사전 구성된 인스턴스를 시작하면 응용 프로그램 설치 및 설정 시간을 단축할 수 있음
인스턴스 생성 후 아래의 명령어를 실행
[ec2-user@ip-10-0-0-250 ~]$ sudo yum update -y
[ec2-user@ip-10-0-0-250 ~]$ sudo yum install -y httpd php
[ec2-user@ip-10-0-0-250 ~]$ sudo service httpd start
[ec2-user@ip-10-0-0-250 ~]$ sudo chkconfig httpd on
[ec2-user@ip-10-0-0-250 ~]$ sudo usermod -a -G apache ec2-user
[ec2-user@ip-10-0-0-250 ~]$ sudo chown -R ec2-user:apache /var/www
[ec2-user@ip-10-0-0-250 ~]$ echo "<?php phpinfo(); ?>" > /var/www/html/phpinfo.php
현재 인스턴스의 상태를 사용자 정의 AMI로 생성
사용자 정의 AMI를 이용해서 인스턴스를 만들 때 ⇒ 이미지를 만들 때와 동일한 리전에서만 인스턴스 생성이 가능
만약, 다른 리전에 인스턴를 생성할 경우에는 AMI 이미지를 복사해서 사용


사용자 정의 AMI를 이용해서 인스턴스를 생성
⇒ 응용 프로그램 설치 및 설정 시간을 단축할 수 있음
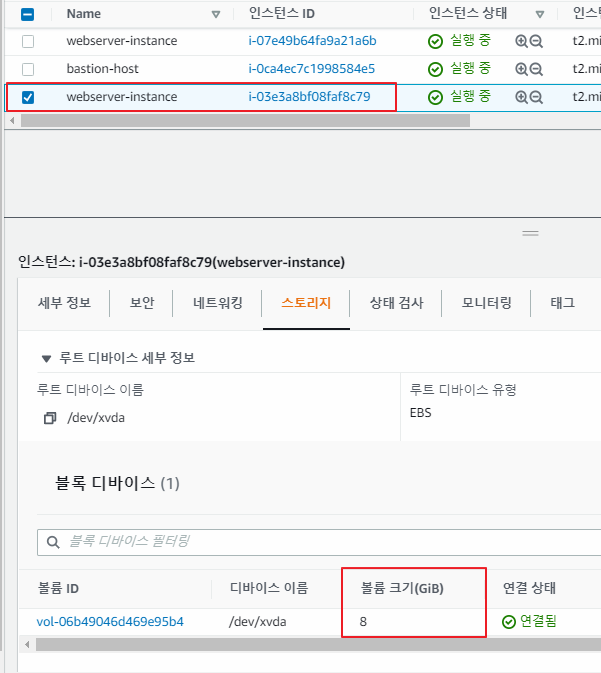
Resizing Root AWS EBS Volumes to Increase Performance
루트 볼륨의 크기를 조정 ⇐ IOPS(Input/Output Operations Per Second: 아이옵스) 향상을 위해서
-
독립형 인스턴스 (배스천 호스트)
-
Auto Scaling Group (2개의 웹 서버 인스턴스)

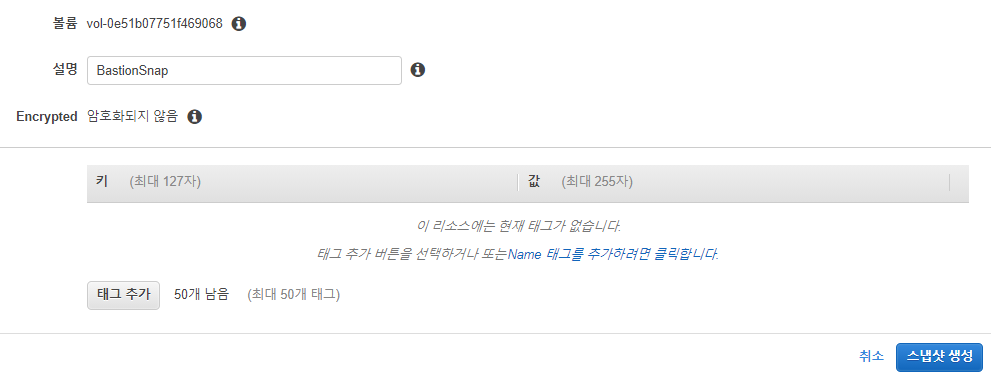
# EBS 스냅샷 생성
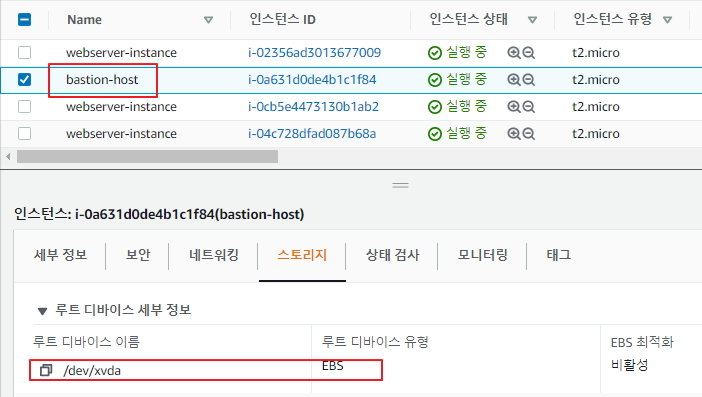
루트 디바이스의 볼륨 ID 링크를 클릭 후 작업에서 스냅샷 생성을 선택

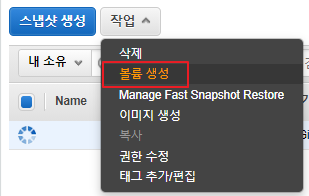
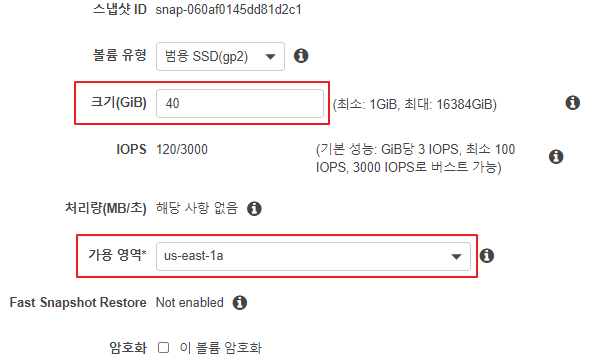
# 더 큰 크기의 EBS 볼륨을 생성

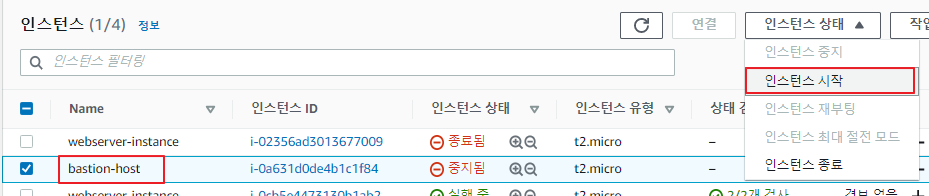
# 생성한 볼륨을 EC2 인스턴스에 적용


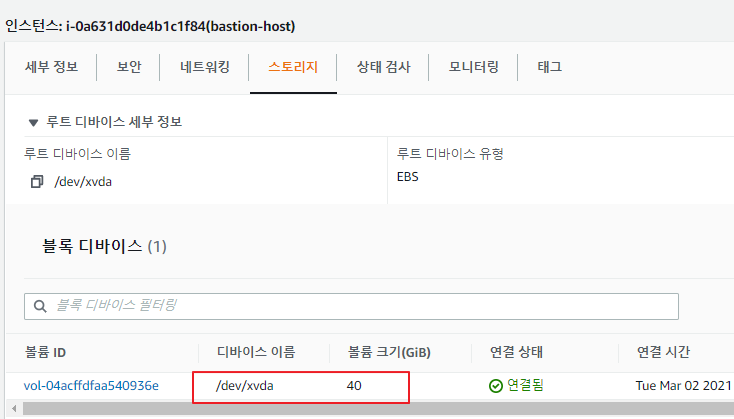
[cloud_user@ip-10-99-1-27 ~]$ lsblk
NAME MAJ:MIN RM SIZE RO TYPE MOUNTPOINT
xvda 202:0 0 40G 0 disk ⇐ 확인
└─xvda1 202:1 0 40G 0 part /
Auto-Scaling이 설정된 경우
#1 인스턴스를 확인

#2 Auth Scaling 확인
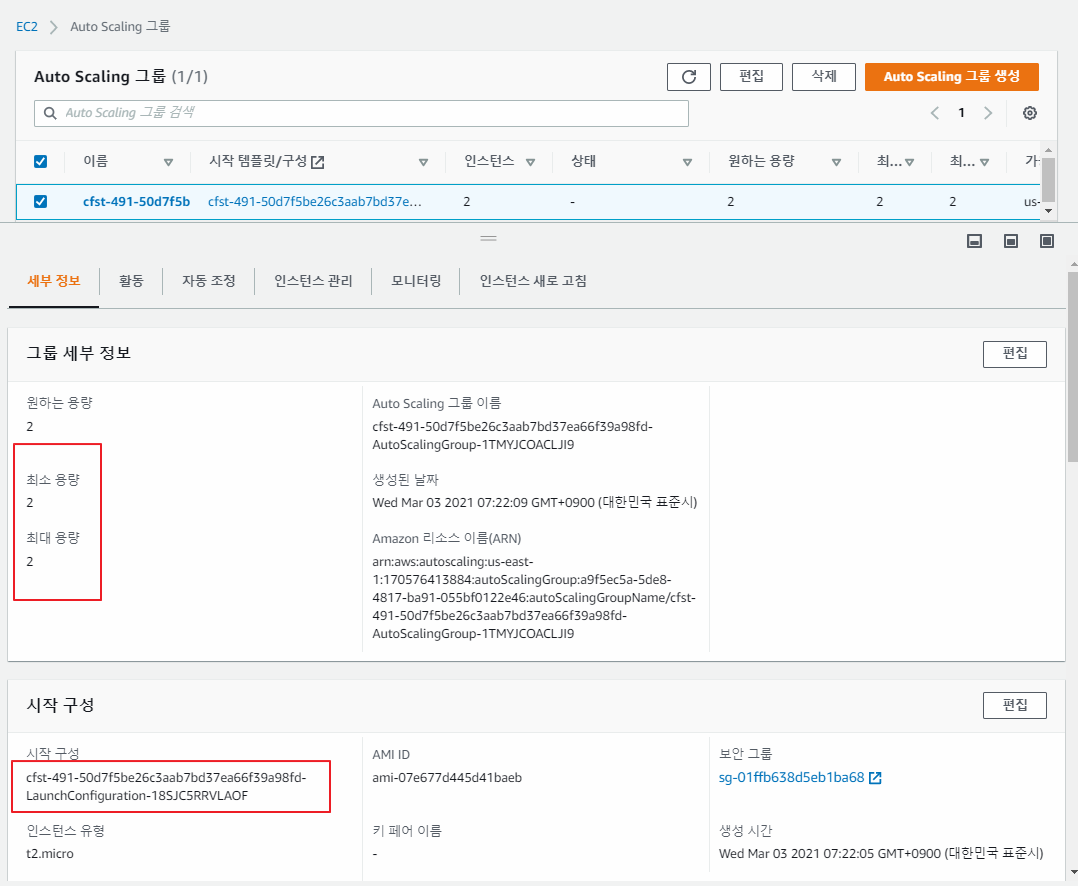
#3 시작 구성을 확인


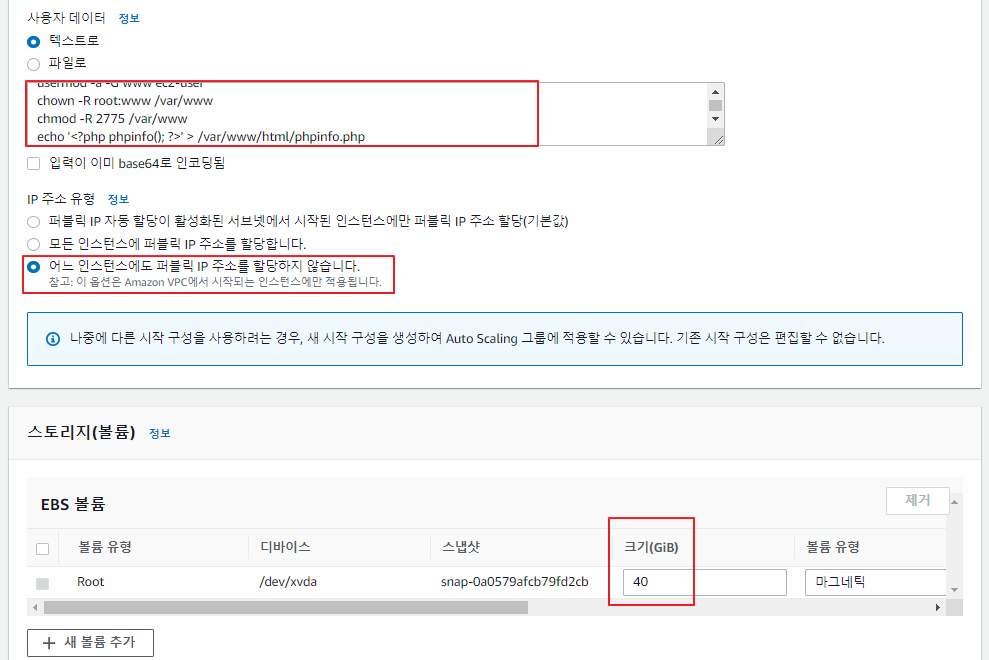
#!/bin/bash
yum update -y
yum install -y httpd24 php70 mysql56-server php70-mysqlnd git
cd /var/www/html
git clone https://github.com/linuxacademy/content-aws-sysops-administrator.git
cd content-aws-sysops-administrator/wp-site/
mv * /var/www/html
groupadd www
usermod -a -G www ec2-user
chown -R root:www /var/www
chmod -R 2775 /var/www
echo '<?php phpinfo(); ?>' > /var/www/html/phpinfo.php
service httpd start
chkconfig httpd on
service mysqld start
chkconfig mysqld on
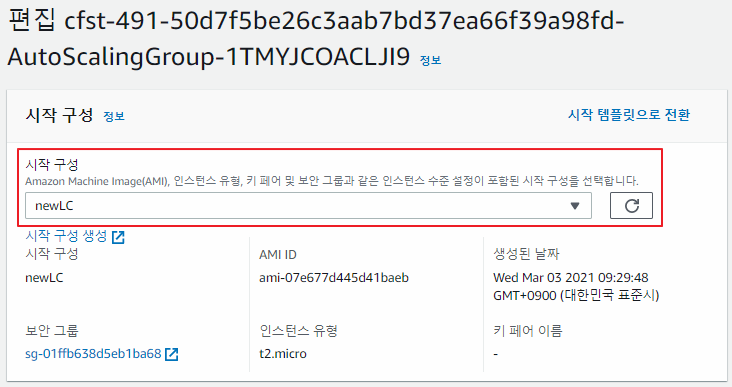
#4 새로운 시작 구성을 생성


#5 Auto Scaling Group에 새롭게 생성한 시작 구성으로 변경
#6 기존에 동작하고 있던 인스턴스를 종료 → Auto Scaling 설정에 따라 (시작 구성에 설정된) 새로운 인스턴스가 생성

'CLOUD > AWS' 카테고리의 다른 글
| 3/5 - A Cloud Guru를 이용한 AWS 6차시 (0) | 2021.03.05 |
|---|---|
| 3/4 - A Cloud Guru를 이용한 AWS 5차시 (0) | 2021.03.04 |
| 3/3 - A Cloud Guru를 이용한 AWS 4차시 (0) | 2021.03.03 |
| 2/26 - A Cloud Guru를 이용한 AWS 2차시 (0) | 2021.02.26 |
| 2/25 - A Cloud Guru를 이용한 AWS 1차시 (0) | 2021.02.26 |