레플리카셋(Replica Set)
정해진 수의 동일한 포드가 항상 실행되도록 관리
노드 장애 등의 이유로 포드를 사용할 수 없다면 다른 노드에서 포드를 다시 생성
디플로이먼트(Deployment)
레플리카셋, 포드의 배포, 업데이트 등을 관리
서비스(service)
포드를 연결하고 외부에 노출
YAML 파일에 containerPort 항목을 정의했다고 해서 해당 포트가 바로 외부에 노출되는 것은 아님
해당 포트로 사용자가 접근하거나, 다른 디플로이먼트의 포드들이 내부적으로 접근하려면 서비스(service) 객체가 필요
서비스의 종류(type)
ClusterIP 타입
-
쿠버네티스 내부에서만 포드들에 접근할 때 사용
-
외부로 포드를 노출하지 않기 때문에 쿠버네티스 클러스터 내부에서만 사용되는 포드에 적합
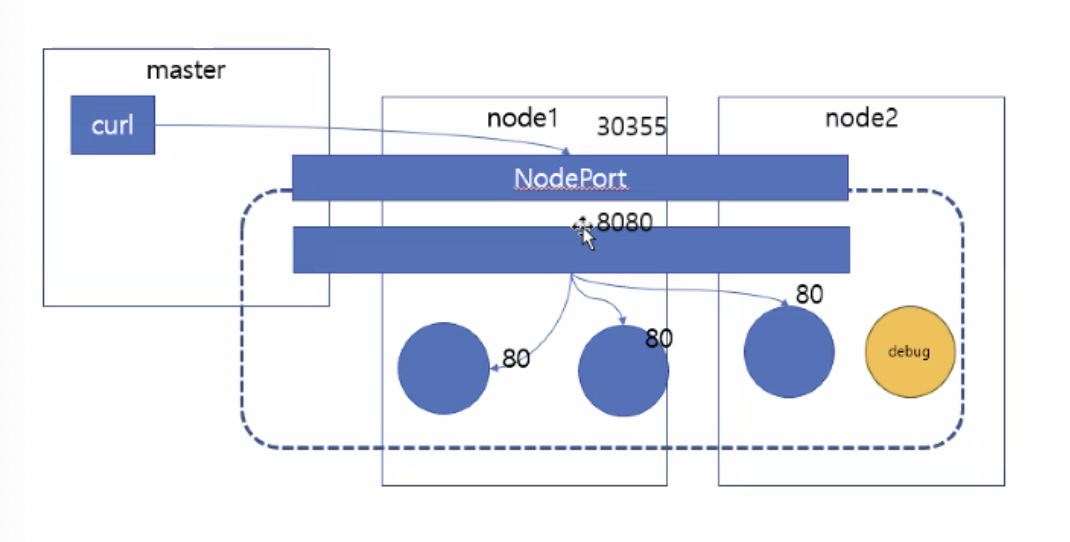
NodePort 타입
-
포드에 접근할 수 있는 포트를 클러스터의 모든 노드에 동일하게 개방
-
외부에서 포드에 접근할 수 있는 서비스 타입
-
접근할 수 있는 포트는 랜덤으로 정해지지만, 특정 포트로 접근하도록 설정할 수 있음
LoadBalancer 타입
-
클라우드 플랫폼에서 제공하는 로드 벨러서를 동적으로 프로비저닝해 포드에 연결
-
NodePort 타입과 마찬가지로 외부에서 포드에 접근할 수 있는 서비스 타입
-
일반적으로 AWS, GCP 과 같은 클라우드 플랫폼 환경에서 사용
NodePort 타입 서비스 - 서비스를 이용해 포드를 외부에 노출하기 위해서 사용
모든 노드의 특정 포트를 개방해 서비스에 접근하는 방식
#1 YAML 파일 생성
[vagrant@master ~]$ vi hostname-svc-nodeport.yaml
|
apiVersion: v1 kind: Service metadata: name: hostname-svc-nodeport spec: ports: - name: web-port port: 8080 targetPort: 80 selector: app: webserver type: NodePort
|
#2 서비스 생성 및 확인
[root@master ~]# kubectl apply -f hostname-svc-nodeport.yaml
service/hostname-svc-nodeport created
[root@master ~]# kubectl get services
NAME TYPE CLUSTER-IP EXTERNAL-IP PORT(S) AGE
hello-service NodePort 10.103.0.239 <none> 8001:31757/TCP 4d16h
hostname-svc-nodeport NodePort 10.100.180.84 <none> 8080:30605/TCP 36s
kubernetes ClusterIP 10.96.0.1 <none> 443/TCP 7d20h
nginx-test NodePort 10.111.201.195 <none> 80:32185/TCP 4d23h
=>외부포트 30605 : 클러스트 외부에서도 접근가능한 포트
[root@master ~]# kubectl get nodes -o wide
NAME STATUS ROLES AGE VERSION INTERNAL-IP EXTERNAL-IP OS-IMAGE KERNEL-VERSION CONTAINER-RUNTIME
master Ready control-plane,master 7d20h v1.20.2 192.168.56.10 <none> CentOS Linux 7 (Core) 3.10.0-1160.15.2.el7.x86_64 docker://20.10.3
node1 Ready <none> 7d20h v1.20.2 192.168.56.11 <none> CentOS Linux 7 (Core) 3.10.0-1160.15.2.el7.x86_64 docker://20.10.3
node2 NotReady <none> 7d20h v1.20.2 192.168.56.12 <none> CentOS Linux 7 (Core) 3.10.0-1160.15.2.el7.x86_64 docker://20.10.3
#3 외부 IP를 통해 30605 포트로 접근
[vagrant@master ~]$ curl 127.0.0.1:30605
<!DOCTYPE html>
<meta charset="utf-8" />
<link rel="stylesheet" type="text/css" href="./css/layout.css" />
<div class="form-layout">
<blockquote>
<p>Hello, hostname-deployment-6cd58767b4-5mtjb</p> </blockquote>
</div>
[vagrant@master ~]$ curl 127.0.0.1:30605
<!DOCTYPE html>
<meta charset="utf-8" />
<link rel="stylesheet" type="text/css" href="./css/layout.css" />
<div class="form-layout">
<blockquote>
<p>Hello, hostname-deployment-6cd58767b4-s9rrs</p> </blockquote>
</div>
[vagrant@node1 ~]$ curl 127.0.0.1:30605
<!DOCTYPE html>
<meta charset="utf-8" />
<link rel="stylesheet" type="text/css" href="./css/layout.css" />
<div class="form-layout">
<blockquote>
<p>Hello, hostname-deployment-6cd58767b4-5mtjb</p> </blockquote>
</div>
#4 내부 IP와 내부 DNS 이름을 이용한 접근
[root@master ~]# kubectl run -it --rm debug --image=alicek106/ubuntu:curl --restart=Never -- bash
If you don't see a command prompt, try pressing enter.
root@debug:/#
root@debug:/# curl 10.100.180.84:8080
<!DOCTYPE html>
<meta charset="utf-8" />
<link rel="stylesheet" type="text/css" href="./css/layout.css" />
<div class="form-layout">
<blockquote>
<p>Hello, hostname-deployment-7dfd748479-jrvbw</p> </blockquote>
</div>
root@debug:/# curl hostname-svc-nodeport:8080
<!DOCTYPE html>
<meta charset="utf-8" />
<link rel="stylesheet" type="text/css" href="./css/layout.css" />
<div class="form-layout">
<blockquote>
<p>Hello, hostname-deployment-7dfd748479-jrvbw</p> </blockquote>
</div>
네임스페이스(namespace)
쿠버네티스 클러스터 안의 가상 클러스터
포드, 레플리카셋, 디플로이먼트, 서비스 등과 같은 쿠버네티스 리소스들이 묶여 있는 하나의 가상 공간 또는 그룹
리소스를 논리적으로 구하기 위한 오브젝트
네임스페이스 생성, 조회
[vagrant@master ~]$ kubectl get namespaces
NAME STATUS AGE
default Active 7d21h
kube-node-lease Active 7d21h
kube-public Active 7d21h
kube-system Active 7d21h
특정 네임스페이스에 생성된 포드를 확인
[vagrant@master ~]$ kubectl get pods ⇐ 네임스페이스를 지정하지 않으면 기본적으로 default 네임스페이스를 사용
NAME READY STATUS RESTARTS AGE
hostname-deployment-6cd58767b4-5mtjb 1/1 Running 1 17h
hostname-deployment-6cd58767b4-8c57s 1/1 Running 1 17h
hostname-deployment-6cd58767b4-s9rrs 1/1 Running 1 17h
[vagrant@master ~]$ kubectl get pods --namespace default
NAME READY STATUS RESTARTS AGE
hostname-deployment-6cd58767b4-5mtjb 1/1 Running 1 17h
hostname-deployment-6cd58767b4-8c57s 1/1 Running 1 17h
hostname-deployment-6cd58767b4-s9rrs 1/1 Running 1 17h
[vagrant@master ~]$ kubectl get pods --namespace kube-system
~~~~~~~~~~~~~~~~~~~~~~~
쿠버네티스 클러스터 구성에 필수적인 컴포넌트와 설정값이 존재하는 네임스페이스
NAME READY STATUS RESTARTS AGE
calico-kube-controllers-7fc57b95d4-ln6sk 1/1 Running 12 7d21h
calico-node-7szvn 1/1 Running 8 7d21h
calico-node-c5jds 1/1 Running 12 7d21h
calico-node-wcnsd 1/1 Running 6 7d21h
coredns-5c98db65d4-8l99b 1/1 Running 12 7d21h
coredns-5c98db65d4-kq45x 1/1 Running 12 7d21h
etcd-master 1/1 Running 17 7d21h
kube-apiserver-master 1/1 Running 18 7d21h
kube-controller-manager-master 1/1 Running 14 7d21h
kube-proxy-jkqhz 1/1 Running 12 7d21h
kube-proxy-q6tg7 1/1 Running 6 7d21h
kube-proxy-tl8kf 1/1 Running 8 7d21h
kube-scheduler-master 1/1 Running 13 7d21h
kubernetes-dashboard-6b8c96cf8c-l9lfn 1/1 Running 6 7d18h
[vagrant@master ~]$ kubectl get services -n kube-system
NAME TYPE CLUSTER-IP EXTERNAL-IP PORT(S) AGE
kube-dns ClusterIP 10.96.0.10 <none> 53/UDP,53/TCP,9153/TCP 7d21h
kubernetes-dashboard ClusterIP 10.97.227.222 <none> 443/TCP 7d18h
네임스페이스 생성, 확인
#1 YAML 작성
[vagrant@master ~]$ vi production-namespace.yaml
|
apiVersion: v1 kind: Namespace metadata: name: production |
#2 네임스페이스 생성 및 확인
[vagrant@master ~]$ kubectl apply -f production-namespace.yaml
namespace/production created
[vagrant@master ~]$ kubectl create namespace mynamespace
namespace/mynamespace created
[vagrant@master ~]$ kubectl get namespaces
NAME STATUS AGE
default Active 7d22h
kube-node-lease Active 7d22h
kube-public Active 7d22h
kube-system Active 7d22h
mynamespace Active 9s
production Active 39s
#3 특정 네임스페이스에 리소스를 생성하는 방법
[vagrant@master ~]$ vi hostname-deploy-svc-ns.yaml
|
apiVersion: apps/v1 kind: Deployment metadata: name: hostname-deployment-ns namespace: production spec: replicas: 3 selector: matchLabels: app: webserver template: metadata: name: my-webserver labels: app: webserver spec: containers: - name: my-webserver image: alicek106/rr-test:echo-hostname ports: - containerPort: 80 --- apiVersion: v1 kind: Service metadata: name: hostname-svc-clusterip-ns namespace: production spec: ports: - name: web-port port: 8080 targetPort: 80 selector: app: webserver type: ClusterIP |
[vagrant@master ~]$ kubectl apply -f hostname-deploy-svc-ns.yaml
deployment.apps/hostname-deployment-ns created
service/hostname-svc-clusterip-ns created
[vagrant@master ~]$ kubectl get pods,services --namespace production
NAME READY STATUS RESTARTS AGE
pod/hostname-deployment-ns-6cd58767b4-94l9p 1/1 Running 0 48s
pod/hostname-deployment-ns-6cd58767b4-g5zmr 1/1 Running 0 48s
pod/hostname-deployment-ns-6cd58767b4-m7t9l 1/1 Running 0 48s
NAME TYPE CLUSTER-IP EXTERNAL-IP PORT(S) AGE
service/hostname-svc-clusterip-ns ClusterIP 10.109.85.128 <none> 8080/TCP 48s
#4 모든 네임스페이스의 리소스를 확인
[vagrant@master ~]$ kubectl get pods --all-namespaces
NAMESPACE NAME READY STATUS RESTARTS AGE
default hostname-deployment-6cd58767b4-5mtjb 1/1 Running 1 18h
default hostname-deployment-6cd58767b4-8c57s 1/1 Running 1 18h
default hostname-deployment-6cd58767b4-s9rrs 1/1 Running 1 18h
kube-system calico-kube-controllers-7fc57b95d4-ln6sk 1/1 Running 12 7d22h
kube-system calico-node-7szvn 1/1 Running 8 7d22h
kube-system calico-node-c5jds 1/1 Running 12 7d22h
kube-system calico-node-wcnsd 1/1 Running 6 7d22h
kube-system coredns-5c98db65d4-8l99b 1/1 Running 12 7d22h
kube-system coredns-5c98db65d4-kq45x 1/1 Running 12 7d22h
kube-system etcd-master 1/1 Running 17 7d22h
kube-system kube-apiserver-master 1/1 Running 18 7d22h
kube-system kube-controller-manager-master 1/1 Running 14 7d22h
kube-system kube-proxy-jkqhz 1/1 Running 12 7d22h
kube-system kube-proxy-q6tg7 1/1 Running 6 7d22h
kube-system kube-proxy-tl8kf 1/1 Running 8 7d22h
kube-system kube-scheduler-master 1/1 Running 13 7d22h
kube-system kubernetes-dashboard-6b8c96cf8c-l9lfn 1/1 Running 6 7d19h
production hostname-deployment-ns-6cd58767b4-94l9p 1/1 Running 0 115s
production hostname-deployment-ns-6cd58767b4-g5zmr 1/1 Running 0 115s
production hostname-deployment-ns-6cd58767b4-m7t9l 1/1 Running 0 115s
#5 동일 네임스페이스 내의 서비스에 접근
[vagrant@master ~]$ kubectl get services --namespace production
NAME TYPE CLUSTER-IP EXTERNAL-IP PORT(S) AGE
hostname-svc-clusterip-ns ClusterIP 10.109.85.128 <none> 8080/TCP 4m3s
[vagrant@master ~]$ kubectl run -it --rm debug --image=alicek106/ubuntu:curl --restart=Never --namespace=production -- bash
If you don't see a command prompt, try pressing enter.
root@debug:/#
root@debug:/# curl 10.109.85.128:8080
<!DOCTYPE html>
<meta charset="utf-8" />
<link rel="stylesheet" type="text/css" href="./css/layout.css" />
<div class="form-layout">
<blockquote>
<p>Hello, hostname-deployment-ns-6cd58767b4-m7t9l</p> </blockquote>
</div>
root@debug:/# curl hostname-svc-clusterip-ns:8080
<!DOCTYPE html>
<meta charset="utf-8" />
<link rel="stylesheet" type="text/css" href="./css/layout.css" />
<div class="form-layout">
<blockquote>
<p>Hello, hostname-deployment-ns-6cd58767b4-g5zmr</p> </blockquote>
</div>
#6 다른 네임스페이스 내의 서비스에 접근
[vagrant@master ~]$ kubectl run -it --rm debug --image=alicek106/ubuntu:curl --restart=Never -- bash ⇐ 네임스페이스를 지정하지 않고(=default 네임스페이스) 포드를 생성
If you don't see a command prompt, try pressing enter.
root@debug:/# curl hostname-svc-clusterip-ns:8080
curl: (6) Could not resolve host: hostname-svc-clusterip-ns
root@debug:/# curl 10.109.85.128:8080
<!DOCTYPE html>
<meta charset="utf-8" />
<link rel="stylesheet" type="text/css" href="./css/layout.css" />
<div class="form-layout">
<blockquote>
<p>Hello, hostname-deployment-ns-6cd58767b4-m7t9l</p> </blockquote>
</div>
다른 네임스페이스에 존재하는 서비스로 접근하기 위해서는 [서비스이름].[네임스페이스이름].svc 형태로 사용
root@debug:/# curl hostname-svc-clusterip-ns.production.svc:8080
<!DOCTYPE html>
<meta charset="utf-8" />
<link rel="stylesheet" type="text/css" href="./css/layout.css" />
<div class="form-layout">
<blockquote>
<p>Hello, hostname-deployment-ns-6cd58767b4-g5zmr</p> </blockquote>
</div>
네임스페이스 삭제
[vagrant@master ~]$ kubectl get namespaces
NAME STATUS AGE
default Active 7d22h
kube-node-lease Active 7d22h
kube-public Active 7d22h
kube-system Active 7d22h
mynamespace Active 21m
production Active 22m
[vagrant@master ~]$ kubectl delete namespace mynamespace
namespace "mynamespace" deleted
[vagrant@master ~]$ kubectl delete -f production-namespace.yaml
namespace "production" deleted
[vagrant@master ~]$ kubectl get namespaces
NAME STATUS AGE
default Active 7d22h
kube-node-lease Active 7d22h
kube-public Active 7d22h
kube-system Active 7d22h
네임스페이스에 속하는 오브젝트 종류
[vagrant@master ~]$ kubectl api-resources --namespaced=true
네임스페이스에 속하지 않는 오브젝트 종류 → 클러스터 전반에 사용되는 경우가 많음
[vagrant@master ~]$ kubectl api-resources --namespaced=false
------교재 195p ~ 214p-------
컨피그맵(configmap), 시크릿(secret) - 포드에 설정값을 전달
컨피그맵은 설정값을, 시크릿은 노출되면 안 되는 비밀값을 저장
네임스페이스 별로 존재
컨피그맵 생성
YAML 파일을 이용해서 생성
kubectl create configmap 명령어로 생성
[root@master ~]# kubectl create configmap log-level-configmap --from-literal LOG_LEVEL=DEBUG
configmap/log-level-configmap created
[vagrant@master ~]$ kubectl create configmap start-k8s --from-literal k8s=kubernetes --from-literal container=docker
configmap/start-k8s created ~~~~~~~~~~~~~~
키=값(key=value) 형식의 정보를 저장
컨피그맵 확인
[root@master ~]# kubectl get configmap
NAME DATA AGE
kube-root-ca.crt 1 7d22h
log-level-configmap 1 110s
start-k8s 2 50s
[root@master ~]# kubectl describe configmap log-level-configmap
Name: log-level-configmap
Namespace: default
Labels: <none>
Annotations: <none>
Data
====
LOG_LEVEL:
----
DEBUG
Events: <none>
[root@master ~]# kubectl get configmap log-level-configmap -o yaml
apiVersion: v1
data:
LOG_LEVEL: DEBUG
kind: ConfigMap
metadata:
creationTimestamp: "2021-02-24T03:24:10Z"
managedFields:
- apiVersion: v1
fieldsType: FieldsV1
fieldsV1:
f:data:
.: {}
f:LOG_LEVEL: {}
manager: kubectl-create
operation: Update
time: "2021-02-24T03:24:10Z"
name: log-level-configmap
namespace: default
resourceVersion: "151046"
uid: 9e963d85-6985-4cbd-a725-79e116c6444f
포드에서 컨피그맵을 사용하는 방법1. 컨피그맵의 값을 컨테이너의 환경변수로 사용
envFrom ⇒ 컨피그맵에 정의된 모든 키=값쌍을 가져와서 환경변수로 설정
#1 YAML 파일을 작성
[vagrant@master ~]$ vi all-env-from-configmap.yaml
|
apiVersion: v1 kind: Pod metadata: name: container-env-example spec: containers: - name: my-container image: busybox args: ['tail', '-f', '/dev/null'] envFrom: ⇐ 컨피그맵에 정의되어 있는 모든 키=값 쌍을 가져와서 환경변수로 설정 - configMapRef: name: log-level-configmap ⇐ 컨피그맵 이름 - configMapRef: name: start-k8s |
#2 포드를 실행
[root@master ~]# kubectl apply -f all-env-from-configmap.yaml
pod/container-env-example created
#3 컨테이너 환경변수를 확인
[vagrant@master ~]$ kubectl exec container-env-example -- env
PATH=/usr/local/sbin:/usr/local/bin:/usr/sbin:/usr/bin:/sbin:/bin
HOSTNAME=container-env-example
LOG_LEVEL=DEBUG
container=docker
k8s=kubernetes
NGINX_TEST_PORT_80_TCP_PORT=80
valueFrom, configMapKeyRef ⇒ 컨피그맵에 존재하는 키=값 쌍중에서 원하는 데이터만 선택해서 환경변수로 설정
#1 YAML 파일을 작성
[vagrant@master ~]$ vi selective-env-from-configmap.yaml
|
apiVersion: v1 kind: Pod metadata: name: container-env-example spec: containers: - name: my-container image: busybox args: ['tail', '-f', '/dev/null'] env: - name: ENV_KEYNAME_1 ⇐ 새롭게 정의될 환경변수 이름 valueFrom: configMapKeyRef: key: LOG_LEVEL ⇐ 해당 컨피그맵에 정의된 변수의 이름(키) name: log-level-configmap ⇐ 참조할 컨피그맵 이름 - name: ENV_KEYNAME_2 valueFrom: configMapKeyRef: key: k8s name: start-k8s |
#2 포드 생성 및 환경변수 확인
[vagrant@master ~]$ kubectl delete -f all-env-from-configmap.yaml
pod "container-env-example" deleted
[vagrant@master ~]$ kubectl apply -f selective-env-from-configmap.yaml
pod/container-env-example created
[vagrant@master ~]$ kubectl exec container-env-example -- env
PATH=/usr/local/sbin:/usr/local/bin:/usr/sbin:/usr/bin:/sbin:/bin
HOSTNAME=container-env-example
ENV_KEYNAME_1=DEBUG
ENV_KEYNAME_2=kubernetes
KUBERNETES_PORT_443_TCP_PORT=443
:
포드에서 컨피그맵을 사용하는 방법2. 컨피그맵의 값을 포드 내부의 파일로 마운트해 사용
volumeMounts ⇒ 모든 키-값 쌍 데이터를 포드에 마운트
#1 YAML 파일을 생성
[vagrant@master ~]$ vi volume-mount-configmap.yaml
|
apiVersion: v1 kind: Pod metadata: name: configmap-volume-pod spec: containers: - name: my-container image: busybox args: ["tail", "-f", "/dev/null"] volumeMounts: - name: configmap-volume mountPath: /etc/config volumes: - name: configmap-volume configMap: name: start-k8s |
#2 포드를 생성
[vagrant@master ~]$ kubectl apply -f volume-mount-configmap.yaml
pod/configmap-volume-pod created
#3 포드 내부의 /etc/config 디렉터리를 조회
[vagrant@master ~]$ kubectl exec configmap-volume-pod -- ls -al /etc/config
total 0
drwxrwxrwx 3 root root 87 Feb 24 05:46 .
drwxr-xr-x 1 root root 20 Feb 24 05:46 ..
drwxr-xr-x 2 root root 34 Feb 24 05:46 ..2021_02_24_05_46_50.402227761
lrwxrwxrwx 1 root root 31 Feb 24 05:46 ..data -> ..2021_02_24_05_46_50.402227761
lrwxrwxrwx 1 root root 16 Feb 24 05:46 container -> ..data/container ⇐ 컨피그맵의 키이름의 파일이 생성
lrwxrwxrwx 1 root root 10 Feb 24 05:46 k8s -> ..data/k8s
[vagrant@master ~]$ kubectl exec configmap-volume-pod -- cat /etc/config/container
docker ⇐ 파일 내용이 컨피그맵의 값과 동일
[vagrant@master ~]$ kubectl exec configmap-volume-pod -- cat /etc/config/k8s
kubernetes
원하는 키-값 쌍의 데이터만 선택해서 포드에 마운트
#1 YAML 생성
[vagrant@master ~]$ vi selective-volume-configmap.yaml
|
apiVersion: v1 kind: Pod metadata: name: configmap-volume-pod spec: containers: - name: my-container image: busybox args: ["tail", "-f", "/dev/null"] volumeMounts: - name: configmap-volume mountPath: /etc/config volumes: - name: configmap-volume configMap: name: start-k8s ⇐ 컨피그맵의 이름 items: - key: k8s ⇐ 컨피그맵에서 가져올 값의 키 path: k8s_fullname ⇐ 컨피그맵의 키에 해당하는 값을 저장할 파일 이름 |
#2 포드 생성 후 마운트 디렉터리 및 파일을 확인
[vagrant@master ~]$ kubectl delete -f volume-mount-configmap.yaml
pod "configmap-volume-pod" deleted
[vagrant@master ~]$ kubectl apply -f selective-volume-configmap.yaml
pod/configmap-volume-pod created
[vagrant@master ~]$ kubectl exec configmap-volume-pod -- ls -al /etc/config
total 0
drwxrwxrwx 3 root root 79 Feb 24 05:59 .
drwxr-xr-x 1 root root 20 Feb 24 05:59 ..
drwxr-xr-x 2 root root 26 Feb 24 05:59 ..2021_02_24_05_59_16.332588447
lrwxrwxrwx 1 root root 31 Feb 24 05:59 ..data -> ..2021_02_24_05_59_16.332588447
lrwxrwxrwx 1 root root 19 Feb 24 05:59 k8s_fullname -> ..data/k8s_fullname
[vagrant@master ~]$ kubectl exec configmap-volume-pod -- cat /etc/config/k8s_fullname
kubernetes
파일로부터 컨피그맵을 생성
nginx.conf (nginx 서버의 설정 파일) 또는 mysql.conf (MySQL 설정 파일) 등의 내용 전체를 컨피그맵에 저장할 때 사용
#1 설정 파일을 생성
[vagrant@master ~]$ echo Hello, World! >> index.html
#2 index.html 파일의 내용을 컨피그맵으로 설정
[vagrant@master ~]$ kubectl create configmap index-file --from-file index.html
configmap/index-file created
#3 컨피그맵의 내용을 확인
[vagrant@master ~]$ kubectl describe configmap index-file
Name: index-file
Namespace: default
Labels: <none>
Annotations: <none>
Data
====
index.html: ⇐ 파일 명이 컨피그맵의 키(key)로 사용
----
Hello, World! ⇐ 파일 내용이 컨피그맵의 값(value)로 사용
Events: <none>
#4 키 이름을 직접 지정해서 컨피그맵을 생성
[vagrant@master ~]$ kubectl create configmap index-file-customkey --from-file myindex=index.html
configmap/index-file-customkey created
[vagrant@master ~]$ kubectl describe configmap index-file-customkey
Name: index-file-customkey
Namespace: default
Labels: <none>
Annotations: <none>
Data
====
myindex: ⇐ 컨피그맵 생성시 사용한 키
----
Hello, World!
Events: <none>
여러 개의 키-값 형식의 내용으로 구성된 설정 파일을 한꺼번에 컨피그맵으로 가져오기
#1 여러 개의 키-값 형식의 내용으로 구성된 설정 파일을 생성
[vagrant@master ~]$ vi multiple-keyvalue.env
|
mykey1=myvalue1 |
[vagrant@master ~]$ kubectl create configmap from-env-1 --from-file multiple-keyvalue.env
configmap/from-env-1 created
[vagrant@master ~]$ kubectl get configmap from-env-1 -o wide
NAME DATA AGE
from-env-1 1 20s
[vagrant@master ~]$ kubectl get configmap from-env-1 -o yaml
apiVersion: v1
data:
multiple-keyvalue.env: |+ ⇐ 하나의 키
mykey1=myvalue1 ⇐ 하나의 값
mykey2=myvalue2
mykey3=myvalue3
mykey4=myvalue4
kind: ConfigMap
metadata:
creationTimestamp: "2021-02-24T06:15:00Z"
name: from-env-1
namespace: default
resourceVersion: "196301"
selfLink: /api/v1/namespaces/default/configmaps/from-env-1
uid: 6dcc3748-17de-4af2-af06-e0099c08f90b
[vagrant@master ~]$ kubectl describe configmap from-env-1
Name: from-env-1
Namespace: default
Labels: <none>
Annotations: <none>
Data
====
multiple-keyvalue.env: ⇐ 하나의 키/값으로만 구성
----
mykey1=myvalue1
mykey2=myvalue2
mykey3=myvalue3
mykey4=myvalue4
Events: <none>
[vagrant@master ~]$ kubectl create configmap from-env-2 --from-env-file multiple-keyvalue.env
configmap/from-env-2 created
[vagrant@master ~]$ kubectl get configmap from-env-2
NAME DATA AGE
from-env-2 4 2m42s
[vagrant@master ~]$ kubectl get configmap from-env-2 -o yaml
apiVersion: v1
data:
mykey1: myvalue1 ⇐ 네개의 키/값으로 구성
mykey2: myvalue2
mykey3: myvalue3
mykey4: myvalue4
kind: ConfigMap
metadata:
creationTimestamp: "2021-02-24T06:17:40Z"
name: from-env-2
namespace: default
resourceVersion: "196534"
selfLink: /api/v1/namespaces/default/configmaps/from-env-2
uid: 72086a95-ca18-4a78-96b1-51ff431c4e27
[vagrant@master ~]$ kubectl describe configmap from-env-2
Name: from-env-2
Namespace: default
Labels: <none>
Annotations: <none>
Data
====
mykey2:
----
myvalue2
mykey3:
----
myvalue3
mykey4:
----
myvalue4
mykey1:
----
myvalue1
Events: <none>
--run-dry -o yaml 옵션으로 컨피그맵을 생성하지 않고 YAML 파일로 생성
[vagrant@master ~]$ kubectl create configmap my-configmap --from-literal mykey=myvalue --dry-run -o yaml
apiVersion: v1
data:
mykey: myvalue
kind: ConfigMap
metadata:
creationTimestamp: null
name: my-configmap
[vagrant@master ~]$ kubectl get configmap ⇐ my-configmap이 실제는 생성되지 않았음
NAME DATA AGE
from-env-1 1 40m
from-env-2 4 37m
index-file 1 48m
index-file-customkey 1 45m
log-level-configmap 1 145m
start-k8s 2 144m
[vagrant@master ~]$ kubectl create configmap my-configmap --from-literal mykey=myvalue --dry-run -o yaml > my-configmap.yaml ⇐ YAML 형식의 출력을 파일로 저장 (리다이렉트)
[vagrant@master ~]$ cat my-configmap.yaml
apiVersion: v1
data:
mykey: myvalue
kind: ConfigMap
metadata:
creationTimestamp: null
name: my-configmap
YAML 파일을 이용해서 컨피그맵을 생성
[vagrant@master ~]$ kubectl apply -f my-configmap.yaml
configmap/my-configmap created
[vagrant@master ~]$ kubectl get configmap
NAME DATA AGE
from-env-1 1 44m
from-env-2 4 41m
index-file 1 52m
index-file-customkey 1 49m
log-level-configmap 1 149m
my-configmap 1 11s
start-k8s 2 148m
[vagrant@master ~]$ kubectl describe configmap my-configmap
Name: my-configmap
Namespace: default
Labels: <none>
Annotations: kubectl.kubernetes.io/last-applied-configuration:
{"apiVersion":"v1","data":{"mykey":"myvalue"},"kind":"ConfigMap","metadata":{"annotations":{},"creationTimestamp":null,"name":"my-configma...
Data
====
mykey:
----
myvalue
Events: <none>
시크릿(secret)
SSH 키, 비밀번호 등과 같이 민감한 정보를 저장하는 용도로 사용
타입
-
Opaque 타입
-
기본 타입
-
사용자가 정의하는 데이터를 저장하는 일반적인 목적의 시크릿
-
비공개 레지스트리(private registry)에 접근할 때 사용하는 인증 설정 시크릿
시크릿 생성 방법
--from-literal
[vagrant@master ~]$ kubectl create secret generic my-password --from-literal password=p@ssw0rd
secret/my-password created ~~~~~~~
Opaque 타입의 시크릿 생성을 명시
[vagrant@master ~]$ kubectl get secrets
NAME TYPE DATA AGE
default-token-mmbs5 kubernetes.io/service-account-token 3 8d
my-password Opaque 1 12s
--from-file
[vagrant@master ~]$ echo mypassword > pw1 && echo yourpassword > pw2
[vagrant@master ~]$ ls pw*
pw1 pw2
[vagrant@master ~]$ kubectl create secret generic our-password --from-file pw1 --from-file pw2
secret/our-password created
[vagrant@master ~]$ kubectl get secrets
NAME TYPE DATA AGE
default-token-mmbs5 kubernetes.io/service-account-token 3 8d
my-password Opaque 1 9m35s
our-password Opaque 2 8s
시크릿 내용 확인
[vagrant@master ~]$ kubectl describe secret my-password
Name: my-password
Namespace: default
Labels: <none>
Annotations: <none>
Type: Opaque
Data
====
password: 8 bytes
[vagrant@master ~]$ kubectl get secrets my-password -o yaml
apiVersion: v1
data:
password: cEBzc3cwcmQ= ⇐ BASE64로 인코딩
kind: Secret
metadata:
creationTimestamp: "2021-02-24T07:05:44Z"
name: my-password
namespace: default
resourceVersion: "200708"
selfLink: /api/v1/namespaces/default/secrets/my-password
uid: 81d33e98-db84-4f5d-9998-55077e2a1507
type: Opaque
**BASE64 : base64는 임의의 바이트 스트림을 화면에 표시할 수 있는 ASCII 문자들로 바꾸는 인코딩 방식을 말한다. 이 인코딩은 인터넷 전자 메일을 전송할 때 MIME의 content transfer encoding의 하나로 정의된다.
BASE64 인코딩 및 디코딩
[vagrant@master ~]$ echo p@ssw0rd | base64 ⇐ 인코딩
cEBzc3cwcmQK
[vagrant@master ~]$ echo cEBzc3cwcmQ= | base64 -d ⇐ 디코딩
p@ssw0rd
시크릿에 저장된 값을 포드의 환경변수로 참조
시크릿에 저장된 모든 값을 가져오기
[vagrant@master ~]$ vi env-from-secret.yaml
|
apiVersion: v1 kind: Pod metadata: name: secret-env-example spec: containers: - name: my-container image: busybox args: ["tail", "-f", "/dev/null"] envFrom: - secretRef: ⇐ my-password 시크릿에 저장된 모든 키-값을 환경변수로 설정 name: my-password
|
시크릿에 저장된 일부 값을 가져오기
[vagrant@master ~]$ vi selective-env-from-secret.yaml
|
apiVersion: v1 kind: Pod metadata: name: selective-secret-env-example spec: containers: - name: my-container image: busybox args: ["tail", "-f", "/dev/null"] env: - name: YOUR_PASSWORD valueFrom: secretKeyRef: name: out-password key: pw2
|
시크릿에 저장된 값 전체를 포드에 볼륨 마운트
[vagrant@master ~]$ vi volume-mount-secret.yaml
|
apiVersion: v1 kind: Pod metadata: name: secret-volume-example spec: containers: - name: my-container image: busybox args: ["tail", "-f", "/dev/null"] volumeMounts: - name: secret-volume mountPath: /etc/secret volumes: - name: secret-volume secret: secretName: our-password |
시크릿에 저장된 값 일부를 포드에 볼륨 마운트
[vagrant@master ~]$ vi selective-volume-mount-secret.yaml
|
apiVersion: v1 kind: Pod metadata: name: selective-secret-volume-example spec: containers: - name: my-container image: busybox args: ["tail", "-f", "/dev/null"] volumeMounts: - name: secret-volume mountPath: /etc/secret volumes: - name: secret-volume secret: secretName: our-password items: - key: pw1 path: password1 |
포드 생성 후 시크릿 확인
[vagrant@master ~]$ kubectl apply -f selective-volume-mount-secret.yaml
pod/selective-secret-volume-example created
[vagrant@master ~]$ kubectl exec selective-secret-volume-example -- ls -al /etc/secret
total 0
drwxrwxrwt 3 root root 100 Feb 24 08:05 .
drwxr-xr-x 1 root root 20 Feb 24 08:05 ..
drwxr-xr-x 2 root root 60 Feb 24 08:05 ..2021_02_24_08_05_38.422941904
lrwxrwxrwx 1 root root 31 Feb 24 08:05 ..data -> ..2021_02_24_08_05_38.422941904
lrwxrwxrwx 1 root root 16 Feb 24 08:05 password1 -> ..data/password1
[vagrant@master ~]$ kubectl exec selective-secret-volume-example -- cat /etc/secret/password1
mypassword ⇐ 시크릿을 포드의 환경변수나 볼륨파일로 가져오면 BASE64로 디코딩된 값을 사용
'CLOUD > Docker' 카테고리의 다른 글
| 2/25 - 도커/쿠버네티스 활용 컨테이너 개발 12차시 (0) | 2021.02.25 |
|---|---|
| 2/23 - 도커/쿠버네티스 활용 컨테이너 개발 10차시 (0) | 2021.02.23 |
| 2/22 - 도커/쿠버네티스 활용 컨테이너 개발 9차시 (0) | 2021.02.22 |
| 2/19 - 도커/쿠버네티스 활용 컨테이너 개발 8차시 (0) | 2021.02.19 |
| 2/16 - 도커/쿠버네티스 활용 컨테이너 개발 7차시 (0) | 2021.02.16 |